background image

This Manual is Designed to Make it as Easy as Possible for You

to Assemble, Install, Operate, and Maintain Your Ceiling Fan

Unpacking Instructions

For your convenience, check-off each step.  As each step is completed, place a check mark.  This will ensure that all 

ace should you be interrupted. 

Wiring  outlet  box  and  box  connectors  must  be  of  type 

required by local code.  The minimum wire would be a 3-

conductor (2-wire with ground) of the following size:

NOTE:    Place  the  parts  from  the  loose  parts  bags  in  a  small 

container to keep them from being lost.  If any parts are missing, 

contact your local retailer.

Tools Needed for Assembly

Materials

Wire Size A.W.G.

Installed Wire Length

14

12

Up to 50 ft.

50 - 100 ft.

NOTE:  If you are uncertain of part description, refer to

exploded view illustration. (Figure 1, page 13)

3

1.

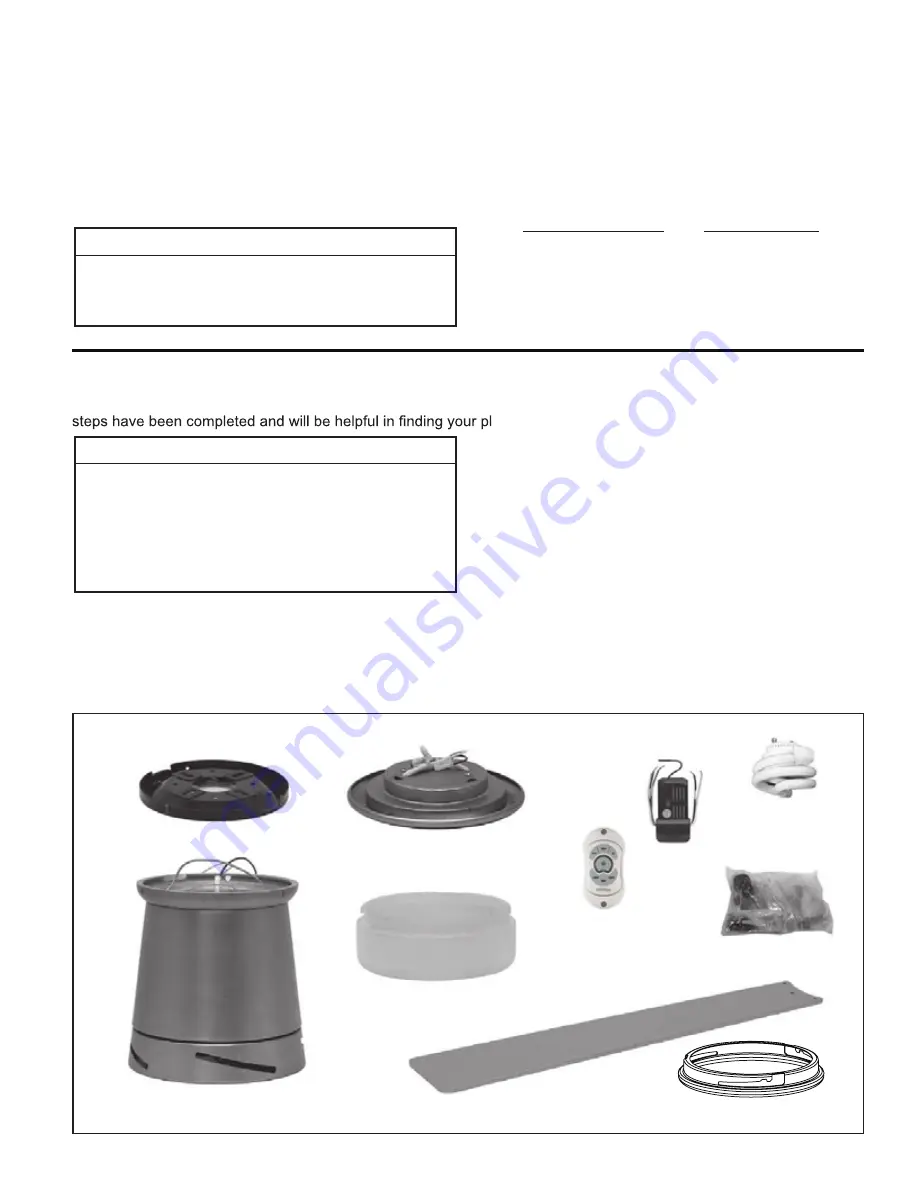
Check  to  see  that  you  have  received  the  following 

parts:

• Fan Motor

 Assembly

• Ceiling Bracket

 Assembly

• Support Light Kit

 Assembly

• 18W CF

L

 Bulb

• Lower Glass

• Blade Set

 TR20WH Hand-held Remote

• Receiver Unit

Support Light Kit

Assembly

Lower Glass

Hardware Bags

Fan Motor Assembly

Ceiling Bracket Assembly

 One Phillips head screwdriver

 One stepladder

• One ¼˝ blade screwdriver

 One wire stripper

Three wire connectors

  (supplied)

TR20WH

Hand-held Remote

• Hardware bags:

– 3/16-24 x 11mm screws

       with pan head (13)

    – Steel washer

    – Wire nuts (4)

    – Phillips screwdriver

, 4˝

    – 3/16-24 x 13mm screws


with flat head (4)

WARNING

Do  not  install  or  use  fan  if  any  part  is  damaged  or 

missing.    This  product  is  designed  to  use  only  those 

parts supplied with this product and/or any accessories 

designated  specifically  for  use  with  this  product  by 

Fanimation.    Substitution  of  parts  or  accessories  not 

designated for use with this product by Fanimation could 

result in personal injury or property damage.  Contact 

your retail store for missing or damaged parts.

WARNING

Before assembling your ceiling fan, refer to section on 

proper method of wiring your fan (page 4).  If you feel you 

do  not  have  enough  wiring  knowledge  or  experience, 

have your fan installed by a licensed electrician.

Blade Set

Receiver

Unit

CFL

Bulb

• Lower Steel Cap Assembly

 Lower Steel Cap Assembly

Summary of Contents for The Inlet FPS7880 Series

Page 1: ...OWNER S MANUAL READ AND SAVE THESE INSTRUCTIONS Model No FPS7880 The Inlet Snugger Ceiling Fan Net Weight 8 7 kg 19 1 lbs...

Page 2: ...antability and fitness for a particular purpose to the extent permitted by law Some states do not allow limitations on implied warranties Fanimation will not be liable for incidental consequential or...

Page 3: ...de Set TR20WH Hand held Remote Receiver Unit Support Light Kit Assembly Lower Glass Hardware Bags Fan Motor Assembly Ceiling Bracket Assembly One Phillips head screwdriver One stepladder One blade scr...

Page 4: ...er Season Reverse the motor and operate the ceiling fan at low speed in the clockwise direction This produces a gentle updraft which forces warm air near the ceiling down into the occupied space Remem...

Page 5: ...anding a load of at least 50 lbs Failure to verify that the screws are properly installed could result in the fan falling Figure 2 Junction Box Screws 2 Figure 3 Figure 2 Figure 1 WARNING To avoid pos...

Page 6: ...ity systems simply change the combination code in your transmitter and receiver To set the code perform these steps Transmitter remove battery cover Press firmly below arrow and slide battery cover of...

Page 7: ...supplied don t over tighten Figure 3 NOTE This step is applicable after the necessary wiring is completed see page 6 Figure 1 Wide Notch Narrow Notch Fan Motor Assembly Narrow Tab White Dot Red Dot W...

Page 8: ...ure 2 1 Carefully slide the blade through the slot as shown Figure 1 2 Securely fasten blades with pan head screws Do not over tighten Figure 2 3 Make sure the screws securing the blades to the motor...

Page 9: ...gures 2 4 Securely attach Lower Glass by twisting clockwise onto the Support Light Kit Assembly Don t overtighten or force it Figure 4A 5 You have now completed the assembly of your ceiling fan Restor...

Page 10: ...Do not use water when cleaning your ceiling fan It could damage the motor or the finish and create the possibility of electrical shock Operating Instructions TR20WH Hand held Remote HI Push Button hig...

Page 11: ...2 Loose screws in motor housing 3 Screws securing fan blade holders to motor hub are loose 4 Wire connectors inside housing rattling 5 Motor noise caused by solid state variable speed control 6 Screw...

Page 12: ...ld Remote TR20WH 8 Lower Steel Cap P788021 9 Hardware Bags Containing HDWFPS7880 Wire Connectors 4 Blade Assembly Mounting Hardware Bag Containing 3 16 24 x 11mm Screws with Pan Head 13 Steel Washer P...

Page 13: ...13 NOTE The Inlet FPS7880 Exploded View 1 2 3 Figure 1 4 5 7 9 8 6...

Page 14: ...10983 Bennett Parkway Zionsville IN 46077 Toll Free 888 567 2055 FAX 866 482 5215 Outside U S call 317 733 4113 Visit Our Website www fanimation com Copyright 2011 Fa nimation 2011 01...

Page 15: ...MANUAL DEL PROPIETARIO LEA Y GUARDE ESTAS INSTRUCCIONES Modelo N FPS7880 The Inlet C modo ventilador de techo Peso neto 8 7 kg 19 1 lb...

Page 16: ...descargas el ctricas y lesiones personales graves 1 Lea el manual del propietario y la informaci n de seguridad antes de instalar su nuevo ventilador Observe los diagramas de ensamblaje adjuntos 2 An...

Page 17: ...signados por Fanimation para usar con este producto podr a ocasionar lesiones personales o da os en el ventilador P ngase en contacto con su tienda si faltan piezas o hay piezas da adas Juego de aspas...

Page 18: ...ionar el ventilador de techo a velocidad baja y en el sentido de las agujas del reloj Esto produce una suave corriente ascendente que obliga al aire c lido que se acumula cerca del techo a bajar al es...

Page 19: ...llos no est n correctamente colocados el ventilador podr a caerse Figura 2 Figura 3 Figura 1 ADVERTENCIA Para evitar posibles descargas el ctricas aseg rese de que la electricidad est desconectada en...

Page 20: ...ansmisoryreceptor Para configurar el c digo siga los siguientes pasos Transmisor retire la cubierta de la bater a Presione firmemente la flecha que se encuentra debajo y deslice para retirar la cubier...

Page 21: ...Asegure cuidadosamente la unidad de la caja en las ranuras de montaje en el soporte del techo con un cuarto giro hacia arriba en el sentido de las agujas del reloj Figura 2 3 Asegure la unidad de la...

Page 22: ...n cuidado las aspas a trav s de la ranura como se muestra Figura 1 2 Asegure bien las aspas con tornillos de cabeza No ajuste demasiado Figura 2 3 Aseg rese de que los tornillos que fijan las aspas al...

Page 23: ...or girando en el sentido de las agujas del reloj en la unidad de soporte del kit de iluminaci n No ajuste demasiado ni lo fuerce Figura 4A 5 De esta manera complet el ensamblaje de su ventilador de te...

Page 24: ...el ventilador de techo Podr a da ar el motor o la terminaci n y ocasionar posibles descargas el ctricas Instrucciones de funcionamiento Control remoto de mano TR20WH Bot n HI alto velocidad del ventil...

Page 25: ...los que aseguran los soportes de las aspas al buje del motor est n flojos 4 Los conectores de cables dentro de la caja hacen ruido 5 Ruido del motor provocado por el control de velocidad de estado s l...

Page 26: ...WFPS7880 Conectores de cables 4 Bolsa de accesorios para el montaje de las unidades de aspas que contiene Tornillos de cabeza de 3 16 24 x 11 mm 13 Arandela de acero Destornillador Phillips de 4 Bolsa...

Page 27: ...1 2 3 4 5 7 9 6 27 NOTA The Inlet FPS7880 Despiece Figura 1 8...

Page 28: ...nett Parkway Zionsville IN 46077 Llame sin cargo al 888 567 2055 FAX 866 482 5215 Desde fuera de los EE UU llame al 317 733 4113 Visite nuestro sitio Web en www fanimation com Copyright 2011 Fanimatio...

Reviews: