background image

NOTE: Place the parts from the loose parts bags in a small 


container to keep them from being lost. If any parts are 

missing, contact your local retailer.

Tools Needed for Assembly 

(Not Included)

Materials

    WARNING

Before assembling your ceiling fan, refer to section on 

proper method of wiring your fan (page 10). If you feel you 

do not have enough wiring knowledge or experience, have

your fan installed by a licensed electrician.

This manual is designed to make it as easy as possible for you to assemble,

install, operate and maintain your ceiling fan

• One Phillips head screwdriver

• One ¼˝ blade screwdriver

• One stepladder

• One wire stripper

Wiring outlet box and box connectors must be of type

required by local code. The minimum wire would be a 3-

conductor (2-wire with ground) of the following size:

nstalled ire ength

ire i e

p to   ft

 ft

Unpacking Instructions

1. 

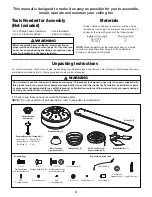
Check to see that you have received the following parts:

NOTE: If you are uncertain of part description, refer to exploded view illustration.

WARNING

Do not install or use fan if any part is damaged or missing. This product is designed to use only those parts supplied with 

this product and/or any accessories designated specifically for use with this product by Fanimation. Substitution of parts 

or accessories not designated for use with this product by Fanimation could result in personal injury or property damage. 

Contact your retail store for missing or damaged parts.

For your convenience, check-off each step. As each step is completed, place a check mark. This will ensure that all steps have been 

completed and will be helpful in finding your place should you be interrupted.

4


Hanger Bracket

Assembly (1) 

Motor Coupling

Cover Assembly (1)

Hardware Bags

Motor Assembly (1)

Blade Holder Set (1)

Blade Set (1)

Switch Cup Housing/

Adapter Assembly (1)

Ceiling Canopy (1)

Downrod/Hanger Ball Assembly (1)
– Downrod (1)

– Hanger Ball (1)

– Set Screw (1)

– Hairpin Clip (1)

– Clevis Pin (1)

– Pin (1)

Wire Connectors (4)

5/32˝ 

Threaded Rods (2)

5/32˝ 

Lockwashers (2)

Knurled Knobs (2)

1/4"-20 

Pan Head Screws 

with Lock Washers (9)

3/16"-24 

Carriage Head Nuts (25)

3/16"-24 

Washer Head Screws

and Flat Washers (25)

Bag Assembly Safety Cable

Safety Cable (1)

Cable Clamp (1)

Flat Washer,

Stainless Steel (1) Lag Bolt Screw (1)

Chain Fob (1) Chain Coupler (1)

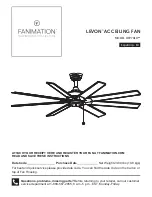
Summary of Contents for The Levon FP7910 series

Page 1: ...23 80 lbs 10 8 kgs LEVON AC CEILING FAN MODEL FP7910 Espa ol p 19 Questions problems missing parts Before returning to your retailer call our customer service department at 1 888 567 2055 8 a m 5 p m...

Page 2: ...conductor then it should be connected to an ungrounded conductor power supply If the conductor of a fan is identified for equipment grounding then it should be connected to an equipment grounding con...

Page 3: ...s e o d y t n a r r a w s i h t s n o i t i d n o c e t a m i l c g n i y r a v f o e s u a c e B 4 tarnishing or peeling f o s e m e r t x e o t e r u s o p x e e s u s i m t n e d i c c a t c e l g...

Page 4: ...se fan if any part is damaged or missing This product is designed to use only those parts supplied with this product and or any accessories designated specifically for use with this product by Fanimat...

Page 5: ...ur Fanimation Retailer for optional mounting accessories Turn Off When Not in the Room Ceiling fans cool people not rooms If the room is unoccupied turn off the ceiling fan to save energy Your new cei...

Page 6: ...of wooden blocking To avoid fire or shock follow all wiring instructions carefully Any electrical work not described in these instructions should be done or approved by a licensed electrician Figure 3...

Page 7: ...d Retain the pin and clip for reinstallation in Step 4 Figure 2 3 Loosen the two set screws and locking nuts in the downrod support of the motor assembly Route the black blue white wires and safety ca...

Page 8: ...ball so the pin is captured in the groove in the top of the hanger ball Pull the hanger ball up tight against the pin Securely tighten the set screw in the hanger ball A loose set screw could create f...

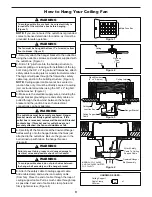
Page 9: ...n the hanger bracket and the junction box so that electrical connections can be made later 4 Carefully lift the fan and seat the downrod hanger ball assembly onto the hanger bracket that was just atta...

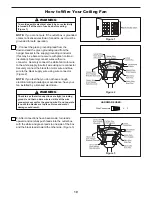
Page 10: ...side of the box and the black leads toward the other side Figure 3 NOTE If you are not sure if the outlet box is grounded contact a licensed electrician for advice as it must be grounded for safe oper...

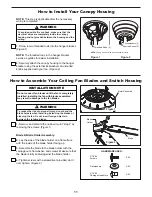
Page 11: ...Assembly 2 Lay the side of the blade holder on a flat surface with the inside of the blade holder facing up 3 Assemble the blade to the blade holder with the carriage nuts flat washer and screws Make...

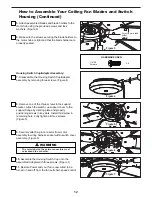
Page 12: ...ee screws Figure 4 8 Remove one of the three screws in the support bracket Attach the switch cup support cover to the support flange by rotating plate and properly positioning screws in key slots Inst...

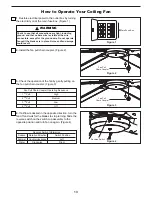
Page 13: ...o not operate fan until the blades are in place Noise and fan damage could result Main Fuse Box Fan Pull Chain Coupler Fan Pull Chain Coupler Operating Sequence 1 st Pull High 2nd Pull Medium 3 rd Pul...

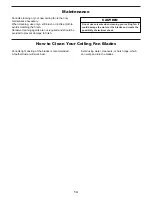
Page 14: ...and should be avoided to prevent damage to finish Periodic light dusting of the blades is recommended A feather duster will work best Avoid using water cleansers or harsh rags which can warp and ruin...

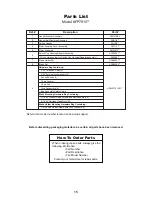
Page 15: ...ated on downrod support Hardware Bag Containing 3 16 24 Washer Head Screws and Flat Washers 25 3 16 24 Carriage Head Nuts 25 Blade Mounting Hardware Bag Containing Motor Assembly Hanger Ball Downrod A...

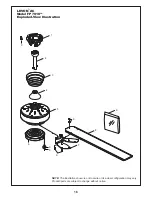
Page 16: ...E The illustration shown is not to scale or its actual configuration may vary Product parts are subject to change without notice LEVON AC Model FP7910 Exploded View Illustration 1 2 3 4 5 9 8 7 9 9 9...

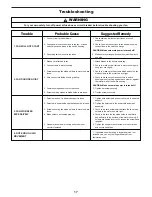
Page 17: ...the longer downrod from fanimation com For your own safety turn off power at fuse box or circuit breaker before trouble shooting your fan 1 FAN WILL NOT START 2 FAN SOUNDS NOISY 3 FAN WOBBLES EXCESSI...

Page 18: ...2019 10 V 01 Copyright 2019 Fanimation 10983 Bennett Parkway Zionsville IN 46077 Phone 888 567 2055 Outside U S 317 733 4113 FAX 866 482 5215 FANIMATION COM...

Page 19: ...m 5 pm hora del Este de lunes viernes C digo de fecha Fecha de compra ADJUNTE SU RECIBO AQU Y REGISTRE SU VENTILADOR EN FANIMATION COM LEA Y GUARDE ESTAS INSTRUCCIONES Para ofrecer un servicio r pido...

Page 20: ...on las piezas suministradas o los accesorios indicados espec ficamente para el mismo Si utiliza piezas o accesorios que no est n indicados para su uso con este producto podr a sufrir lesiones personal...

Page 21: ...nt a expresa o impl cita Por la presente Fanimation niega todas las garant as impl citas que incluyen entre otras la comerciabilidad y la aptitud para determinado fin hasta donde la ley lo permita Alg...

Page 22: ...ntes ou endommag es Instrucciones para el desempaque Para su comodidad marque cada uno de los pasos A medida que completa cada paso coloque una marca de verificaci n Con esto se asegurar de completar...

Page 23: ...un flujo de aire ptimo Consulte en su tienda minorista de Fanimation para obtener accesorios de montaje opcionales Apague el ventilador cuando no se encuentre en la habitaci n Los ventiladores son pa...

Page 24: ...siga con cuidado todas las instrucciones de instalaci n el ctrica Cualquier trabajo el ctrico que no se describa en estas instrucciones deber ser realizado o aprobado por un electricista autorizado Re...

Page 25: ...de horquilla en ambas piezas Instale la clavija de horquilla y aseg rela con la pinza de horquilla Fije los dos tornillos de presi n y las tuercas de seguridad en el soporte de la varilla interior Fi...

Page 26: ...e la parte superior de la misma Empuje la semiesfera hacia arriba bien ajustada contra el pasador Ajuste firmemente el tornillo de fijaci n en la semiesfera Si el tornillo de fijaci n est flojo podr a...

Page 27: ...tier fusibles principal avant de suspendre le ventilateur afin d viter tout risque d lectrocution Figure 1 ADVERTENCIA La caja de distribuci n el ctrica de be estar bien asegurada y debe ser capaz de...

Page 28: ...l aro Inserte el extremo del cable en el orificio de la abrazadera y ajuste firmemente el tornillo Figura 4 ADVERTENCIA Para evitar una posible descarga el ctrica no apriete los cables entre el ensamb...

Page 29: ...lanco neutro mediante el conector de forma segura Conecte de forma segura el conductor negro del motor del ventilador y el conector azulal conductor negro mediante el conector Figura 2 NOTA Si siente...

Page 30: ...ntre la cubierta y el techo Pour viter tout risque d incendie ou de choc assurez vous que les fils lectriques sont compl tement l int rieur du bo tier de la monture et qu ils ne sont pas pinc s entre...

Page 31: ...plana X 24 3 16 24 Tuerca cabeza hexagonal X 24 C mo ensamblar las aspas del ventilador de techo y la caja del interruptor cont Aditamentos utilizados Aditamentos utilizados Tornillos 2 por soporte de...

Page 32: ...La etiqueta de color de estos dos conectores debe corresponder mutuamente L tiquette de couleur sur ces deux connecteurs doit correspondent les uns aux autres AVERTISSEMENT C mo utilizar su ventilador...

Page 33: ...n Posici n del interruptor En direcci n con traria a las manecillas del reloj En direcci n de las manecillasdel reloj Verano Izquierda Derecha Invierno Interruptor del Reversa Limpieza de las aspas Ma...

Page 34: ...gonal 25 Bolsa de accesorios para el montaje de aspas que contiene Unidad del motor Unidad del barral de la semiesfera Capuch n de techo Soportes del aspas Juego de aspas Unidad del soporte de suspens...

Page 35: ...35 LEVON AC 1 2 3 4 5 9 8 7 9 9 9 6 9 9 Modelo FP7910 Ilustraci n del despiece NOTA La ilustraci n que se muestra no est hecha a escala y su c guraci n real y o terminaci n puede variar...

Page 36: ...del soporte de la cubierta inferior est flojo 4 Aseg rese de que los soportes de las aspas del ventilador est n colocados firmemente y de manera uniforme en relaci n con la superficie de la caja del m...

Page 37: ...Copyright 2019 Fanimation Visite nuestro sitio Web en www fanimation com 10983 Bennett Parkway Zionsville IN 46077 Llame sin cargo al 888 567 2055 FAX 866 482 5215 Desde fuera de los EE UU llame al 3...

Reviews: