background image

 Table of Contents


SETTING UP AND INSTALLING YOUR PHONE............................................... 1


Introduction....................................................................................................... 1


Important Safety Instructions............................................................................ 1


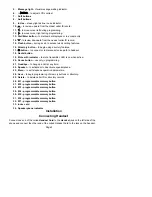
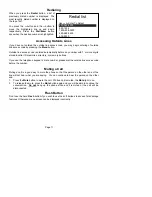
Parts Checklist.................................................................................................. 2


Installation ........................................................................................................ 3


Connecting Handset......................................................................................... 3


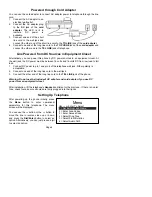
Powered through Cord Adapter........................................................................ 4


Line Powered from DC Sources in Equipment Closet ..................................... 4


Setting Up Telephone....................................................................................... 4


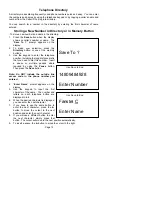
Setting Extension Number and Name .............................................................. 5


Entering Area Codes ........................................................................................ 5


Entering Outside Line Access Code ................................................................ 6


Selecting Ringing Tone .................................................................................... 6


Selecting Flash Duration .................................................................................. 6


Selecting Audio Path ........................................................................................ 7


Wall Mounting................................................................................................... 7


Adjusting the Display Angle.............................................................................. 7


Adjusting the Display Contrast ......................................................................... 8


Adjusting Handset Receiver Volume................................................................ 8


Adjusting Headset Receiver Volume................................................................ 8


Adjusting Speakerphone Receiver Volume...................................................... 8


USING THE TELEPHONE................................................................................... 9


Making a Call.................................................................................................... 9


Editing Telephone Number before Dialing ....................................................... 9


Receiving a Call................................................................................................ 9


Call Duration Timer and Real Time Clock...................................................... 10


Switching Between the Handset and the Speakerphone............................... 10


Switching Between the Headset and the Speakerphone............................... 10


Switching Between the Handset and the Headset ......................................... 10


Redialing......................................................................................................... 11


Accessing Outside Lines ................................................................................ 11


Muting a Call................................................................................................... 11


Flash Button ................................................................................................... 11


Telephone Directory ....................................................................................... 12


Storing a New Number in Directory or in Memory Button .............................. 12


Using the Keypad to Enter a Name................................................................ 13


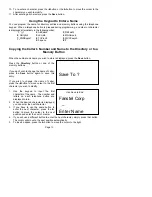
Copying the Caller’s Number and Name to the Directory or to a Memory Button

........................................................................................................................ 13


Dialing Telephone Numbers from the Directory ............................................. 14


Deleting Entries in the Directory..................................................................... 14


Summary of Contents for ST2118-TV

Page 1: ...Screen Telephone For Vertical TeleVantage PBX OWNER S MANUAL MODEL ST2118 TV 505 33TV ...

Page 2: ... Volume 8 Adjusting Headset Receiver Volume 8 Adjusting Speakerphone Receiver Volume 8 USING THE TELEPHONE 9 Making a Call 9 Editing Telephone Number before Dialing 9 Receiving a Call 9 Call Duration Timer and Real Time Clock 10 Switching Between the Handset and the Speakerphone 10 Switching Between the Headset and the Speakerphone 10 Switching Between the Handset and the Headset 10 Redialing 11 A...

Page 3: ...ephone s Programming 17 Maintenance Information 17 Troubleshooting 17 LIMITED WARRANTY 18 Warranty Limitation 18 What This Warranty Does Not Cover 19 State Law Rights 19 FCC REGISTRATION AND REPAIR INFORMATION 19 Connection and Use with the Nationwide Telephone Network 19 Notification to the Telephone Company 19 Repair Instructions 20 Rights of the Telephone Company 20 Interference Information Par...

Page 4: ...ould be operated only from the type of power source indicated on the marking label 8 Do not allow anything to rest on the power cord Do not locate this product where the cord will be abused by persons walking on it Do not attach the power cord to building surfaces 9 Do not overload wall outlets and extension cords as this can result in the risk of fire or electric shock 10 Never push any objects i...

Page 5: ...k Parts Checklist Remember to save your sales receipt in case you ever need warranty service Check to make sure your package includes the items described below 1 Telephone base 4 AC DC adapter 2 Telephone handset 5 Cord adapter 3 Line and handset cords 6 Wall mount bracket Controls and Functions 1 LCD display 2 Hook switch 3 Telephone keypad 4 Volume to adjust receiver volume for handset speaker a...

Page 6: ...ute with indicator to mute transmitter LED is on when active 20 Pause button use only in programming 21 Goodbye to hang up a call at any time 22 Speaker to activate or to deactivate speakerphone 23 Menu to set telephone operation parameters 24 Save to begin programming of memory buttons or directory 25 Delete to delete caller ID or directory records 26 M1 programmable memory button 27 M2 programma...

Page 7: ...is phone by DC power sources in an equipment closet At the wall jack the DC power must be between 14 volts and 16 volts DC from low load to full load 1 Connect DC power to pin 1 and pin 6 of the telephone wall jack Either polarity is acceptable 2 Connect one end of the long line cord to the wall jack 3 Connect the other end of the long line cord to the TEL LINE jack of the phone Warning Do not use...

Page 8: ...o6 7 PQRSpqrs7 8 TUVtuv8 9 WXYZwxyz9 0 0 space Press Save button to store the extension number and name Entering Area Codes If you enter your local area codes Caller ID number can be dialed correctly in the USA If you dial your local calls using 7 digits e g 555 1212 you need to enter your area code for 7 digits dialing Otherwise enter up to 3 area codes for 10 digits local dialing To enter area c...

Page 9: ...side line access code 1 Press the Menu button followed by the 3 button 2 Enter your outside line access code 3 Press Save button to store the access code Selecting Ringing Tone You can select one of four ringing tones for this telephone 1 Press the Menu button followed by the 4 button 2 The phone rings with the Ring Tone 1 for about 2 seconds 3 Press the Save button to select the Ring Tone 1 or 4 ...

Page 10: ...tabs at the thin end of the wall mount bracket into the holes at the rear of the phone bottom Press and latch the tabs at the thicker end of the wall bracket into holes at the front end of phone The back of the phone should then have two round plastic holes that can be used to hang your phone on the wall 2 Use the two round holes to hang the phone on the wall plate on your wall Important Note If y...

Page 11: ...s telephone we recommend a headset without built in amplifier Amplifier for adjusting headset receiver volume is built into this telephone If you need to adjust the headset receiver volume 1 Press the ÃHeadset button and listen to the dial tone 2 Press the right side of the Volume button to increase the receiver volume 3 Press the left side of the Volume button to decrease the receiver volume 4 Pr...

Page 12: ...ever another phone on the same phone line is in use Editing Telephone Number before Dialing You can enter the telephone number you wish to dial before lifting handset or pressing the Speaker button 1 Use the keypad to enter the telephone number The number is displayed on the screen 2 If you enter one or more wrong digits press the button one or more times till incorrect digits are erased 3 When al...

Page 13: ...Hanging up the handset will not disconnect the call when the Speakerphone is activated You have to press the Speaker or the Goodbye button to disconnect the call 4 If the speakerphone is not activated simply hang up the handset and the call will be disconnected Switching Between the Headset and the Speakerphone To switch between a call from the headset to the speakerphone during a conversation 1 W...

Page 14: ...fore any number with 7 or more digits stored in caller ID memories directory or memory buttons If you use the telephone keypad to dial a number please dial the outside line access code before the number Muting a Call Muting a call is a good way to mute the phone so that the person on the other end of the line will not hear what you are saying You can continue to hear the person on the other end 1 ...

Page 15: ...ory buttons 3 Use the keypad to enter the telephone number including the long distance prefix that you need to dial this number Insert a pause or multiple pauses where required by using the Pause button Then press the Save button Note Do NOT include the outside line access code in the phone number you entered 4 Enter Name prompt appears on the display 5 Use the keypad to input the first character ...

Page 16: ...wish to store is displayed press the Save button Press the Directory button or one of the memory buttons If you don t wish to change the name of caller press the Save button again to save this entry If you wish to change the name of caller press the button to move cursor to the first character you wish to modify 1 Use the keypad to input the first character of the name The number and letters on ea...

Page 17: ...more times to reach the first character of the name for which you are searching For example by pressing 5 5 two times the first record with a name starting with K is displayed Press the button and the next K listing is displayed 4 To dial the number displayed press the Dial Enter button The speakerphone is activated automatically before dialing 5 To leave the directory mode at any time press the G...

Page 18: ...and the oldest call has the smallest number e g 1 Viewing the Caller ID List This Caller ID telephone automatically stores in the Call Memory the Caller ID information of the last 99 calls received It keeps track of all calls received whether they were answered or not The oldest call in the Call Memory is always call 1 The highest numbered call or call 99 if the Call Memory is full is always the m...

Page 19: ...le and Private Call Certain messages may appear instead of a caller s name and or number 1 The screen will display Unavailable if a call is made through a telephone company which does not offer the Caller ID service This can include long distance international and sometimes even local phone calls 2 The screen will display Private Call if a caller s information is blocked from being transmitted For...

Page 20: ...irmware version number is displayed release the buttons Follow the Installation procedures to select the language and to enter the area codes Maintenance Information Although your unit is designed to be maintenance free it contains sensitive electronic parts Treat it with care to assure the best performance Avoid Rough Treatment Avoid dropping the unit The original packaging should be used for pro...

Page 21: ... How Long For one year from the date of purchase What We Will Do If we repair your product we may use new or reconditioned replacement parts If we choose to replace your product we may replace it with a new or reconditioned one of the same or similar design The repair or replacement product will be warranted for either a 90 days or b the remainder of the original one year warranty period whichever...

Page 22: ...tate Law Rights This warranty gives you specific legal rights and you may also have other rights that vary from state to state FCC Registration and Repair Information Your new product has been registered with the Federal Communication Commission FCC This product complies with standards in Part 68 of the FCC Rules The FCC requires us to provide you with the following information Connection and Use ...

Page 23: ...unctioning of your product If such changes are planned you will be notified Interference Information Part 15 of FCC Rules Some telephone equipment generates uses and can radiate radio frequency energy and if not installed and used properly may cause interference to radio and television reception Your product has been tested and found to meet the standards for a Class B digital device as specified ...

Reviews: