background image

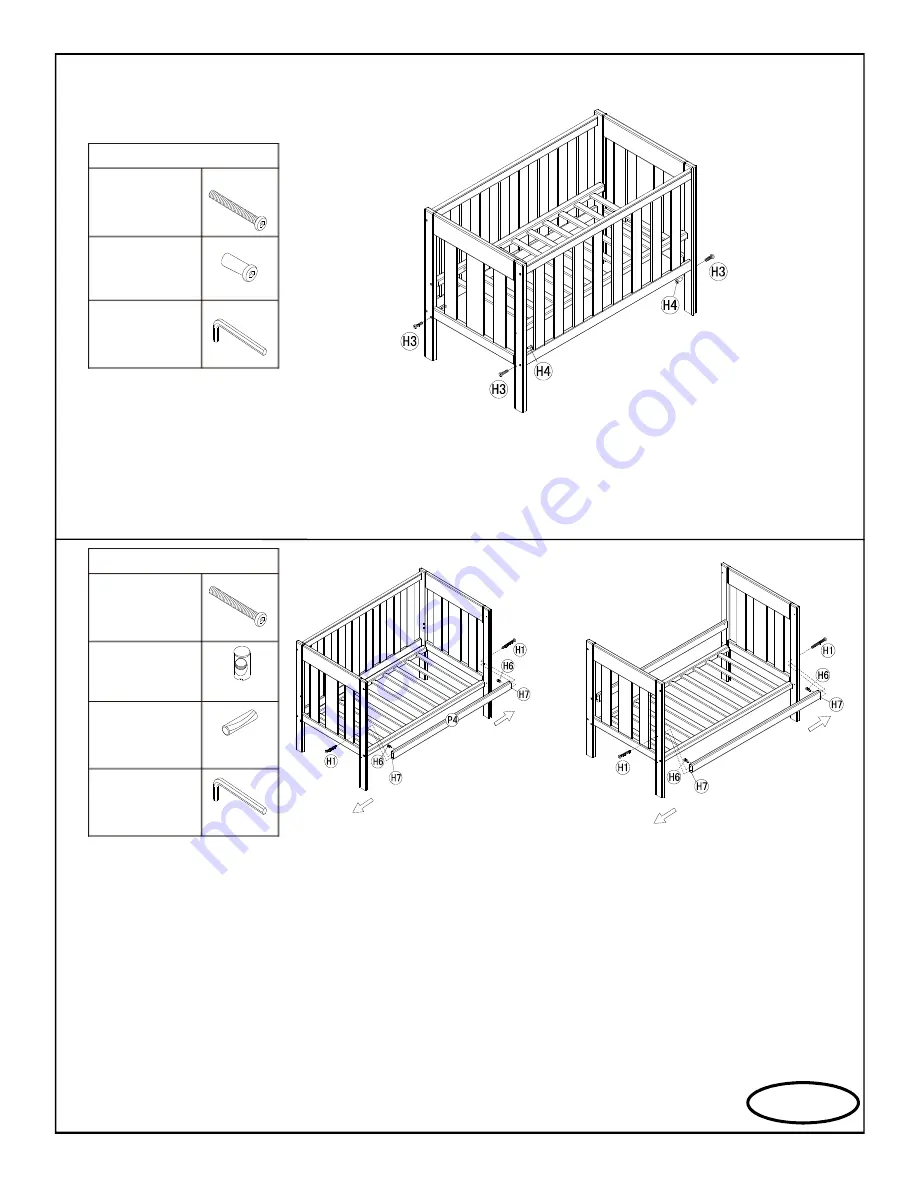
Step 5

You will need:

4x Bolts

(H3)

(H4)

4x End Caps

You will need:

4x Bolts

Allen key

(H8)

Install Bolts (H3) and end caps (H4) in holes not being used as indicated  on 
(P1) All bolts can now be tightened  using the Allen Key (H8) Do not over 
tighten. 

Affixing Bed Rails (P4)

When it is time to replace the cot sides (P2) with the bed rails (P4) provided, first ensure the 
base (P3) is in the lower position and loosen the base bolts  (H1) using the Allen Key (H8) to 
allow removal of the sides (P2).  Remove one cot side(P2) using the Allen Key (H8).  Place 
the  4 x wood dowel  (H7) into each end of the bed rail (P4). Place the 4 x cross dowels  
(H6) in the hole on the side of the bed rail  (P4)(with screwdriver slot facing out and parallel 
to the bed rail (P4)).  Align the end of the bed rail (P4) with the 2 holes at the end of the cot 
(P1). Affix a 65mm bolt (H1) through the outside of the end (P1) and align with the cross 
dowel (H6).  Tighten  with the Allen Key (H8) only until the cross dowel (H6) is engaged.  
Remove the other cot side (P2) using the Allen Key (H8). Affix the second bed rail, following 
the same procedure as above for the other side. Tighten all bolts, taking care not to over 
tighten.

Page 6

4x Bolts

(H1)

(H6)

4 x cross dowel

4x Wood Dowel

(H7)

(H8)

Allen key

Summary of Contents for SUNBURY

Page 1: ...Assembly Instructions SUNBURY Twinkle Cot Junior Bed Ver1 1 ...

Page 2: ...you were preparing to do a jigsaw puzzle 3 4 5 Carefully identify each component especially those that are similar The most common mistake is getting things back to front Separate and identify each component from the hardware pack and rest each one in its proper Location before fastening DO NOT fully tighten screws leave slightly loose When the item is fully assembled tighten the screws but do not...

Page 3: ...Need To Assemble the Cot Cot End Cot Side Base Bed Rail Page 3 Please make sure you have all these parts before you start 65mm 40mm 19mm BOLT Cross Dowel 20mm Cross Dowel 13mm Wood Dowel Allen Key BOLT BOLT Cap ...

Page 4: ...the Allen key H8 through the outside of the end and align with the base and use 2 x cross dowel H5 as per above Do not over tighten or bolts may cross thread You will need 2x Bolts H1 H5 Allen key H8 2x Cross Dowel Step 2 Repeat step 1 to connect the other end Page 4 You will need 2 x Bolts H1 H5 Allen key H8 2x Cross Dowel ...

Page 5: ...s at the outside of the end P1 and fix using the Allen Key H8 Do not over tighten or bolts may cross thread Tighten only until the bolt is engaged at this stage DO NOT ATTEMPT TO INSTALL THE BED RAILS P4 AND COT SIDES P2 SIMULTANEOUSLY 4x Bolts H2 Allen key H8 Repeat step 3 to connect the other side P2 Step 4 Page 5 4x Bolts H2 Allen key H8 ...

Page 6: ... Allen Key H8 Place the 4 x wood dowel H7 into each end of the bed rail P4 Place the 4 x cross dowels H6 in the hole on the side of the bed rail P4 with screwdriver slot facing out and parallel to the bed rail P4 Align the end of the bed rail P4 with the 2 holes at the end of the cot P1 Affix a 65mm bolt H1 through the outside of the end P1 and align with the cross dowel H6 Tighten with the Allen ...

Page 7: ...of any moving parts when accessing the dropside Page 7 Ensure that your child is clear of any moving parts when accessing the dropside Ensure the wheels have the brakes locked while the cot is in use When using the dropside ensure you first lift and then push the pins at either end simultaneously This dropside can be lifted using 1 or 2 hands Ensure that the dropside locks into the upper position ...

Reviews: