background image

2. Operation


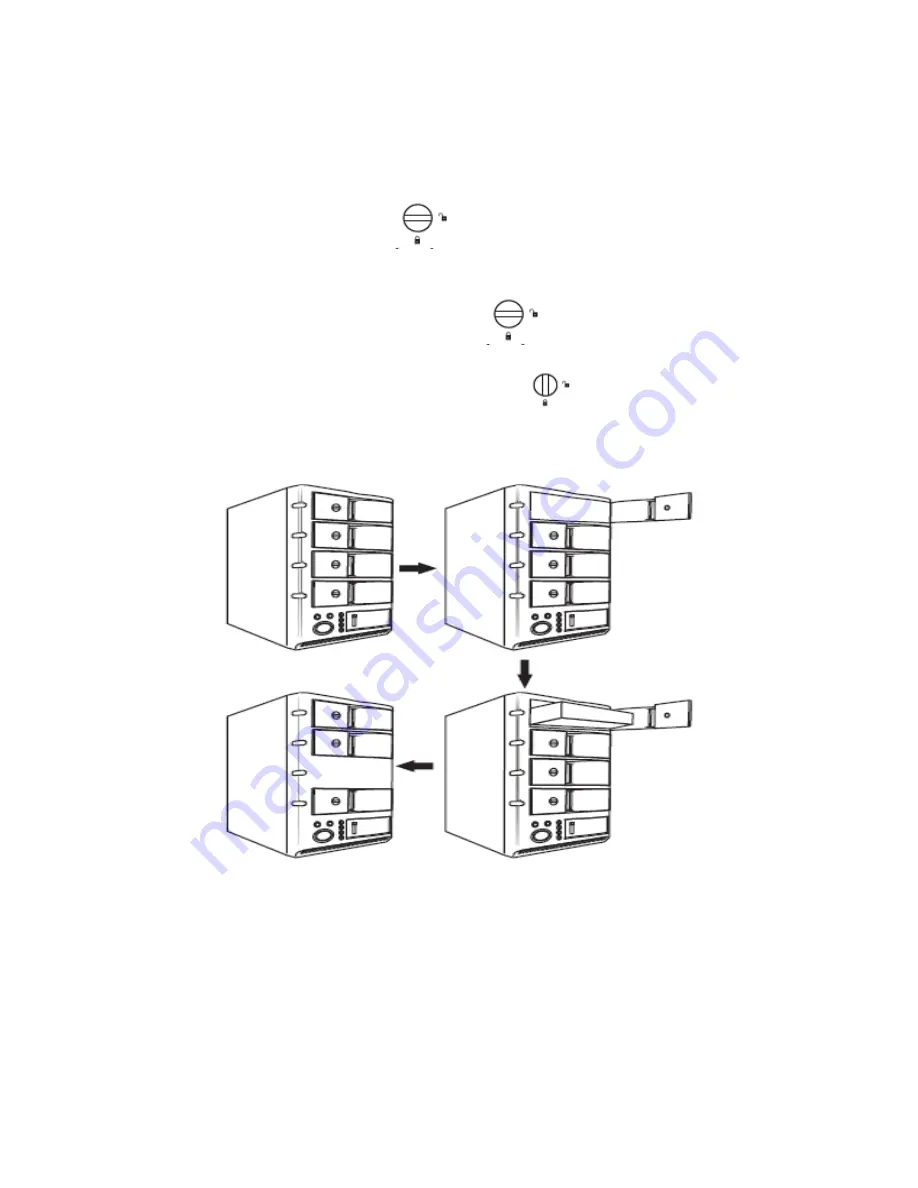
2.1 Hard Disk Installation:   

Sway from side to side the lock 

   , and pull the doorknob to insert 4 hard 

disks. Close the doorknob and the installation will be completed (The step will be 
represented in terms of following graphs).


Note

: Sway the lock at the instructed point 

.Now you can open the 

doorknob in order to install or unload the hard disk. 

In Contrast, when you sway the lock to this point 

, then you cannot open it. 

When you install four HDDs, you will discover that the LEDs are glittering with 
blue & red lights in turn for a long time. It can help you check and see whether the 
HDDs are installed correctly.


2.2 USB3.0 interface or eSATA interface 

Insert 4 hard disks, USB3.0 or eSATA cable and power cable have to be 
connected. 


Summary of Contents for MR-35US3R

Page 1: ...Fantec MR 35US3R MANUAL ...

Page 2: ...on 1 1 Features 2 Operation 2 1 Hard Disk Installation 2 2 USB3 0 interface or eSATA interface 2 3 RAID Mode settings 2 4 Rebuild Mode 2 5 Initialization Partitioning and Formatting 3 Notes 3 1 References 4 Raid Modes description ...

Page 3: ...itable to store and backup large amounts of data The MR 35US3R RAID Enclosure is the perfect solution in the office or home usage Support 4x 3 5 SATA HDD Super high speed USB3 0 interface transfer up to 5Gbps High speed e SATA interface up to 3Gbps RAID Modes over USB3 0 or eSATA RAID0 2 or 4 disks RAID1 2 disks RAID 10 4disks RAID3 3 or 4 disks RAID5 3 or 4 disks BIG 2 3 or 4 disks Clear RAID or ...

Page 4: ...cted point Now you can open the doorknob in order to install or unload the hard disk In Contrast when you sway the lock to this point then you cannot open it When you install four HDDs you will discover that the LEDs are glittering with blue red lights in turn for a long time It can help you check and see whether the HDDs are installed correctly 2 2 USB3 0 interface or eSATA interface Insert 4 har...

Page 5: ... to initialize and format the HDD At this point all information will be deleted During formatting the HDD the MR 35US3R HDD LED glitter with purple light When the LED send blue light the format procedure is finished and the RAID 0 mode is ready to use In order to initialize partition and format the HDD refer to pint 2 5 of this manual 2 RAID1 10 MODE Switch to RAID 1 10 and press SET button After ...

Page 6: ...format the HDD refer to pint 2 5 of this manual 5 BIG COMBINE MODE Switch to BIG Combine mode and press SET button After a few seconds the computer will automatically capture an USB device Then open computer management in order to initialize and format the HDD At this point all information will be deleted During formatting the HDD the MR 35US3R HDD LED glitter with purple light When the LED send b...

Page 7: ...2 5 Initialization Partitioning and Formatting ...

Page 8: ......

Page 9: ......

Page 10: ......

Page 11: ......

Page 12: ......

Page 13: ......

Page 14: ......

Page 15: ......

Page 16: ......

Page 17: ...partition table you have to switch another to CLEAR RAID mode and do the RAID mode switch all over again referring to Setup Then go back to the RAID mode you want repeat the previous actions and enable GPT when initializing HDD 10 For Macintosh users the total capacity of more than 2TB could be recognized only of the operation system 10 4 11 Tiger or later 11 Do not connect the device to the SATA ...

Page 18: ...4 RAID Mode description ...

Page 19: ......

Reviews: