background image

8

EXTERIOR DUCTING INSTALLATION

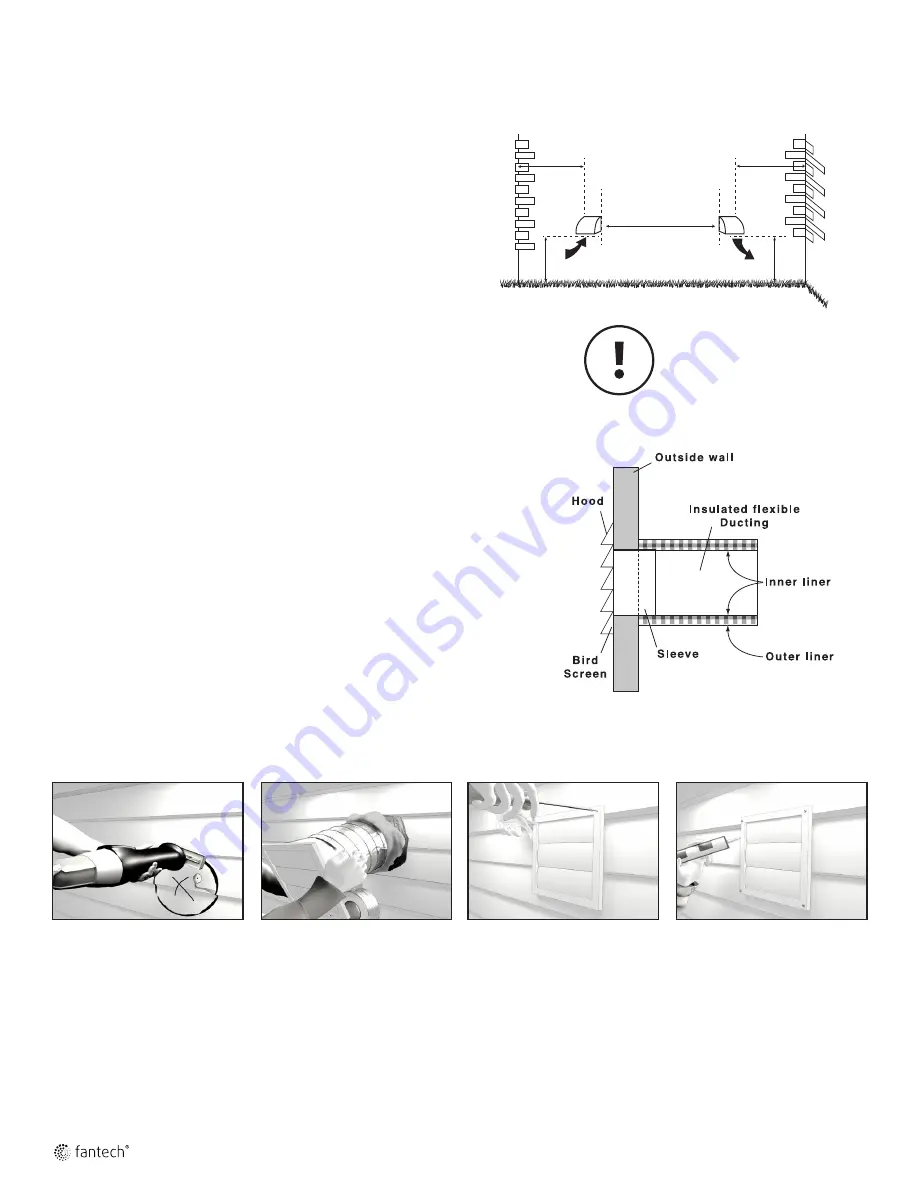
WEATHERHOOD LOCATION

•   Decide where your intake and exhaust hoods will be located.

Locating the Intake Weatherhood

•  Should be located upstream (if there are prevailing winds) from the 

exhaust outlet.

• At a minimum distance to 900 mm (3') away from dryer vents and furnace 

exhaust (medium or high efficiency furnaces), driveways, oil fill pipes, gas 
meters, or garbage containers.

• At a minimum height of 460mm (18’’) above the ground, or above the level 

of expected snow accumulation.

•  Ideally, keep weatherhoods 1m (3') from corners.
• Do not locate in the garage, attic, crawl space, or underneath deck.

Locating the Exhaust Weatherhood

•  At least 460mm (18") above ground or above the depth of expected snow accumulation
• Ideally, keep weatherhoods 1m (3') from corners.
• Not near a gas meter, electric meter or a walkway where fog or ice could create a hazard
• Do not locate in a garage, workshop or other unheated space

INSTALLING THE DUCTING TO THE WEATHERHOODS

A well designed and installed ducting system will allow the FAA to operate at its
maximum efficiency. The inner liner of the flexible insulated duct must be secured to the 
sleeve of the weatherhood (as close to the outside as possible) and to the appropriate duct 
connection on the FAA. The insulation should remain full and not crushed. The outer liner, 
which acts as a vapor barrier, must be completely sealed to the outer wall and the FAA 
using tape and/or caulking. A good bead of high quality caulking (preferably acoustical 
sealant) will seal the inner flexible duct to both the FAA duct connection and the 
weatherhood prior to securing them.
To minimize airflow restriction, the flexible insulated duct that connects the two outside 
weatherhoods to the FAA should be stretched tightly and be as short as possible.
Twisting or folding the duct will severely restrict airflow.

See “Installation Diagram Examples” for installation examples.

1

  Using the duct connection of 

the outside hood, outline the 
intake & exhaust holes to be 
cut. The holes should be slightly 
larger than the duct connection 
to allow for the thickness of the 
insulated flexible duct. Cut a 
hole for both the intake and 
exhaust hoods.

Push the hood into the opening 
and then attach the hood to the 
outside wall with mounting 
screws. 
Repeat the installation 
procedure for both the supply 
and exhaust hoods.

2

  Pull the insulated flexible duct 

through the opening until it is 
well extended and straight. 
Slide the duct’s inner vinyl sleeve 
over the hood duct connection 
and secure. Pull the insulation 
over the duct and pull the vapor 
barrier over the sleeve. Secure 
with appropriate tape or 
sealant.

4

  Using a caulking gun, seal 

around both hoods to prevent 
any leaks.

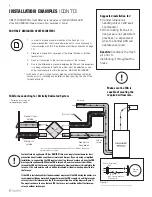
STEPS FOR HOOD INSTALLATION:

36" (1m)

INTAKE

OUTSIDE CORNER

INSIDE CORNER

EXHAUST

18" (460mm) 

18" (460mm) 

3' (900mm)

min.

36” (1m)

REQUIRES A WEATHERHOOD 

WITH A BACKDRAFT 

DAMPER ON THE EXHAUST 

SIDE.

Summary of Contents for ATMO Series

Page 1: ...signs components and specifications to maintain their technological leadership position Please visit our website www fantech net for more detailed technical information Fantech se r serve le droit de...

Page 2: ...pment i e Gas Furnaces Oil Furnaces Wood Stoves etc Products are designed and manufactured to provide reliable performance but they are not guaranteed to be 100 free of defects Even reliable products...

Page 3: ...XTERIOR DUCTING INSTALLATION Weatherhood Location 8 Installing the ducting to the weatherhood 8 INTERIOR DUCTING INSTALLATION General Tips 9 Installing duct to FAA 9 Supply Exhaust Air Grilles Locatio...

Page 4: ...53 25 60 28 501 1000 47 93 45 21 53 24 60 28 68 31 75 35 1001 1500 94 139 60 28 68 31 75 35 83 38 90 42 1501 2000 140 186 75 35 83 38 90 42 98 45 105 49 2001 2500 187 232 90 42 98 45 105 49 113 52 120...

Page 5: ...YSTEM BEST FOR NEW CONSTRUCTION 1 Stale air is drawn from key areas of the home requiring local exhaust bathroom kitchen laundry room 2 Fresh air is distributed directly to habitable rooms in the hous...

Page 6: ...ing for Partially Dedicated System Air from inside Unit air flow should be balanced while FAA is on Normal speed and furnace blower is running Air return Cold air return Ductwork layout may dif fer de...

Page 7: ...ould be balanced while FAA is on Normal speed and furnace blower is running 1 m 3 3 min recommended Cold air return Ductwork layout may dif fer depending on model FAA Furnace ducting for Simplified In...

Page 8: ...rrier must be completely sealed to the outer wall and the FAA using tape and or caulking A good bead of high quality caulking preferably acoustical sealant will seal the inner flexible duct to both th...

Page 9: ...round shape listing label of the listing agency Air Duct A category of flexible duct tested and classified as to the Surface Burning Characteristics in accordance with the UL 181 Standard Air Ducts a...

Page 10: ...top Stovetop fan Central vacuum system Bathroom exhaust fans unless they are specifically designed for this purpose These appliances may cause lint dust or grease to collect in the FAA damaging the un...

Page 11: ...e FAA The drain nipple is placed upside down in the unit to prevent it being damaged during shipping or the installation of the unit The Switch on the electrical box is used to toggle between STANDBY...

Page 12: ...hed press on next and move on to the next stage STAGE 2 BALANCE SUPPLY FAN ONLY IN HIGH SPEED In this step balance supply fan and measure airflow on the supply air side Pressing on up or down will adj...

Page 13: ...mizing energy use associated with ventilation Set preferred indoor relative humidity range and ventilation mode for day and night conditions No battery to replace all programmed settings are retained...

Page 14: ...stem Use in bathroom kitchen laundry room WALL CONTROLS CONT D MDEH SERIES FEATURES CONNECT TO MDEH1 Rotary dial Dehumidistat Multiple units can be used We recommend setting the relative humidity abov...

Page 15: ...15 Fantech ON Model ON ON ON ON LOW SPEEDS 90V 75V J4 J5 J6 WIRING DIAGRAM ATMO PRODUCT LINE Observe polarity on all accessory controls where applicable...

Page 16: ...TION TO A COOLING SYSTEM On some newer furnaces and older thermostats energizing the R and G terminal at the furnace has the effect of energizing the Y at the thermostat and thereby turning on the coo...

Page 17: ...power supply at site Have electrician check supply voltage Ductwork is restricting airflow Check duct installation Improper speed control setting Increase the speed of the FAA i e change unit control...

Page 18: ...al damages incurred in the use of the ventilation system Fantech is not responsible for providing an authorized service centre near the purchaser or in the general area Fantech reserves the right to s...

Page 19: ...moment et sans pr avis les caract ristiques la conception les composants et les sp cifications de ses produits afin de conserver sa position de leader de technologie S il vous pla t visitez notre sit...

Page 20: ...z fournaise mazout po le bois etc Les produits sont con us et fabriqu s pour fournir une performance fiable mais ils ne sont pas garantis 100 sans d faut M me les produits ont des pannes occasionnelle...

Page 21: ...mplacement des hottes 26 Installation de l ensemble des conduits avec hottes 26 INSTALLATION DES CONDUITS INT RIEURS Conseils pratiques 27 Installation des conduits sur le AAF 27 Emplacement des grill...

Page 22: ...n L s Pi3 min L s 500 47 30 128 38 18 45 21 53 25 60 28 501 1000 47 93 45 21 53 24 60 28 68 31 75 35 1001 1500 94 139 60 28 68 31 75 35 83 38 90 42 1501 2000 140 186 75 35 83 38 90 42 98 45 105 49 200...

Page 23: ...nte selon le mod le SYST ME ENTI REMENT SP CIALIS NOUVELLE CONSTRUCTION Installation sugg r e pour Plinthe eau chaude Plancher chauffant Plinthe lectriques Thermopompe mural bibloc Avantages Fourni la...

Page 24: ...Fournaise centrale unit de traitement d air air climatis central Lorsque l installation des endroits habitable n est pas possible ou pratique dispendieux ou lorsque l unit de traitement d air fonctio...

Page 25: ...vici vacu l ext rieur Air frais provenant de l ext rieur L appareil est quilibr vitesse normale et pendant que le ventilateur de la fournaise est en marche Les papareil air frais AAF de Fantech qui ut...

Page 26: ...mur ext rieur et le AAF l aide de ruban ou de produit de calfeutrage D posez un cordon de produit de calfeutrage de premi re qualit du mastic d isolation acoustique de pr f rence pour sceller le cond...

Page 27: ...d UL 181 cat gorie de conduit d air n est pas l preuve de la p n tration de la flamme de la perforation et la r sistance l impact et ayant des limitations sur l utilisation la longueur et la localisat...

Page 28: ...teur de cuisini re Syst me d aspirateur central Ces lectrom nagers peuvent entra ner l accumulation de charpie de poussi re ou de graisse dans le AAF et l endommager MONTAGE CHAINES Assurez vous d avo...

Page 29: ...au de drain Former un siphon avec le conduit pour viter que les odeurs ne remontent dans le syst me Mauvaises odeurs peu probables l int rieur du cabinet car l appareil fonctionnera en pression positi...

Page 30: ...d air frais BAS BAS BAS BAS BAS BAS HAUT HAUT HAUT HAUT HAUT HAUT AUTO MANUAL OPTIONS AUTO MANUAL OPTIONS NEXT AUTO MANUAL OPTIONS NEXT 0 ADJUST AUTO MANUAL OPTIONS NEXT 0 BALANCE TAPE 1 R GLER LE NIV...

Page 31: ...la ventilation R glage de la plage d humidit int rieure relative et du mode de ventilation favoris pour le jour et la nuit Aucune pile remplacer tous les r glages programm s sont conserv s en cas de p...

Page 32: ...OLS CONT D S RIE MDEH CARACT RISTIQUES RELIER MDEH1 D shumidistat molette Plusieurs commandes peuvent tre utilis es Nous recommandons de fixer le taux d humidit relative au del de 80 l t D D S RIE EDF...

Page 33: ...33 Fantech ON Model ON ON ON ON LOW SPEEDS 90V 75V J4 J5 J6 Respectez la polarit sur tous les acces soires de contr les Le cas ch ant SCH MAS LECTRONIQUES...

Page 34: ...ion de la borne Y du thermostat et cons quemment la mise sous tension du syst me de refroidissement Si votre syst me est muni d un tel type de thermostat vous devez respecter le c blage de verrouillag...

Page 35: ...cacit du AAF V rifiez le r seau de conduits Mauvais r glage de la commande de vitesse Augmentez la vitesse du AAF i e changez la vitesse de l appareil de vitesse R DUITE vitesse NORMALE avec le contr...

Page 36: ...nu de respecter tous les codes en vigueur dans sa r gion Les pi ces y compris les pi ces de rechange pos es ult rieurement sont garanties pendant 5 ans partir de la date d achat de l appareil Les mote...

Page 37: ...be 461102 Kit Chain 404261 Kit Wall Bracket 463942 Wiring Diagram 463927 11 Installation Manual 463913 Filter MERV 8 Pack of 2 463943 Filter MERV 13 Pack of 2 463944 Kit AUX 24V Damper 463947 ATMO 200...

Page 38: ...38 NOTE...

Page 39: ...39 NOTE...

Page 40: ...make technical changes For updated documentation please refer to www fantech net Fantech Fantech se r serve le droit de faire des changements tech niques Pour de la documentation jour s il vous pla t...

Reviews: