


WARRANTY and MAINTENANCE
Recommended Maintenance
1. Since fan bearings are sealed and provided with an internal lubricating material, no additional lubrication is necessary.
2. Fan impeller may accumulate lint. Periodic inspection, based upon dryer usage, should be performed to ensure that the fan impeller is not obstructed or
loaded with lint. Under normal conditions, fan should be inspected a minimum of every Six (6) Months. Note: Excessive booster fan noise or vibration may
be an indication of lint buildup on the impeller. To inspect and clean the impeller:
a. Disconnect the incoming power supply at the source.
b. Remove the duct from the fan inlet and remove any lint buildup o~ the impeller.
c. Reconnect the duct to the fan. Turn power supply on.
Troubleshooting
Important Notice: Prior to performing Steps 1 - 4, be certain that the electrical supply to the fan/switch is turned off.
If fan fails to start when the dryer cycle begins, please follow the procedure listed below:
1. Check the incoming supply for proper voltage.
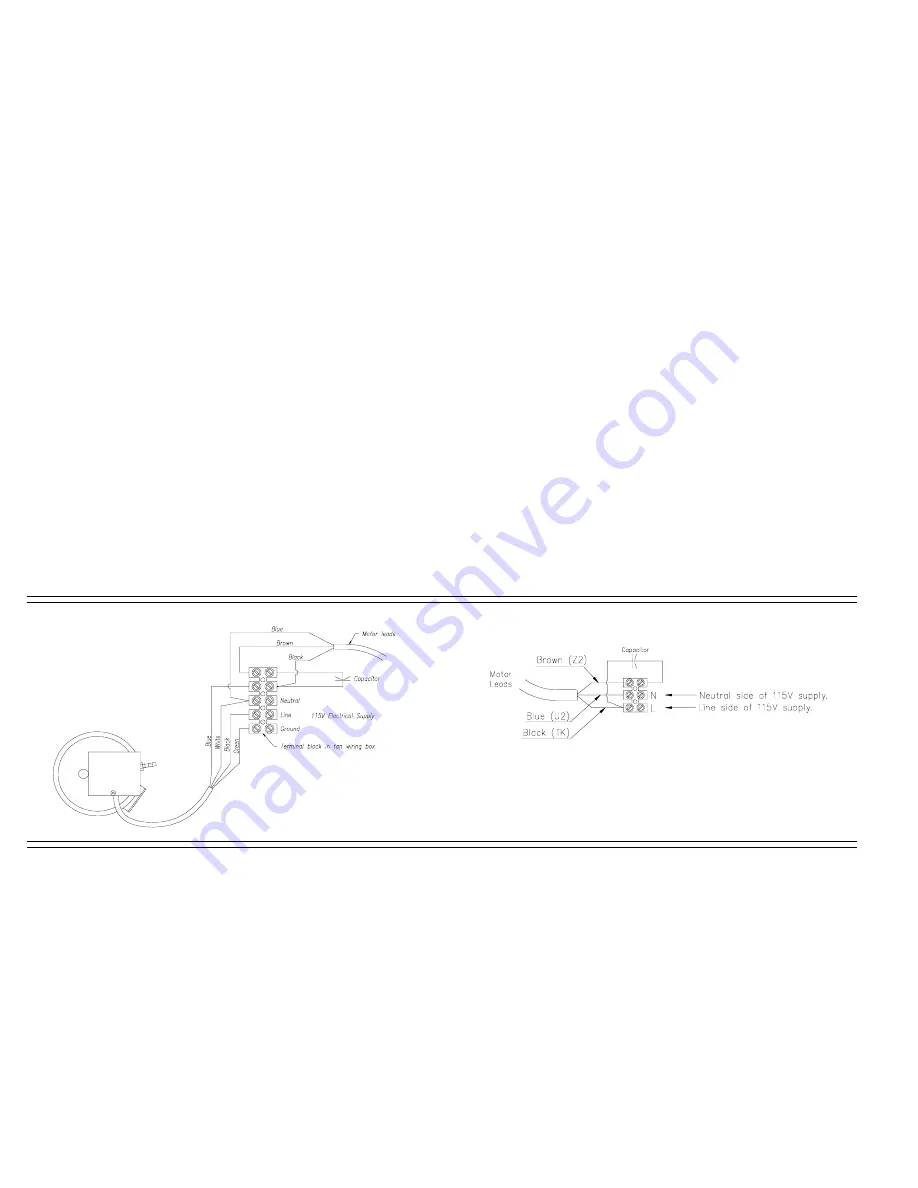
2. Consult schematic shown below (also included on inside lid of fan wiring terminal lid) to ensure proper connection.
3. If possible, use a meter to test for continuity across the fan motor leads. In order to do this, the capacitor and pressure switch must be disconnected (do
not test the capacitor - it will not meter continuity). If motor leads show continuity, rewire the fan, capacitor and pressure switch.
4. Turn on the electrical supply and restart the dryer cycle. Check to be certain that fan starts.
If fan still fails to start after performing Steps 1 - 4, continue following the procedure as listed below:
5. Verify that the pressure switch diaphragm is vertical as illustrated on Page 2 of these instructions. If the diaphragm is not vertical, reposition the pressure
switch and check for fan operation against another dryer cycle.
6. Verify that the tubing is not crimped and that the tubing connector nipples are not obstructed.
7. If switch diaphragm is vertical and fan still fails to start, with the electrical supply on:
a. Remove the tubing from the nipple on the fan and blow gently into the tubing;
b. If fan starts, consult Fantech for additional technical support.
8. If fan fails to start after blowing into the tubing:
a. Disconnect incoming power supply at the source.
b. Remove the pressure switch leads from the wiring terminal block
c. Connect the incoming power supply directly to the fan motor as shown in "FR110 Wiring" diagram below.
d. Turn on power to fan.
9. If fan fails to start, please consult Fantech for additional technical support.
FIVE (5) YEAR WARRANTY
THIS WARRANTY SUPERSEDES ALL PRIOR WARRANTIES
FOR FACTORY RETURN YOU MUST:
1) Have a Return Materials Authorization (RMA) number. This number may be obtained by calling
FA NTECH, INC. at 1-800-747-1762. Please have Bill of Sale available.
2) The RMA number must be clearly displayed on the outside of the carton, or delivery will be refused.
3) All product being returned must be shipped prepaid and be accompanied with a copy of the Bill of Sale.
4) Product will be replaced/repaired and shipped back to buyer. No credits will be issued.
DURING THE FIRST THIRTY (30) DAYS:
FANTECH, INC. will replace any product which has a factory defect in workmanship or material.
Product may be returned to either the point of purchase or the FANTECH factory, together with Bill of
Sale, for an immediate replacement.
DURING THE FIRST THREE (3) YEARS (excluding the above 30 day period):
FANTECH, Inc. will replace any product which has a factory defect in workmanship or material.
Product must be returned to the FANTECH factory, together with Bill of Sale, and identified with an
RMA number.
DURING YEARS FOUR (4) and FIVE (5):
FANTECH, INC. will repair or replace any product which has a factory defect in workmanship or
material. Product must be returned to the FANTECH factory, together with a Bill of Sale, and
identified with an RMA number.
THE FOLLOWING WARRANTIES DO NOT APPLY:
Damages from shipping, either concealed or visible. Claim must be filed with the carrier.
Damages resulting from improper wiring or installation.
Damages caused by acts of nature, or resulting from improper consumer procedures such as:
Improper Maintenance,
Misuse, abuse, abnormal use, or accident, or
Incorrect electrical voltage or current.
Removal or alteratation made on the FANTECH label control number or date of manufacture.
Any other warranty, expressed, written or implied, and to any consequential or incidental damages,
loss of property, revenues, or profit, or costs of removal, installation or reinstallation, for any
breach of warranty.
WARRANTY VALIDATION:
The end user must keep a copy of the Bill of Sale to verify purchase date.
Wiring Diagrams
DBF110 Wiring - Fan and Pressure Switch
FR110 Wiring - Fan Only - Refernce
for Troubleshooting Step 8.c.


