background image

6

Low Voltage Control Systems

* Please see instruction manuals for individual controls for proper wiring and set up of control systems.
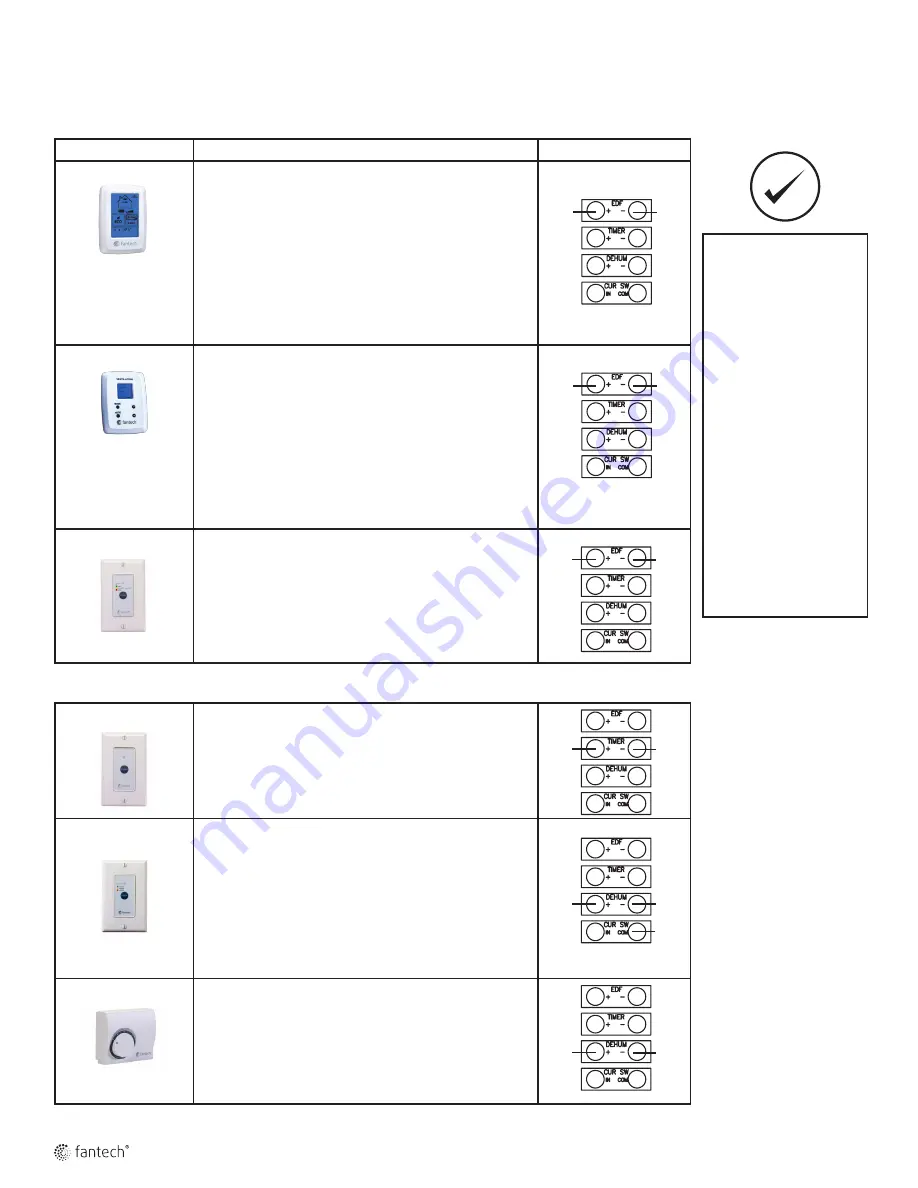
CENTRAL CONTROLS

 – 

These control options can only be used individually

CONTROLS

FEATURES

CONNECT TO

ECO-Touch

•  Our most complete, yet easy to use control system
•  Sleek design with backlight touchscreen LCD
•  ECO mode selects the best operating mode and speed for the 

season, minimizing energy use associated with ventilation

•  Set preferred indoor relative humidity range and ventilation 

mode for day and night conditions

•  No battery to replace, all programmed settings are retained 

during power outage

•  Maintenance reminder indicator
•  Error code messages reduce troubleshooting time

EDF7

•  MODE button provides 3 modes of operations: Ventilation , 

Recirculation and Standby

•  User selected fan speed: Low, Medium, Normal and 20 

minutes per hour

•  AUTO setting allows the homeowner to deactivate the 

dehumidistat

•  When the humidity exceeds the desired setpoint, the venti-

lation system operates at Normal speed.

•  Once the desired humidity level is achieved, your ventilation 

system resumes to its previous mode of operation

EDF1

•  Press button once for continuous LOW speed
•  Press button twice and the unit will cycle 20 minutes ON/ 

40 minutes OFF and repeat

•  Press button a third time and the system will run continu-

ously on HIGH speed  

AUXILIARY CONTROL – These controls can be paired

RTS2*

•  20- minute timer with LED light
•  Boosts system to high speed with the touch of a button
•  Up to 5 can be used in one system
•  Use in bathroom, kitchen, laundry room

RTS3

• Press button once and unit will operate in continuous mode 

on HIGH speed for 20 minutes (Green).

• Press button a second time and unit will operate in continu-

ous mode on HIGH speed for 40 minutes (Yellow).

• Press button a third time and unit will operate in continuous 

mode on HIGH speed for 60 minutes (Red).

• Press button a fourth time to cancel the timer (LED turns 

off).

MDEH1

•  Rotary dial Dehumidistat
•  Multiple units can be used
•  We recommend setting the relative humidity above 80% 

during the summer

To avoid window condensation:  
•   It is not necessary to change 

the humidity control every 
day. Monitor the average 
weekly temperature or 
experiment with various 
settings until you find a level 
that is comfortable for you. 
Adjust the control when 
needed.

• 

   A dehumidistat is ideal for 

use in energy efficient 
houses where indoor 
humidity (during the 
heating season) is higher 
than outdoor levels. High 
humidity is a major cause 
of structure damage and 
IAQ problems such as mold 
and mildew.

*Maintain polarity
between  control
and HRV

(+  

 + ; -  

 -)

EDF

EDF

EDF

EDF

EDF

EDF

+T

-T

D

D

D

D

COM

Summary of Contents for VHR Series

Page 1: ...d without notice any or all of its products features designs components and specifications to maintain their technological leadership position Please visit our website www fantech net for more detaile...

Page 2: ...Heat Recovery Ventilator Remote Controls Remote Controls Recirculation VHR 2004 SHR 2005 R CFM Ports CFM Ports Recirculation Table of content INTRODUCTION What are HRVs 3 How do they work 3 Port conf...

Page 3: ...unit is in standby Four Port Models provide constant ventilation even in defrost mode without the need for additional parts An exhaust only fan shut down defrost strategy is an effective method at an...

Page 4: ...h HRVs are designed to run continously or intermittently giving the homeowner complete control over their air quality Continuous low speed ventilation is recommended which will help eliminate carbon d...

Page 5: ...he presetspeed The exhaust fan will also slow down to the preset speed and the unit will operate in the run cycle for 25 minutes This fan shutdown defrost cycle continues until the supply air stream r...

Page 6: ...the unit will cycle 20 minutes ON 40 minutes OFF and repeat Press button a third time and the system will run continu ously on HIGH speed AUXILIARY CONTROL These controls can be paired RTS2 20 minute...

Page 7: ...the core guide into the bottom channel approximately 1 4 6mm b Mount the left or right side flange of the core guide approximately 1 4 6mm followed by the other side c Mount the top flange of the core...

Page 8: ...power supply at site Have electrician check supply voltage Ductwork is restricting airflow Check duct installation Improper speed control setting Increase the speed of the HRV i e change unit control...

Page 9: ...al damages incurred in the use of the ventilation system Fantech is not responsible for providing an authorized service centre near the purchaser or in the general area Fantech reserves the right to s...

Page 10: ...10 Notes...

Page 11: ...t moment et sans pr avis les caract ristiques la conception les composants et les sp cifications de ses produits afin de conserver sa position de leader de technologie S il vous pla t visitez notre si...

Page 12: ...haleur Ventilateur r cup rateur de chaleur Remote Controls Remote Controls Commande distance Commance distance Recirculation VHR 2004 SHR 2005 R PCM BOUCHES PCM Bouche Recirculation Table des mati res...

Page 13: ...d les 4 ports fournissent une ventilation constante m me s ils sont en mode de d givrage sans toutefois n cessiter des pi ces suppl mentaires La strat gie de d givrage en chappement seul blocage du ve...

Page 14: ...e contr ler enti rement la qualit de l air de son environnement Une ventilation continue basse vitesse est recommand e celle ci facilite l limination du gaz carbonique des contaminants organiques vola...

Page 15: ...cuation ralentit pour atteindre la vitesse pr r gl e et l appareil fonctionne en mode continu pendant 25 minutes Ce cycle de d givrage avec arr t du ventilateur se poursuit jusqu ce que la temp rature...

Page 16: ...N 40 minutes OFF et r p ter EDF1 Appuyez le bouton une troisi me fois et le syst me fonctionnera en haute vitesse continuellement EDF1R Appuyez le bouton une troisi me fois et le syst me fonctionnera...

Page 17: ...te glisser la bride gauche ou droite du guide du noyau sur une distance d environ 6 mm 1 4 po puis faites glisser la bride de l autre c t c Faites glisser la bride sup rieure du guide du noyau dans la...

Page 18: ...acit du VRC V rifiez le r seau de conduits Mauvais r glage de la commande de vitesse Augmentez la vitesse du VRC i e changez la vitesse de l appareil de vitesse R DUITE vitesse NORMALE avec le contr l...

Page 19: ...nu de respecter tous les codes en vigueur dans sa r gion Les pi ces y compris les pi ces de rechange pos es ult rieurement sont garanties pendant 5 ans partie de la date d achat de l appareil Les mote...

Page 20: ...make technical changes For updated documentation please refer to www fantech net Fantech Fantech se r serve le droit de faire des changements tech niques Pour de la documentation jour s il vous pla t...

Reviews: