background image

34

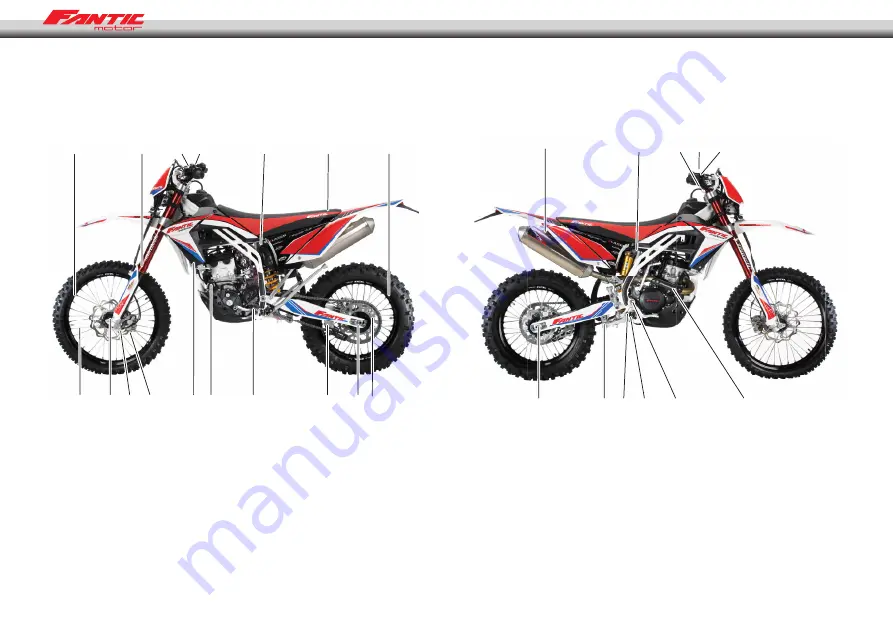
BOLTS AND NUTS TIGHTENING

Every day before riding, check the tighteness of the bolts and nuts described here. Also check that all other fasteners are in place and in good condition.

1

7

9

1

2

5

6

3 4

11 10

12 13

14

15

16 8

18

20

17

19

22 21 23

24 25 26

27

1  - Front and rear wheels
2  - Front forks
3  - Handle bars
4  - Clutch lever support bolt
5  - Air filter housing bolts
6  - Seat support bolts
7  - Spokes
8  - Disk plate screws

9  - Front axle bolt
10  - Brake attachment bolt
11  - Sub chassis support bolt
12  - Radiator support bolts
13  - Nuts and bolts of the engine 
 

   mounting

14  - Shift pedal bolts
15  - Chain guide bolts

16  -   Chain adjust bolt 

17  -   Rear axle bolt 
18  -   Silencer support bolts 
19  -   Rear shock bolts 
20  -   Exhaust flange bolt 
21  -   Upper suspension plate bolts 
22  -   Steering head nut 
23  -   Brake lever support bolt 

24  -  Rod support bolt  

25  -  Rear brake pedal bolt 
26  -  Rod support bolt Rocker 
27  -   Rocker arm bolt 

Summary of Contents for TF 250 2012

Page 1: ......

Page 2: ...ly avoid the contact with body parts clothes inflammable materials WARNING If necessary consult a FANTIC MOTOR dealer The technical information and specifications for maintenance contained in this han...

Page 3: ...any copying or printing errors in this handbook GENERAL CONTENTS AND CONSULTATION All the specifications and helpful instructions for normal use and maintenance of the vehicle are given in the handboo...

Page 4: ...ing symbol identifies special instructions or procedures which if not correctly followed could result in personal injury or even death CAUTION This symbol identifies instructions or procedures which i...

Page 5: ...Maintenance Schedule 15 Battery 16 Cooling System 17 Spark Plug 19 Air Cleaner 21 Throttle Cable 22 Clutch 23 Exhaust System 23 Drive Chain Guide 24 Handlebar 26 Brakes 26 Steering 28 Steering blocka...

Page 6: ...reduction 3 353 57 17 Final reduction 3 846 50 13 Overall drive ratio 11 5 5 gear Transmission oil Capacity 1 300 c c Type SAE 5W40 API SG CHASSIS Type Cromoly steel frame Tire size Front 90 90 x 21 1...

Page 7: ...c diameter Front 260 mm Rear 220 mm DIMENSIONS Overall height 1260 mm Overall length 2260 mm Overall width 825 mm Minimum height 340 mm Wheelbase 1465 mm Fuel tank capacity 7 litres Specifications sub...

Page 8: ...8 LOCATION OF COMPONENTS 1 4 5 6 2 3 1 Clutch handle 2 Engine start button 3 Fuel tank cap 4 Front brake fluid tank 5 Front brake handle 6 Throttle control...

Page 9: ...brake disk 8 10 12 14 9 24 16 11 19 18 17 13 20 21 15 22 22 7 14 Front brake callipers 15 Rear brake fluid tank 16 Shift pedal 17 Rear shock absorber 18 Chain guide 19 Chain 20 Silencer 21 Rear shock...

Page 10: ...side stand to its original position A B A Side stand B Double spring NOTE Do not start the engine or ride the motorcycle when the side stand is down FUEL The Fantic MotorTF250 has a four stroke engine...

Page 11: ...and can be explosive under certain condi tions Always stop the engine and do not smoke Make sure the area is well ventilated and free from any source of flame or sparks this includes any appliance wi...

Page 12: ...turn on the electrical circuit so that the motor may be started A 3 Without using the throttle press the electric start button B B STOPPING THE ENGINE 1 Shift the transmission into neutral 2 After acc...

Page 13: ...ansmission to jump out of gear and cause engine damage A A Gearshift pedal COLD STARTING To do the cold start pull the starter There is no need to use the throttle simply start the engine Note that th...

Page 14: ...1 Start the engine and let it run at idle until the engine is warm 2 Stop and let the engine cool completely 3 Start the engine and ride for 10 minutes at moderate speed NEVER ACCE LERATE HARD 4 Stop...

Page 15: ...il pipes I I I Coolant I I Revise every 2 years Radiator hoses I I I Clutch I I I Chain Clean lubricate and inspect each time the motorcycle has run Brakes I I I Brake lines I I I Revise every 4 years...

Page 16: ...d following the in structions in paragraph 3 If the battery voltage is above 12 60 V the battery can be installed on the vehicle without having to recharge it 3 1 Constant voltage charge mode Constant...

Page 17: ...the co olant is essential If rust inhibitors were not used over a period of time the radiator will be corroded This will clog the tubes of the cooling system CAUTION Use of incorrect coolant solutions...

Page 18: ...eck the coolant level The coolant level should be just at a level below de cap rubber seal If the coolant level is low add the correct amount of coolant through the filler opening Total quantity Mix a...

Page 19: ...lug must be cleaned using a wire brush or a similar tool Measure the gap with a feeler gauge if incorrect adjust the gap by bending the side electrode If the spark plug electrodes are corroded or dama...

Page 20: ...move the fuel tub G WARNING Becareful to the fuel loss when you remove the fuel tub the fuel is highly flammable Stop the engine before to remove the fuel tank Take care to be inside a well ventilated...

Page 21: ...ust to enter the engine causing excessive wear and tear and other damages Do not omit checking the element before and after each race or practice session Clean it if necessary Element Cleaning WARNING...

Page 22: ...t is correctly secured THROTLE CABLE Check that the throttle grip turns smoothly Check that the throttle grip has 2 3 mm of free play If the free play is incorrect loosen the locknut on the upper end...

Page 23: ...h register EXHAUST SYSTEM The exhaust and the silencer reduce noise and carry the gasses away from the driver If the exhaust is damaged rusted dented or split then change it Change the silencer packin...

Page 24: ...too little slack 30 50 mm NOTE In muddy or humid conditions the mud gets inside the chain increasing ten sion and may cause the chain to break To prevent this adjust the chain to 30 50 mm of space be...

Page 25: ...en a part ir worn replace it with a genuine part for maximum resi stance and safety To minimize any chance of the master link coming apart the master link clip must be installed with the closed end of...

Page 26: ...the bolts front first and then the rear to 25 Nm of torque If the handlebar is installed correctly there will be an even gap at the front and rear after tightening A BRAKES Disc and disc pad wear is a...

Page 27: ...e may be defective Since it is dangerous to operate the motorcycle under such conditions have the brake checked inmediately Brake fluid Inspect the brake fluid level and change it periodically The bra...

Page 28: ...sis and lift the motorcycle off the ground Move the handlebar lightly to either side if the handlebar continues moving under its own momentum the steering is not too tight Squatting in front of the mo...

Page 29: ...ng air pressure because the suspension has been designed to work without air pressure Rebound and compression dampening adjustment turn the adju sting screws clockwise to increase damping turn it coun...

Page 30: ...d rebound action quicker Softer springs make the fork softer and rebound action slower Preload turn adjusting screw C counterclockwise as far as it will go Standard adjusting MARZOCCHI turn counter cl...

Page 31: ...standard mea surement would be 24 clicks from the completely closed position A B B Compression adjustment Spring adjustment Remove the seat and side covers Loosen the air cleaner duct clamp screw Rem...

Page 32: ...old before riding Road conditions When the road is wet muddy sandy or slippery reduce the tire pressure On gravel roads or hard terrain increase the tire pressure Spokes and wheel rims The spokes on b...

Page 33: ...Disc brake master cylinders and callipers under the fuel tank If water gets into the ignition coil or into the spark plug cap the spark will jump through the water and be grounded out the affected pa...

Page 34: ...5 Air filter housing bolts 6 Seat support bolts 7 Spokes 8 Disk plate screws 9 Front axle bolt 10 Brake attachment bolt 11 Sub chassis support bolt 12 Radiator support bolts 13 Nuts and bolts of the e...

Page 35: ...10 Engine mounting bolts 36 Front axle bolt 51 Front brake lever support bolt 6 Fork flange bolt 15 Steering nut 98 Rear axle nut 98 Rear brake pedal bolt 9 Sub frame support bolt 26 Rear shock absorb...

Page 36: ...rainy conditions and especially after using high water pressure Before lubricating each part remove any rusty spots with rust remover and wipe off any grease oil or dirt General lubrication Clutch lev...

Page 37: ...m portant operations to keep the engine in perfect shape After 5 hours of running of a new bike remove and change the oiland the oil filter After that you must change the oil every 10 hours or 500 kms...

Page 38: ...w provoking a malfunction in the engine 4 During the oil filter change check the o rings and change it if you find a problem crack C 5 Replace the filter cover and put the screws that secure the cover...

Page 39: ...lity and terrain conditions additional influences include the rider s style and position on the motorcycle If you have a problem test by changing your riding posture or position so it can be deduced A...

Page 40: ...oke High Level standard level oil Low level Force Troubleshooting Improper Settings Listed below are some symptoms of improper suspension settings and the most likely means of correcting them The prop...

Page 41: ...mm This increases agility Fast course with many jumps Raise the fornt end slightly Lower the fork tubes 5 mm Deep potholes or sandy ground Raise the front end slightly to gain stability After making s...

Page 42: ...he shock absorber spring preload 3 Decrease the compression damping Does the suspension jounce stops at front and rear of the motorcycle in high speed jumps If this occurs 1 or 2 times in the same lap...

Page 43: ...ar brake pedal operation 25 Seat inspection 26 Wheel spokes tightness 27 Front and rear tire air pressure 28 Drive chain slack 29 Coolant level 2 After 1 day of racing competition 1 Clean the air clea...

Page 44: ...nted metal surfaces with a coat of oil to prevent rust do not apply oil to the brakes and rubber parts Cover the exhaust pipe with a plastic bag to prevent corrosion Place the motorcycle in such a pos...

Page 45: ...ime The odometer and the control for the total time with motor running save the data to the memory even when the device is switched off When the multifunction apparatus is not activated it displays a...

Page 46: ...TER ODO 0 0 999999 1 0 1 OPERATION TIME RT 0 999 ore 59 minutes 1 minute 0 1 OPERATION TIME ACCUMULATED ART 0 9999 ore 59 minutes 1 minute 0 1 CLOCK 00 00 00 12 59 59 o 23 59 59 0 1 BATTERY LOW LO App...

Page 47: ...even when the device is not running 12 24 hour clock It shows the time in either 12 or 24 hour formats Ambient temperature engine temperature gauge The ambient temperature is displayed on the upper l...

Page 48: ...igit press button 3 Confirm by pressing button 2 Selecting the temperature unit To change the temperature display between C and F press button 1 Confirm by pressing button 2 Selecting the danger tempe...

Page 49: ...unctions can be reset simulta neously Maximum speed Distance Chronometer Maximum temperature Maximum rpm Confirm the reset by pressing buttons 1 and 2 simultaneously Total reset of the display Press t...

Page 50: ...is pressed If the lighting is connected to the 12V system on the vehicle it will be brighter and stay on for up to 20 minutes after the vehicle has come to a full halt Sleep Mode If the multifunction...

Page 51: ...it and reassemble it cor rectly remove the old fuel and change it the engine would start imediately Dry the spark plug or change it If the engine is drowned you can press the hot starter and on the sa...

Page 52: ...ncorrect or poor gasoline or wrong octane rating Incorrect or non specified spark plug Exhaust system joints deteriorated Clean the combustion chamber Go to a specialist workshop Drain the petrol and...

Page 53: ...y adjusted Eliminate the excess oil to an adequate level Empty the fork oil and fill with oil of the recommended viscosity Change front fork Go to a specialist workshop Verify tyre pressure Adjust the...

Page 54: ...heel misaligned Change the chassis Go to a specialist workshop Adjust the steering Go to a specialist workshop Change steering shaft Go to a specialist workshop Change front fork Align the wheels 22 T...

Page 55: ...carburator TPS tail light license plate light intermittence pickup tachometer rear bake light start relay regulator rectifier regulator rectifier key commutator parking light dashboard left commutator...

Page 56: ...isted at the moment of delivery During the first six months subsequent to the delivery of the repaired vehicle the seller will be responsible for any unwarranted faults arising out of the repair Any d...

Page 57: ...surfaces Various 1 FM shall have the prerogative to decide at its own discretion whether to repair or replace defective parts Where parts are replaced ownership of the parts removed shall pass to FM...

Page 58: ...VICE AND ANOTHER Engine oil level Coolant level Brake fluid level Mixer oil level Correct operation of all lights Tyre pressure and condition cold AFTERE SALES SERVICE NUMBER SERVICE MONTH VIN CHASSIS...

Page 59: ...IONAL SILIKON Tires Treater TUTELA PROFESSIONAL RINNOVA GOMME APPLICATIONS ORIGINAL PRODUCTS Multipurpose Grease TUTELA PROFESSIONAL TP 1 Bike Cleaner TUTELA PROFESSIONAL MOTO SPEED CLEANER Engine Cle...

Page 60: ......

Reviews: