background image

17

2 mm.

4

3

5

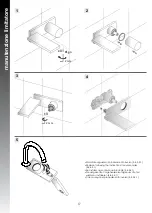
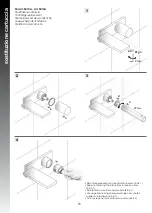
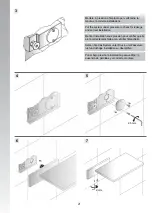
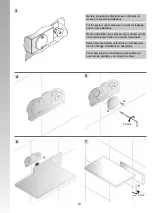
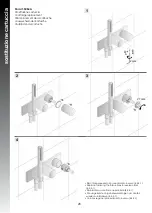
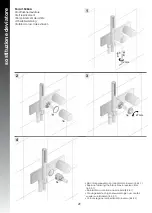
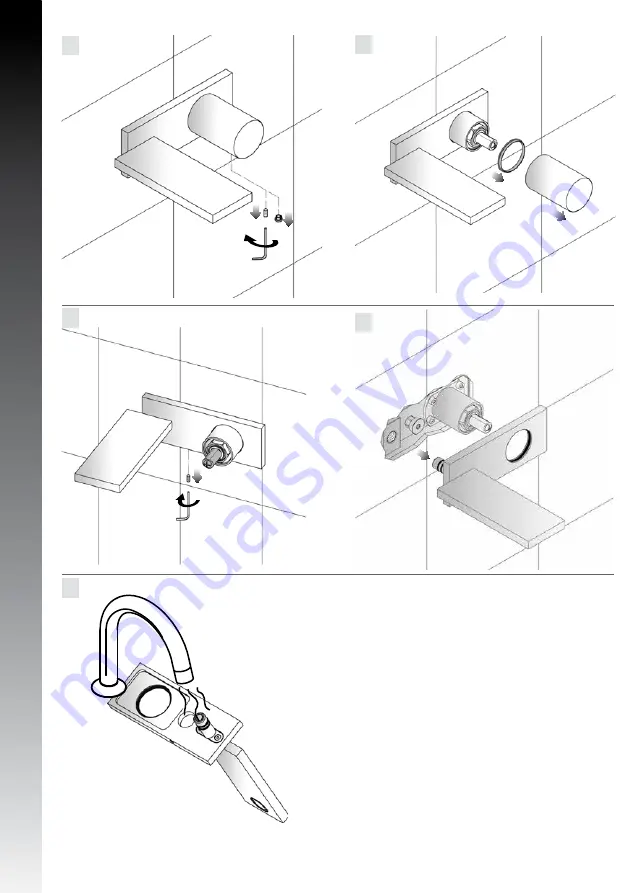
•Rimontare seguendo il procedimento inverso (5-4-3-2-1)

•Replace following the instructions in reverse order 

  (5-4-3-2-1)

•Re-installer au contraire du procédé (5-4-3-2-1)

•Die umgekehrte Vorgehensweise folgen um die Teil 

  wieder zu installieren (5-4-3-2-1)

•Colocar según el procedimiento inverso (5-4-3-2-1)

1

2 mm.

B

A

B

B

A

2

manutenzione limitatore

Summary of Contents for Milano 5003F

Page 1: ... Art 5003WF Art 5004F Art 5004WF Art 5006F Art 5006WF Art 5008F Art 5010B 5013B Art 5041A 5041B Art 5084B Art 5041A 5042B Istruzioni Instructions Instructions de montage Bedienungsanleitung Instrucciones milano ...

Page 2: ... il conseguente scoppio del flessibile Prolonged contact with any substance even scarcely aggressive can cause external braid damage and subsequent flexible burst Avvitare i raccordi con tenuta O R a mano Coppia massima di ser raggio 3 Nm Hand tighten O ring seal connec tors Max torque 3 Nm Avvitare i raccordi con tenuta a guarnizione dadi a mano più 1 4 di giro con chiave appro priata Hand tighte...

Page 3: ...t 5006WF Miscelatore monocomando lavabo con scarico a pressione con maniglia Single lever washbasin mixer with push plug waste with handle Mitigeur lavabo à vidange avec manette Einhebelwaschtischmischer mit Druckablaufgarnitur mit Griff Mezclador con manija monocomando para lavatorio con desague 1 1 A B min 32 mm max 33 mm Si consiglia l utilizzo di rubinetti filtro It is advised to use taps with...

Page 4: ...4 5 6 4 3 A B C 13 mm 2 A B C 11 mm ...

Page 5: ...5 OFF CALDA HOT CHAUD WARM CALIENTE MIX FREDDA COLD FROID KALT FRIA 5003F 5003WF 5004F 5004WF 5006F 5006WF 5010B 5013B regolazioni ...

Page 6: ... inverso 2 1 Replace following the instructions in reverse order 2 1 Re installer au contraire du procédé 2 1 Die umgekehrte Vorgehensweise folgen um die Teil wieder zu installieren 2 1 Colocar según el procedimiento inverso 2 1 manutenzione ...

Page 7: ...so 6 5 4 3 2 1 Replace following the instructions in reverse order 6 5 4 3 2 1 Re installer au contraire du procédé 6 5 4 3 2 1 Die umgekehrte Vorgehensweise folgen um die Teil wieder zu installieren 6 5 4 3 2 1 Colocar según el procedimiento inverso 6 5 4 3 2 1 manutenzione limitatori ...

Page 8: ... Einhebelwaschtischmischer mit Druckablaufgarnitur mit Griff Mezclador con manija monocomando para lavatorio con desague 35 mm 1 A B 1 min 32 mm max 33 mm Si consiglia l utilizzo di rubinetti filtro It is advised to use taps with filters On conseille l utilisation de robinets filtres Es wird geraten Hähne mit Filter zu benutzen Se aconseja utilizar llave con filtro installazione ...

Page 9: ...9 5 6 4 3 A B C 13 mm 2 A B C 11 mm ...

Page 10: ...10 OFF CALDA HOT CHAUD WARM CALIENTE MIX FREDDA COLD FROID KALT FRIA regolazioni ...

Page 11: ...1 Replace following the instructions in reverse order 5 4 3 2 1 Re installer au contraire du procédé 5 4 3 2 1 Die umgekehrte Vorgehensweise folgen um die Teil wieder zu installieren 5 4 3 2 1 Colocar según el procedimiento inverso 5 4 3 2 1 6 mm manutenzione limitatori ...

Page 12: ...Sustitucion del cartucho 5 Rimontare seguendo il procedimento inverso 5 4 3 2 1 Replace following the instructions in reverse order 5 4 3 2 1 Re installer au contraire du procédé 5 4 3 2 1 Die umgekehrte Vorgehensweise folgen um die Teil wieder zu installieren 5 4 3 2 1 Colocar según el procedimiento inverso 5 4 3 2 1 A B A B 27 mm 2 mm 3 sostituzione cartuccia ...

Page 13: ...ver washbasin mixer Partier externes mitigeur lavabo à encastrer Externe Stüke Up Einhebelwashtisch und Brausemlscher Pedazos externos monomando lavabo empotrado installazione 50 G1 2 G1 2 81 61 5 77 60 160 20 46 160 143 104 5 51 35 5 50 G1 2 G1 2 81 61 5 77 60 160 20 46 210 193 104 5 51 35 5 Art 5010 Art 5013 ...

Page 14: ...14 1 2 3 2 mm 4 A B 5 2 mm A B ...

Page 15: ...15 1 OFF CALDA HOT CHAUD WARM CALIENTE MIX FREDDA COLD FROID KALT FRIA regolazioni ...

Page 16: ...o inverso 2 1 Replace following the instructions in reverse order 2 1 Re installer au contraire du procédé 2 1 Die umgekehrte Vorgehensweise folgen um die Teil wieder zu installieren 2 1 Colocar según el procedimiento inverso 2 1 manutenzione ...

Page 17: ... following the instructions in reverse order 5 4 3 2 1 Re installer au contraire du procédé 5 4 3 2 1 Die umgekehrte Vorgehensweise folgen um die Teil wieder zu installieren 5 4 3 2 1 Colocar según el procedimiento inverso 5 4 3 2 1 1 2 mm B A B B A 2 manutenzione limitatore ...

Page 18: ...l cartucho 3 Rimontare seguendo il procedimento inverso 4 3 2 1 Replace following the instructions in reverse order 4 3 2 1 Re installer au contraire du procédé 4 3 2 1 Die umgekehrte Vorgehensweise folgen um die Teil wieder zu installieren 4 3 2 1 Colocar según el procedimiento inverso 4 3 2 1 1 2 mm B A B A A B 27 mm 4 sostituzione cartuccia ...

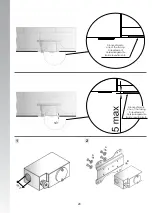
Page 19: ...RE IL CORPO INCASSO OLTRE IL FILO DEL RIVESTIMENTO ESTERNO WARNING THE BUILT IN BODY CANNOT BE POSITIONED BEYOND THE LINE OF THE EXTERNAL FACING ATTENTION IL EST INTERDIT PLACER CORPS A ENCASTRER AU DELA DU FIL DU REVETEMENT EXTERNE ACHTUNG DAS EINBAUGEHAUSE DARF NICHT AUBERHALB DER AUR ENVERKLEIDUNG POSITIONERT WERDEN ATTENCION NO RESULTA POSIBLE POSICIONAR IL CUERPO EMPOTRADO MAS ALLA DEL BORDE ...

Page 20: ...20 1 2 A A B G 1 2 Filo rivestimento Line of the facing Fil revetement Verkleidungskante Borde revestimiento Filo rivestimento Line of the facing Fil revetement Verkleidungskante Borde revestimiento ...

Page 21: ... check for leakage and correct installation Mettre l installation sous pression pour vérifier qu elle a été correctement faite et en vérifier l étanchéité Setzen Sie das System unter Druck um Wasserver lust und richtige Installation zu überprüfen Poner bajo presiòn la instalaciòn para verificar la ausencia de pèrdidas y el correcto montaje 3 ...

Page 22: ...ARE IL CORPO INCASSO OLTRE IL FILO DEL RIVESTIMENTO ESTERNO WARNING THE BUILT IN BODY CANNOT BE POSITIONED BEYOND THE LINE OF THE EXTERNAL FACING ATTENTION IL EST INTERDIT PLACER CORPS A ENCASTRER AU DELA DU FIL DU REVETEMENT EXTERNE ACHTUNG DAS EINBAUGEHAUSE DARF NICHT AUBERHALB DER AUR ENVERKLEIDUNG POSITIONERT WERDEN ATTENCION NO RESULTA POSIBLE POSICIONAR IL CUERPO EMPOTRADO MAS ALLA DEL BORDE...

Page 23: ...23 1 2 A A B G 1 2 Filo rivestimento Line of the facing Fil revetement Verkleidungskante Borde revestimiento Filo rivestimento Line of the facing Fil revetement Verkleidungskante Borde revestimiento ...

Page 24: ... check for leakage and correct installation Mettre l installation sous pression pour vérifier qu elle a été correctement faite et en vérifier l étanchéité Setzen Sie das System unter Druck um Wasserver lust und richtige Installation zu überprüfen Poner bajo presiòn la instalaciòn para verificar la ausencia de pèrdidas y el correcto montaje 3 ...

Page 25: ...al pieces built in single lever bathtub shower mixer Partier externes mitigeur bain douche douche à encastrer Externe Stüke Up Einhebelwannen und Brausemlscher Pedazos externos monomando baño ducha ducha empotrado 1 2 A 12 mm B installazione 50 G1 2 G1 2 250 85 77 5 48 5 60 81 74 90 ...

Page 26: ...26 5 2 A 1 B 2 mm 2 mm C C D D 3 C A 4 F G B 2 mm D E ...

Page 27: ...27 1 CALDA HOT CHAUD WARM CALIENTE MIX FREDDA COLD FROID KALT FRIA OFF regolazioni ...

Page 28: ...el cartucho 3 Rimontare seguendo il procedimento inverso 4 3 2 1 Replace following the instructions in reverse order 4 3 2 1 Re installer au contraire du procédé 4 3 2 1 Die umgekehrte Vorgehensweise folgen um die Teil wieder zu installieren 4 3 2 1 Colocar según el procedimiento inverso 4 3 2 1 27 mm 4 A B 2 mm sostituzione cartuccia ...

Page 29: ...ler au contraire du procédé 4 3 2 1 Die umgekehrte Vorgehensweise folgen um die Teil wieder zu installieren 4 3 2 1 Colocar según el procedimiento inverso 4 3 2 1 27 mm 4 B 2 mm A Per Art 5084A Sostituzione deviatore Bolt replacement Remplacement de la tête Oberteilsersetzung Sustitucion rosca de extrusion sostituzione deviatore ...

Page 30: ...T PRESSURE DIFFERENCE HOT COLD 1 5 BAR Operating instructions These mixers can be used with cumulos boilers or instantaneous water heaters Warning The supplying pipes must be carefully cleaned before installation Remember that the hot water supply must ALWAYS be connected to the tube on the LEFT Datos Técnicos PRESSION MÍNIMA 1 BAR PRESSION MÁXIMA 10 BAR PRESSION DE TRABAJO ACONSEJADA 2 5 BAR TEMP...

Page 31: ... may permanen tly ruin the surface of the products and in such case FANTINI S p A may not be held liable for damage The Manufacturer reserves the right to modify product and accessories at any time without prior notice Datas products and sketches included in this document are just for information and do not bind the producer CONSEJOS PARA EL CUIDADO DEL PRODUCTO La limpieza de las superficies se h...

Page 32: ...onarroti 4 Telefono 39 0322 918411 r a Telefax 39 0322 969530 e mail fantini fantini it www fantini it Australian Standard Installation Products shall be installed in accordance with AS NZS 3500 series of standards Installer shall ensure that the flow controlled aerator is tightened to prevent removal by hand ...

Reviews: