30
75036155 - KJ46 - rev 00 - ( 06-2022 )
KJ 46
GB
F
I
f10
f11
f12-1
f12-2
f12-3
90°
P
D
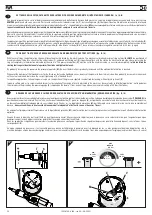
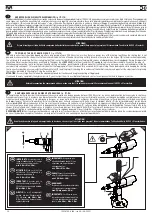
POSA IN OPERA DELL’INSERTO
(fig.
f10-f11-f12
)
Predisporre la rivettatrice per l'utilizzo tramite settaggio della potenza oppure la regolazione meccanica della corsa (Come riportato a
pag. 24÷29
). Inserire l’inserto sul
tirante (
A
) ed esercitare su di esso una leggera pressione come indicato in(fig.
f1O
), in questo modo l’inserto si avvita automaticamente sul tirante filettato. Assicurarsi che
la testa dell’inserto vada in battuta con la testina (
B
) verificando che il tirante (
A
) fuoriesca di
2 mm
dall’inserto (Come riportato a
pag. 20
).
E' possibile ora procedere alla messa in posa dell' inserto, premendo il pulsante (
D
) (fig.
f11
) fino al completo serraggio dell' inserto, per effettuare lo svitamenti del tirante
premere il pulsante (
P
) (fig.
f11
).
Deformazione insufficiente
(fig.
f12-1
)
=
l’inserto potrebbe ruotare all’interno dell’alloggiamento pregiudicandone l’utilizzo e la resistenza.
Deformazione eccessiva
(fig.
f12-3
)
=
possibili danneggiamenti dell’inserto e tirante (
A
) con probabili rotture di entrambi i componenti.
ANOMALIE DI FUNZIONAMENTO
In tutti i casi in cui si verificano condizioni per le quali sia necessario ottenere uno svitamento forzato del tirante filettato dall'inserto, premere il pulsante (
P
)
(fig.
f11
)
.
PLACING OF THE INSERT
(fig.
f10-f11-f12
)
Prepare the riveting tool for use by setting the power or mechanical stroke adjustment (as shown on
page 24÷29
).
Introduce the insert on the tie rod (
A
) and push slightly on it as indicated in (fig.
f1O
), so as to make it clamp automatically on the threaded tie rod. Make sure that the insert
head touches the head (
B
) checking that the tie rod (
A
) comes out of 2mm from the insert(follow the instructions of
page 20
).
Place the insert pushing the button (
D
) (fig.
f11
) until the insert is completely pulled, and push the button (
P
) to release the tie rod ((fig.
f11
).
Insufficient deformation
(fig.
f12-1
)
=
the insert could rotate inside the housing compromising its use and resistance.
Excessive deformation
(fig.
f12-3
)
=
possible damages of the insert and tie rod (
A
) with eventual breaks of both components.
WORKING PROBLEMS
Any time it is necessary to unscrew forcedly the threaded tie rod from the insert, push the button (
P
)
(fig.
f11
)
.
POSE DE L’INSERT
(fig.
f10-f11-f12
)
Préparer la riveteuse pour son utilisation en réglant la puissance ou le réglage mécanique de la course (comme indiqué à la
page 24÷29
). Introduire l’insert sur le tirant (
A
)
et exercer sur celui-ci une légère pression comme indiqué sur la (fig.
f1O
)
de sorte que l’insert se visse automatiquement sur le tirant fileté. S’assurer que la tête de l’insert est en butée
contre la tête (
B
) en s’assurant que le tirant (
A
) dépasse de l’insert de 2 mm(procéder comme indiqué
page 20
).
Procéder à la pose de l’insert, en appuyant sur le bouton (
D
) (fig.
f11
). jusqu’au sertissage complet de l’insert, pour le dégagement du tirant pressez sur le bouton (
P
) (fig.
f11
).
Déformation insuffisante
(fig.
f12-1
)
=
l’insert pourrait tourner à l’intérieur du logement et compromettre le fonctionnement et la résistance.
Déformation excessive
(fig.
f12-3
=
possibles dommages de l’insert et du tirant (
A
) et probable rupture des deux composants.
ANOMALIES DE FONCTIONNEMENT
Lorsqu’il est nécessaire d’obtenir un dévissage forcé du tirant fileté de l’insert, il faut appuyer sur le bouton (
P
)
(fig.
f11
)
.
B
A
ATTENZIONE!
Eseguire questa operazione trattenendo saldamente la rivettatrice in modo da impedirle eventuali bruschi movimenti che potrebbero danneggiare persone o cose.
ATTENTION!
Carry out this operation keeping the riveting tool firmly in order to avoid sharp movements which could damage people or things.
ATTENTION!
Effectuer cette opération en tenant fermement la riveteuse de façon à éviter les mouvements brusques susceptibles de provoquer des dommages physiques et matériels.
Summary of Contents for KJ 46
Page 44: ...44 75036155 KJ46 rev 00 06 2022 KJ 46 RUS...
Page 67: ......

