background image

16

OPERATION

•  When the program ends, the appliance beeps 10 times and switches to the keep 

warm function, which lasts 1 hour.

•  Press the START/PAUSE Button until the appliance is switched off, and then 

remove the Plug from the wall outlet.

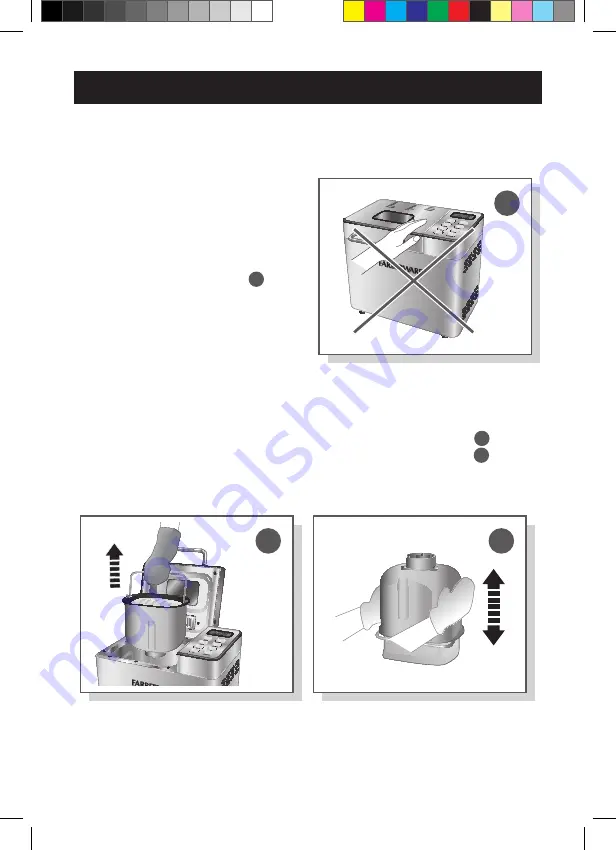
Danger of burns!


-

Always pay special attention when 

placing or removing accessories and 

food from the appliance. Never place 

your bare hand inside the appliance, 

use it to remove accessories or touch 

the Housing or Lid (ill. 

i

) when 

the appliance is plugged in and 

switched on. Always use oven mitts 

when inserting or removing items 

from the appliance.


-

Escaping steam can burn.

i


-

Never place the Bread Pan on a table or counter top to avoid damage to 

surfaces. It is recommended to use a heat resistant trivet or cutting board.

•  Lift the Lid open.

•  Use the Bread Pan Handle to lift the Bread Pan out of the Housing (ill. 

j

).

•  Carefully shake the Bread Pan upside down to demold the bread (ill. 

k

). Use the 

Paddle Removal Tool to remove the Kneading Paddle from the loaf of bread.

•  Let cool down for 20 minutes before slicing with a bread knife.

j

k

IM_Bread Maker_IM_US_V5_210507.indd   16

5/7/21   11:38 AM

Summary of Contents for 4897074552841

Page 1: ...MAKER Model Number FW61100043213 UPC 4897074552841 Customer Assistance 1 855 451 2897 US Please consider the option to recycle the packaging material IM_Bread Maker_IM_US_V5_210507 indd 1 5 7 21 11 3...

Page 2: ...on repair or adjustment The use of accessory attachments not recommended by the appliance manufacturer may result in fire electric shock or injuries to persons Do not use outdoors or in a damp area Do...

Page 3: ...f the appliance when in operation Avoid contact with moving or spinning parts Do not operate the appliance without the provided bread pan or with an empty bread pan Never beat the bread pan top or edg...

Page 4: ...as great as the electrical rating of the appliance If the appliance is of the grounded type the extension cord should be a grounding 3 wire cord The longer cord should be arranged so that it does not...

Page 5: ...g Window Drawer Control Panel Air Vents Power Cord With Plug Anti slip Foot x4 Body Bread Pan Kneading Paddle Housing Bread Pan Handle Dispenser Measuring Cup Paddle Removal Tool Measuring Spoon IM_Br...

Page 6: ...ton START PAUSE Button NUT Button TIME Button COLOR Button MENU Button Program Display Loaf Size Display Dispenser Display Crust Browning Level Display Program Step Display Time Delay Display PARTS IM...

Page 7: ...ted This is normal and does not indicate a defect or hazard When using the appliance for the first time it is recommended to operate it for at least 15 minutes on its BAKE setting Using the appliance...

Page 8: ...e bread baked on this setting is usually smaller with a dense texture For light breads made from fine flour Normally the bread is fluffy and has a crispy crust This is not a suitable setting for recip...

Page 9: ...owder For preparing dough for buns pizza crust etc to be baked in a conventional oven No baking in this program For baking only No kneading or rising in this program Can be used to increase the baking...

Page 10: ...n RISE2 Second rise 25 min N A N A 30 min 30 min 5 40 min RISE3 Third rise 40 min 45 min N A 40 min 43 min 0 60 min BAKE 75 min 20 min N A 70 min 70 min 0 90 min Total time 3h 20min 1h 20min 20 min 2h...

Page 11: ...am and set time to achieve doneness When preparing jams and marmalades fruits must be chopped before putting them into the Bread Pan The doughs of gluten free breads are generally wetter and more like...

Page 12: ...it to be trapped by the Lid ill b a b Insert the Kneading Paddle onto the Bread Pan shaft at the bottom of the Bread Pan ill c Applying some nonstick cooking spray or vegetable oil onto the Kneading P...

Page 13: ...d onto the drive shaft Rotate the Bread Pan slightly to engage if required Gently close the Lid ill f When required pull out the Drawer located under the lid at the back of the appliance and remove th...

Page 14: ...cting the bread size Total operation time will vary 1 5lb 2 0lb Applicable to 1 Basic 3 French 5 Whole Wheat 12 Gluten Free COLOR Button Selecting the crust browning level Light Medium Dark Applicable...

Page 15: ...ppliance to start working immediately Select the delay function only after selecting the program loaf size and crust color Do not use the delay function if the recipe includes ingredients which can sp...

Page 16: ...hen the appliance is plugged in and switched on Always use oven mitts when inserting or removing items from the appliance Escaping steam can burn i Never place the Bread Pan on a table or counter top...

Page 17: ...ipes d 1 2 3 The maximum quantity of flour and yeast to be used for a loaf of bread are respectively 4 cups 560g and 3 teaspoons 12g The following table lists some ingredients for common as well as gl...

Page 18: ...th other liquid ingredients Do not use the delay function when the recipe calls for eggs Fats butter or vegetable oil Adds taste texture and moisture to breads It is recommended to use melted or chopp...

Page 19: ...white sugar except if stated otherwise in your recipe Water Water is an essential ingredient for making bread For the best results its temperature should be between 75 F 24 C and 90 F 32 C Water may b...

Page 20: ...poon 5 ml white sugar and 2 teaspoons 10 ml yeast Place the measuring cup in a warm place for 5 to 10 minutes Do not stir Fresh active yeast will begin to bubble up to the 1 cup marking If it does not...

Page 21: ...pe Ensure the yeast does not come into contact with liquids and salt Conversion charts Fluid Ounces fl oz for liquids Cup Tablespoons tbsp Teaspoons tsp 8 1 16 48 7 7 8 14 42 6 3 4 12 36 5 5 8 10 30 4...

Page 22: ...Ultra Fast Loaf size lb 1 5 2 0 N A 1 5 2 0 N A Water 5 fl oz 165 ml 7 fl oz 190 ml 6 fl oz 175 ml 7 fl oz 195 ml 9 fl oz 260 ml 6 fl oz 175 ml Milk powder 2 tsp 9 g 2 tsp 10 g 2 tsp 10 g 2 tsp 10 g...

Page 23: ...tter 3 tbsp oil or 40 g butter 20 g butter 30 g butter 2 tbsp oil or 25 g butter 2 tbsp oil or 30 g butter Sugar 5 tbsp 60 g 6 tbsp 80 g 1 tbsp 20 g 2 tbsp 25 g 3 tbsp 40 g 4 tbsp 50 g Salt tsp 4 g ts...

Page 24: ...p 10 g Sugar 10 tbsp 120 g Vegetable oil 1 tbsp oil or 20 g butter Salt tsp 3 g Flour 2 cups 350 g Baking powder 1 tsp 8 g Low gluten flour 2 cups 300 g Yeast 1 tsp 5 g 10 Jam Water 1 fl oz 50 ml Frui...

Page 25: ...y is reached Doughs prepared and baked at higher altitude tend to rise higher and faster Try reducing the amount of yeast by teaspoon If the bread still rises too high reduce yeast by another teaspoon...

Page 26: ...natively these accessories are dishwasher safe Wipe the appliance Body Housing Control Panel and Lid with a damp cloth Take extra care when cleaning near the heating element in order not to damage it...

Page 27: ...erly installed Press the START PAUSE Button remove the Bread Pan and install the Kneading Paddle properly Reassemble and press the START PAUSE Button to resume operation Kneading Paddle blocked Press...

Page 28: ...bread is too short Not enough sugar yeast added Follow the recipe quantities for the next batch Expired yeast flour Check the yeast flour expiration date Ensure it is fresh and stored in a sealed cont...

Page 29: ...Avoid opening the Lid often for next batches Crust browning level too low Select a higher setting level The crust color is too dark Too much sugar added Decrease the sugar amount for the next batch Cr...

Page 30: ...ddle and clean both Kneading Paddle and Bread Pan For the next batch apply some nonstick cooking spray or vegetable oil onto the Kneading Paddle before assembly The appliance does not heat up Wrong pr...

Page 31: ...its smoke Residues from the production process are eliminated during first use Operate the appliance for at least 15 minutes on its BAKE setting with the Lid open with no food until no odor or smoke i...

Page 32: ...TART PAUSE Button open the Lid and let the appliance warm up for 20 minutes EEr Disconnected temperature sensor Disconnect the appliance from the wall outlet and contact qualified personnel to check a...

Page 33: ...tion glass parts glass containers cutter strainer blades seals gaskets clutches motor brushes and or agitators etc Commercial use or any other use not found in printed directions Damage from misuse ab...

Reviews: