Maintenance - 1370, 1385, 1395, 13114 Backsaver Auger
57
ELECTRIC HOPPER REMOTE
OPERATION
Operation
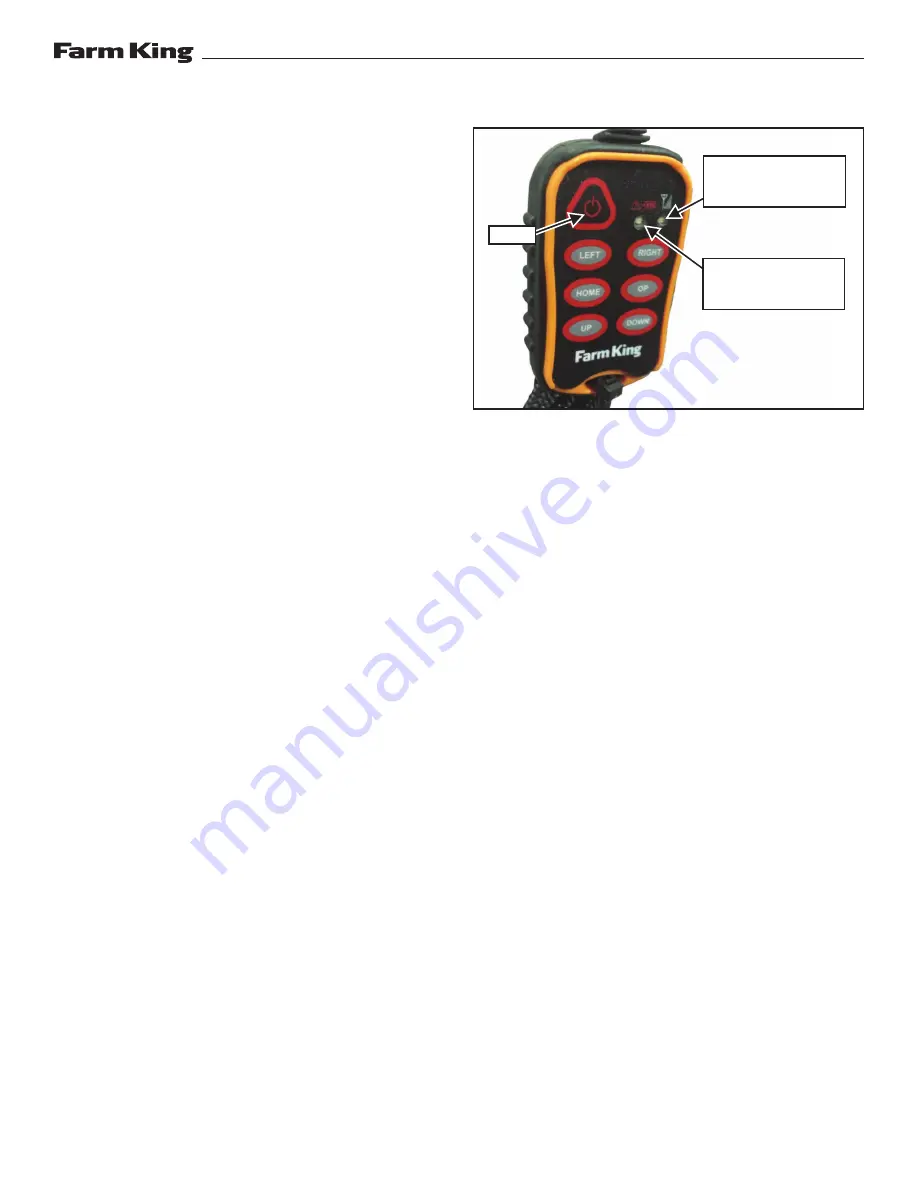
Press and hold the power button on the transmitter
until both LEDs turn on, then release.
The green LED will flash rapidly when
communication has been established with the
receiver. The green LED flashes slowly if the
receiver is off or there is no communication
between the transmitter and receiver.
Turn the receiver on and press the corresponding
buttons on the transmitter keypad to turn on and
off the LEFT, RIGHT, WINCH UP, WINCH DOWN
outputs.
The only way to turn to turn off the LIGHT output
early is to recycle power to the receiver with the
transmitter off.
Recharging
The red BATTERY LED on the transmitter will blink
once every second when the battery is low and
requires charging.
Plug the charging connector into the port at the
top of the transmitter. Observe orientation and do
not use force.
A solid red LED indicates battery is charging. Once
the internal battery is fully charged, the red LED
will turn off and the green LED will turn on. A fully
discharged unit will take up to 3 hours to recharge.
Use only approved chargers.
Indicator Lights
The receiver has two LED indicators, the red
ERROR CODE indicator and the green SIGNAL
indicator.
The green SIGNAL indicator flashes rapidly
whenever there is communication between the
transmitter and the receiver.
The red ERROR CODE indicator starts blinking once
every second when there is no RF communication
between the receiver and transmitter. It also blinks
when there is a problem with the system in the
form of an error code. Refer to the ERROR CODE
CHART table for more information.
Figure 52
Teach ID Code
To synchronize a new transmitter and receiver
together use the following procedure:
1. Make sure both transmitter and receiver are off.
2. Press and hold the POWER button until both lights
start to blink to put the transmitter into TEACH ID
mode.
3. Release the POWER button.
4. Apply power to receiver.
5. Wait for 1 second or until the green and red LEDs
on the transmitter stop blinking and green LED start
blinking rapidly.
Power
Green LED will blink
when turned on and in
range of the receiver.
Red LED will blink
when battery power is
getting low.
Summary of Contents for 1370
Page 1: ...062022 FK428 OPERATOR AND PARTS MANUAL BACKSAVER AUGER Models 1370 1385 1395 13114...
Page 2: ......
Page 4: ...1370 1385 1395 13114 Backsaver Auger 2...
Page 6: ...Warranty Registration Form 1370 1385 1395 13114 Backsaver Auger 4...
Page 8: ...Introduction 1370 1385 1395 13114 Backsaver Auger 6...
Page 12: ...Safety 1370 1385 1395 13114 Backsaver Auger 10...
Page 24: ...Operation 1370 1385 1395 13114 Backsaver Auger 22...
Page 44: ...Operation 1370 1385 1395 13114 Backsaver Auger 42...
Page 46: ...Maintenance 1370 1385 1395 13114 Backsaver Auger 44...
Page 61: ...Maintenance 1370 1385 1395 13114 Backsaver Auger 59 8 6 7 7 11 2 3 9 1 1 Figure 54...
Page 65: ...Parts Identification 1370 1385 1395 13114 Backsaver Auger 63...
Page 132: ...Specifications 1370 1385 1395 13114 Backsaver Auger 130...
Page 140: ...Specifications 1370 1385 1395 13114 Backsaver Auger 138...
Page 142: ...Warranty 1370 1385 1395 13114 Backsaver Auger 140...
Page 145: ......


