background image

7

7

(931) 583-0397

(931) 583-0397 | support@farmersfriend.com

 | support@farmersfriend.com

1. 

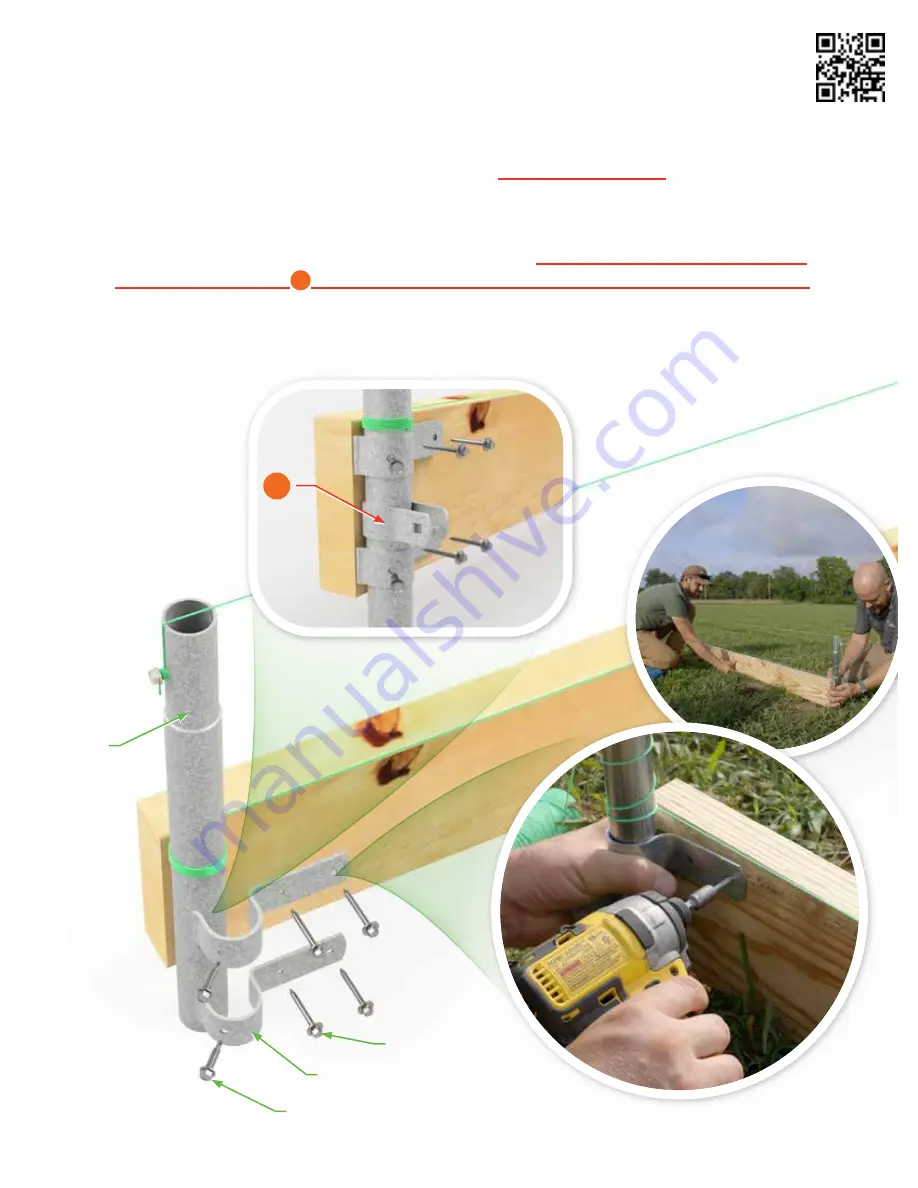
Attach a baseboard flush with the outside of the front-left corner post

front-left corner post and just under the 

bottom string using two of the baseboard corner straps, four wood screws, and two self-tap-
ping screws
. It can be helpful to have someone hold the other end of the baseboard.

If you are planning to install a DIY or Dutch door end wall, now would be the time to install the 

now would be the time to install the 

necessary brace bands 

necessary brace bands 

1

 for your end wall brackets 

 for your end wall brackets between the two baseboard end straps.

between the two baseboard end straps.

S T E P   4

S T E P   4

Front, Left Corner Baseboard

Front, Left Corner Baseboard

fmfr.io/haven/4

Corner Post

Baseboard corner strap

Wood screw

Self-tapping screw

1

Summary of Contents for Haven HIGH TUNNEL

Page 1: ...The Haven The Haven a s s e m b l y a n d i n s t r u c t i o n m a n u a l Watch the video Scan the code or visit fmfr io haven v h i g h t u n n e l h i g h t u n n e l...

Page 2: ...Rev 20231004...

Page 3: ...u do market gardening is not for the faint of heart I also know the importance of having the right tools for the job Our goal at Farmers Friend is to help you succeed by providing high quality tools t...

Page 4: ...w Before you begin assembling your new Haven High Tunnel take a moment to acquaint yourself with the installed location of the major parts The instructions on the following pages will be specific abou...

Page 5: ...Rollup Bar 28 Hand Crank and Guide Bar 33 Anti Billow Ropes 35 SingleChannel SingleChannel p 5 Purlin Purlin p 17 Bows Bows p 13 Crossbars Crossbars p 14 FrontWindBracing FrontWindBracing p 16 Quarter...

Page 6: ...ck hammer attachment 3 Measure down the length of your tunnel and drive another post in 2 just inside your tunnel length measurement Be sure to measure from outside to outside of ground posts Be sure...

Page 7: ...rner post 1 3 Drive the front right post at mark 1 Now your tunnel is square 4 Measuring outside to outside install the back right corner post 3 16 directly across from the back left corner post 2 and...

Page 8: ...he ground then run it down tight to the other end The top string will be your guide for how far to drive the remaining posts into the ground The bottom string will be your guide for keeping the posts...

Page 9: ...o have someone hold the other end of the baseboard If you are planning to install a DIY or Dutch door end wall now would be the time to install the now would be the time to install the necessary brace...

Page 10: ...t adjacent to the lower string but without touching it but without touching it A post in contact with the lower string will skew the alignment of subsequent posts 3 Drive this post into the ground unt...

Page 11: ...end using a baseboard splice plate and six wood screws 2 Again measure 48 from the center of the previous post and mark on baseboard 3 Drive the next post and attach the next ground post to baseboard...

Page 12: ...e ensures that they land right at the center of the post This allows you to join it to the next baseboard with the tube straps 2 Place the fourth post so that the end of the baseboard is centered on t...

Page 13: ...lush with end of the bolt on the inside of the tunnel 1 Then finger tighten the outside nut up against the baseboard 2 4 While keeping the eye bolt vertical use a 9 16 socket to tighten the inside nut...

Page 14: ...etween the first two posts will be used in a the second post The holes that are skipped between the first two posts will be used in a later step later step 3 Attach the remaining curtain lock pieces e...

Page 15: ...elow then set aside 2 Connect each bow section with one self tapping screw in the side of each bow joint Two classic sections plus one gothic section to form one complete bow assembly Be sure to face...

Page 16: ...race band with bolt and nut then tighten down with socket or wrench 4 Next slide brace band on opposite side of gothic section to where it meets the end of crossbar Attach and tighten with bolt and nu...

Page 17: ...furthest away from where your bows were Start by installing bows at the end of tunnel that is the furthest away from where your bows were assembled assembled Doing this give you an unobstructed path t...

Page 18: ...the tunnel to avoid puncturing the plastic 4 Starting on the front right corner of the tunnel attach wind brace from 1 to brace band on 2 at its natural connecting height 5 Repeat these steps for the...

Page 19: ...ction 2 Mark the purlin every 4 feet Mark the purlin every 4 feet on the same side as the screws face These marks will help ensure the bows are spaced evenly at the peak when you attach the cross conn...

Page 20: ...wo gold bolts and nuts at every third or fourth bow at each 4 foot mark while a second person holds the purlin up to the peak of the bows to take the extra weight off Continue this to the end of the t...

Page 21: ...g galvanized bolts and nuts with a 1 2 socket or wrench Make sure bolts face to the inside of the tunnel to avoid puncturing the plastic 4 Attach wind brace from 1 to brace band on 2 at its natural co...

Page 22: ...nge of the curtain lock the curtain lock It can be helpful to have someone assist with the bending of the channel to the bow 2 Install a third single channel on top of the curtain lock 3 Use wood scre...

Page 23: ...all a string pulled tightly across the top of the single channel down the length of the tunnel and also across the top of the single channel on the opposite end then tie it off S T E P 1 8 S T E P 1 8...

Page 24: ...and equipment farmersfriend com farmersfriend com 1 Secure the first piece of double channel with two self tapping screws flush with the bow after setting it on top of the short single channel S T E P...

Page 25: ...mble a bolt and flange nut into one side of a double channel tube strap and slide it into the channel taking the tube strap around the bow to attach to the first bolt 3 Ensure the channel is just abov...

Page 26: ...ble channel splice plate 2 Next slide the bolt heads into the double channel then center and tighten the first two nuts 3 Now slide the next double channel in the splice plate 4 Before tightening the...

Page 27: ...e bow and attach a tube strap with preassembled bolts and nuts sliding it in together with the next channel 2 Repeat steps 19 22 to the end of the tunnel 3 Secure double channel to final bow with two...

Page 28: ...r end wall now is the time to attach the brace bands for the end wall brackets before continuing bands for the end wall brackets before continuing 1 Attach single channel 1 to the top of your tunnel s...

Page 29: ...spring wire on top 1 then add wire down the sides 2 as two people keep it pulled tight 3 Install the bottom wire 3 4 Trim off excess plastic 4 Also trim any overhaning wire with a pair of wire cutters...

Page 30: ...l up bar and place on top of the eyebolts along the baseboard No screws are No screws are needed at this point needed at this point 2 Center the bar on the tunnel leaving 2 3 inches sticking out at ea...

Page 31: ...tic down one side of the tunnel and cut to length leaving 2 3 extra on each end 3 Pull plastic over the tunnel Be sure the inside printed marks are facing the inside Be sure the inside printed marks a...

Page 32: ...and partially secure it with spring wire on the opposite end at the peak 2 3 Completely secure both ends after the plastic is in position working your way down from the top 3 on both ends at the same...

Page 33: ...channel beginning at one end and working your way to the other end Be sure to not pull the plastic down too tight Be sure to not pull the plastic down too tight try to simply keep it straight 3 Lastly...

Page 34: ...lf tapping screws 2 Drill an extra self tapping screw into each joint 1 of the roll up bar through the batten strip 3 End with a second piece of 3 ft batten strip on the other end of the tunnel 4 Cut...

Page 35: ...om 1 Slide hand crank on tube and drill 5 16 hole using the holes in hand crank as a guide 2 Attach crank handle using 10mm socket onto the center position S T E P 3 0 S T E P 3 0 Hand Cranks Hand Cra...

Page 36: ...ully extended position the eye bolt against the bow 2 and make a mark for drilling 3 Drill a 3 8 hole through the end bow at mark 4 Remove one nut from eye bolt and insert through hole From the inside...

Page 37: ...e and between the eye bolts Install last rope clip next to the last bow 3 Run anti billow rope through eye bolts 3 and secure to the last rope clip at the other end 4 4 Pull anti billow rope up to eac...

Page 38: ...ools and equipment farmersfriend com farmersfriend com 1 The final step is to press on a black bolt cap on to every double channel and wind bracing bolt for protection while working in the tunnel S T...

Page 39: ...2 38 44 50 56 62 F FF 8529 Gothic Center Bow Section 14 gauge NS 7 10 13 16 19 22 25 28 31 G FF 1917 Side Bow Section 14 gauge 14 20 26 32 38 44 50 56 62 H FF 3018 Classic Center Bow Section 14 gauge...

Page 40: ...8 W VP 5107 Double Channel Bolt 36 56 76 96 116 136 156 176 196 X VP 8850 Double Channel Nut 36 56 76 96 116 136 156 176 196 Y FF 3916 Double Channel Splice Plate 4 6 8 10 12 14 16 18 20 Z FF 2587 Dou...

Page 41: ...ized Bolt for Brace Band Clamp 26 32 38 44 50 56 62 68 74 AL VP 8210 Galvanized Nut for Brace Band Clamp 26 32 38 44 50 56 62 68 74 AM VP 5134 Bolt Cap 36 56 76 96 116 136 156 176 196 AN VP 2421 Cross...

Page 42: ......

Page 43: ......

Page 44: ...200 Good Life Way Centerville TN 37033 support farmersfriend com 931 583 0397...

Reviews: