background image

COMMISSIONING

8.4 Brake distribution of the machine 

• 

The  standard  version  of  the  machine  includes  a  single-circuit  two-line  braking  system  by 
KNORR BREMSE.

• 

Braking  is  provided  by  spring  brake  cylinders  –  the  parking  brake  is  implemented  inside  and  it  is 
automatic (controlled by a button, see below).

• 

ATTENTION  !!!  The  parking  brake  is  activated  automatically  when  there  is  a  leak  of  air  from  the 
system and physical brake release is only possible mechanically, see below.

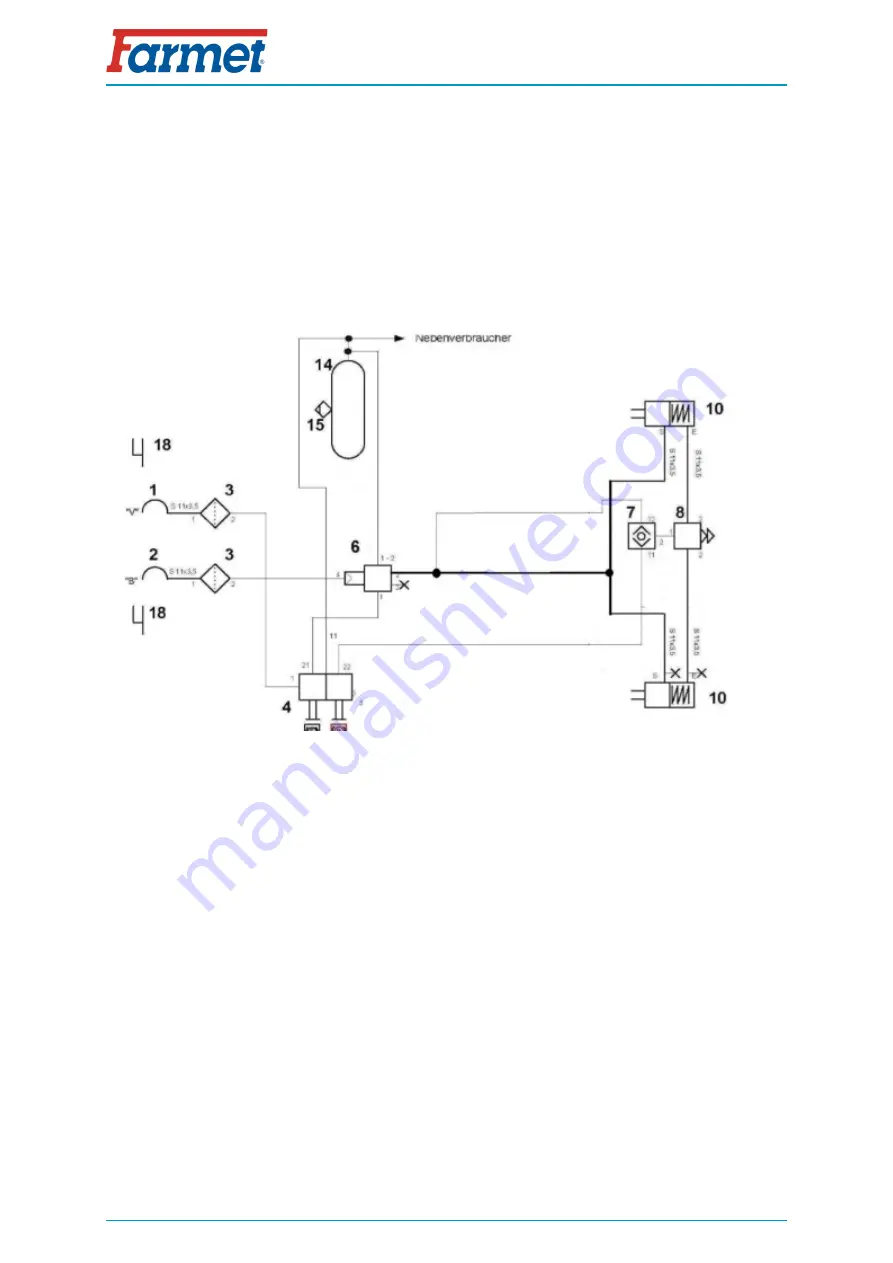
Brake distribution diagram

1. 

Quick-coupler – red line

8. 

Jettisoning valve

2. 

Quick-coupler – yellow line

10. 

Combined membrane brake cylinder Type 24/30

3. 

Air filter

14. 

Air tank 40 l

4. 

Control valve of the manual brake

15. 

Bleeding valve

6. 

Brake valve

18. 

Quick-coupler holder

7. 

Two-way valve

35 

59

Summary of Contents for FANTOM 1050 PRO

Page 1: ...e from 1 7 2019 FARMET a s Jiřinková 276 552 03 Česká Skalice CZ phone 420 491 450 111 fax 420 491 450 136 GSM 420 774 715 738 IČ 46504931 DIĆ CZ46504931 www farmet cz e mail farmet farmet cz OPERATING MANUAL F FA AN NT TO OM M 1 10 05 50 0 P PR RO O 1 12 25 50 0 P PR RO O ...

Page 2: ...2 59 Prepared by Technical Department Farmet a s on 11 7 2019 changes reserved ...

Page 3: ...achine Characteristics This machine serial number must be stated whenever ordering spare parts for possible repairs The production label is located on the frame Use only spare parts for these machines according to the Spare parts catalogue officially issued by the manufacturer Farmet a s Česka Skalice Possibilities of Use of the Cultivator The FANTOM PRO cultivator is designed for cultivation of a...

Page 4: ...PREFACE 4 59 IMPORTANT READ CAREFULLY BEFORE USE KEEP FOR FUTURE REFERENCE ...

Page 5: ... the frames against unfolding during transport 33 8 3 4 Aggregation to the tractor using the three point hitch Transport 34 8 4 Brake distribution of the machine 35 8 4 1 Hand brake control valve 36 8 4 2 Emergency brake release in case of air leak 37 8 5 Description of the share chisel replacement 38 9 REAR ACCESSORIES 39 9 1 Quick change roller system 41 9 2 Setting the parallelogram 42 9 3 Sett...

Page 6: ...PREFACE 6 59 15 ENVIROMENTAL PROTECTION 56 16 MACHINE DISPOSAL AFTER SERVICE LIFE EXPIRY 57 17 SERVICING AND WARRANTY CONDITIONS 58 17 1 Servicing 58 17 2 Warranty 58 ...

Page 7: ...TOM 1050 PRO FANTOM 1250 PRO Working width 10 5 m 12 5 m Transport width 3 m Transport height 3 7 m 3 998 m Machine total length 9 64 m Working depth 4 15 cm Number of shares 57 67 Working performance 8 4 12 6 ha h 10 15 ha h Towing means 295 400 kW 400 440 kW Working speed 8 12 km h Maximum transport speed 20 km h Maximum slope grade 6 Tyre dimensions transport Tyre pressure 504 70 20 480 kPa Mac...

Page 8: ...arns about an immediate dangerous situation ending with death or severe injury This warning sign warns about a dangerous situation ending with death or severe injury This warning sign warns about a situation that may end with a smaller or slight injury It also warns about dangerous actions related to the activity that could lead to an injury 8 59 ...

Page 9: ...thorised by the operator Educated in the machinery field with knowledge of repairs of similar machines Demonstrably familiarised with safety regulations for work with the machine During a repair of a machine connected to a tractor it must own a driver s licence of the corresponding category Machine operator must secure the safety of other persons when working with the machine or transporting the m...

Page 10: ...g the machine If the operator must use medicines prescribed by a physician or uses freely sold medicines he must be informed by a physician whether he is capable of responsible and safe operation of the machine under these circumstances Protective equipment For operation and maintenance use tight clothes protective gloves and goggles against dust and sharp parts of the machine 10 59 ...

Page 11: ... of the machine is stated on the production label The dimensions of the transported machine including the transport means must comply with the valid regulations for road traffic decrees laws The transported machine must be always fastened to the transport means so that its spontaneous loosening could not happen The carrier is responsible for damage caused by the loosening of incorrectly or insuffi...

Page 12: ...hine must have their load capacity at least identical with the weight of the handled machine Machine fastening for handling may only be performed in places designed for that and marked with self adhesive labels showing the chain symbol After fastening suspending at designated points it is forbidden to move in the space of possible reach of the handled machine ...

Page 13: ...regulations for machine operation during use P 1 H When connecting or disconnecting do not step between the tractor and the machine also do not enter this space if the tractor and the machine are not at rest and the engine is not turned off P 2 H Stay out of reach of the drawn up machine P 4 H Stay outside the reach of the tractor agricultural machine set if the tractor engine is in operation P 6 ...

Page 14: ...s in the manual P 42 H When folding and unfolding the side frames stay outside their reach P 50 H Secure the machine against unwanted movement by positioning on its working bodies shares P 52 H Stay outside the reach of the tractor agricultural machine set if the tractor engine is in operation P 53 H It is strictly folding and unfolding the side frames on slopes or inclined surfaces P 100 H The sh...

Page 15: ...WORK SAFETY LABELS Fig 1 Location of safety labels on the machine FANTOM 1050 PRO 1250 PRO FANTOM 1050 PRO 15 59 ...

Page 16: ...WORK SAFETY LABELS FANTOM 1250 PRO 16 59 ...

Page 17: ...ore there are rollers in the rear part of the machine that compact the aerated soil The machine is designed for work with or without rollers The roller hitches are equipped with a quick coupling system for fast disassembly It is possible to install a front flexi board in front of the first row of ploughshares on request to increase the levelling effect during work The axle is located inside the ma...

Page 18: ...t its use is further described in Chapter 8 3 The two ball switching three way valves in the front part of the drawbar are used for switching the function of the blue circuit During operation the blue circuit controls the flexi board if installed and the folding supporting leg of the drawbar It is important to close the ball valves for transport Fig 2 closing ball valves 1 Unfolding machine frames...

Page 19: ...DESCRIPTION Fig 4 Pole piston rod valves Used for manual closure of the piston rods prior to transportation a safety element CLOSED OPEN 19 59 ...

Page 20: ...of the producer best in cooperation with the expert servicing technician determined by the producer The operator must secure a functional test of all assembled parts after the completion of the machine assembly The operator must secure that the handling of the machine using lifting equipment during its assembly is in accordance with chapter 4 ...

Page 21: ...hen working on slopes observe the lowest allowable slope grade of the set TRACTOR MACHINE Before starting the tractor motor check whether no person or animal is in the working space of the set and push the warning sound signal The operator is responsible for the safety and all damage caused by the operation of the tractor and the connected machine The operator is obliged to adhere to the technical...

Page 22: ...tom hitch Loop for the bottom hitch ø50 mm Loop for the bottom hitch ø70 mm Hitch K80 ø80 mm Requirement for the tractor s TPS ø of the pin of the bottom hitch ø36 mm Height of the bottom fixed hitch 300 mm Requirement for the tractor s hydraulic system Side frame folding circuit Circuit pressure 200bar 2900 Psi 2 pcs of quick coupler sockets ISO 12 5 Axle lifting circuit Circuit pressure 200bar 2...

Page 23: ...ames is on one control circuit the YELLOW DUST CAPS for lifting the machine on the axle is on the second control circuit that must be switched to the floating position during work and the setting of the working depth GREEN DUST CAPS on the third control circuit control of flexi boards and supporting leg BLUE DUST CAPS on the fourth control circuit and control of the setting of rollers WHITE DUST C...

Page 24: ...H OF PLOUGHSHARES one green ring Ploughshares are taken out of the processed profile when this circuit branch is pressurized HYDRAULIC CIRCUIT FOR CONTROLLING THE WORKING DEPTH OF PLOUGHSHARES two green rings Ploughshares are recessed into the processed profile when this circuit branch is pressurized HYDRAULIC CIRCUIT FOR CONTROLLING THE POSITION OF THE FLEXI BOARD AND THE SUPPORTING LEG OF THE DR...

Page 25: ...lexi board and supporting leg blue circuit 1 Control distributor in the tractor 2 Hydraulic quick couplers 3 Three way valve 4 Branch for connection with the folding circuit 5 Hydraulic cylinder of the flexi board 6 Hydraulic lock 7 Hydraulic cylinder of the supporting leg 25 59 ...

Page 26: ...ers 3 Hydraulic brake control valve for machine folding cylinders 4 Mechanical switching valve 5 Hydraulic cylinder for folding outside frames 6 Hydraulic cylinder for folding side frames 7 Ball valve 8 Hydraulic pressure accumulator 9 Manometer 10 Hydraulic lock 11 Non return switching valve 12 Non return valve 26 59 ...

Page 27: ... in the tractor 2 Hydraulic quick couplers 3 One sided hydraulic lock 4 Hydraulic cylinder of the drawbar 5 Hydraulic cylinder of the tracing wheel 6 Flow divider 7 Combined hydraulic cylinder setting working depth transport axle 8 Branch for connection with the folding circuit 9 Hydraulic lock 10 Ball valve 27 59 ...

Page 28: ...e circuit 1 Control distributor in the tractor 2 Hydraulic quick couplers 3 Manometer 4 Hydraulic pressure accumulator 5 Hydraulic cylinders 6 One sided hydraulic lock 7 Input for letting off folding 8 Non return valve 9 Stopcock 28 59 ...

Page 29: ...nit The operator must ensure that during folding and unfolding of the side frames no person or animal is within their reach i e at the place of their impact or vicinity Perform folding and unfolding on flat and solid surfaces or laterally to the slope with the fully open control unit Execute the folding or unfolding only with a machine that is raised on the axle with the side rollers in the recess...

Page 30: ...COMMISSIONING Machine position for folding Machine position for unfolding 30 59 ...

Page 31: ...alve 2 Draw in the piston rods of the axle using the yellow circuit into the marginal position i e maximum insertion The machine is evenly placed on all tracing wheels SETTING THE DOWN PRESSURE OF SIDE FRAMES When the machine has been unfolded the down pressure of the side frames must be adjusted to ensure optimal terrain tracing Set the value of 100 bar 1450 Psi on the pressure gauge using the ci...

Page 32: ...rollers must be lifted in the maximum position the machine must be lifted up to zero position 1 Lift the machine on the axle i e draw out the piston rods of the axle using the yellow circuits into the marginal position i e maximum release Close the ball valve of the yellow circuit 2 Fold the machine using the red circuit Close the ball valve of the red circuit The machine is ready for transport Wa...

Page 33: ...ring the frames against unfolding during transport The machine is equipped with a pull down strap for securing the folded frames during transport The operator is obliged to use this protection RETRACTABLE STRAP LOCATION 33 59 ...

Page 34: ...or using the three point hitch Transport If the machine is aggregated into the rear arms of the TBZ TBZ3 the telescopes of the front tow bar must be secured before transport The machine is disconnected Transport position Operating position 34 59 ...

Page 35: ...a button see below ATTENTION The parking brake is activated automatically when there is a leak of air from the system and physical brake release is only possible mechanically see below Brake distribution diagram 1 Quick coupler red line 8 Jettisoning valve 2 Quick coupler yellow line 10 Combined membrane brake cylinder Type 24 30 3 Air filter 14 Air tank 40 l 4 Control valve of the manual brake 15...

Page 36: ...with an automatic manual brake the function of which is described below CONTROL BUTTON OF THE MANUAL BRAKE Description of the manual brake RED BUTTON PRESSED MANUAL BRAKE IS NOT ACTIVE THE MACHINE IS RELEASED RED BUTTON EXTRACTED MANUAL BRAKE IS ACTIVE THE MACHINE IS BRAKED 36 59 ...

Page 37: ...nder Emergency brake release procedure in case of air leak Remove the bolts from the holders of the brake cylinder Fig 1 and 2 Release the cap on the back side of the brake cylinder Fig 3 Insert the bolt by its flat end T shape into the opening in the cylinder and turn the bolt by 90 at the end of the opening so that the screw is arrested and cannot be pulled out Fig 4 Turn the nut 19 mm spanner c...

Page 38: ...replacement HAMMER DRIVER 12 mm The installation is the same for all types of working parts The machine is sufficiently lifted so that the working part can be removed from the shoe Using the prepared tools drive the spring pin out and remove the ploughshare from the shoe Drive a new working part in the shoe and secure it with the spring pin 12x50mm 38 59 ...

Page 39: ...to install various types of rollers and accessories into the rear parallelogram of the machine Segmented roller SDR Diameter 530 mm Weight 237 kg m Double ring roller DRR Diameter 500 mm Weight 191 kg m Double spiked roller DSR Diameter 420 mm Weight 159 kg m ...

Page 40: ...ller SDR DRR DSR TR Crumbling Compacting Depth guiding Resistance to clogging Suitable for rocky soils Suitable for wet soils Heavy soils Medium soils Light soils The machine must not be operated with lifted rear rollers for a long time the rollers can be easily removed using the quick coupling system 40 59 ...

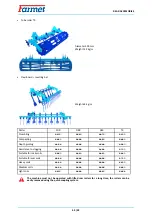
Page 41: ...embly or disassembly of the rollers When replacing rollers it is recommended to use lifting devices The first bolt must be released and removed the second bolt is only released and the roller is removed from its bearing Perform on all rollers along the entire length Attachment of the roller frame in two marked points 1 Only release the nut 2 Release and remove the bolt 41 59 ...

Page 42: ...on of the roller must be parallel to the ground surface To adjust the position of the roller proceed as shown in the figure below 1 Release the securing nut 2 Shortening extending the nut Shortening the rear roller moves up Extending the rear roller moves down 42 59 ...

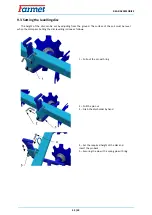
Page 43: ... ground The surface of the soil must be level when the discs pass Setting the disc levelling is done as follows 1 Pull out the pin with ring 2 Pull the pin out 3 Grab the disc holder by hand 4 Set the required height of the disc and insert the pin back 5 Securing the pin with a spring pin with ring 43 59 ...

Page 44: ...s DOWN PRESSURE OF LEVELLING SETTING OF FLEXI BOARDS ANGLE OF LEVELLING The process of changing the down pressure of rear levelling 1 Remove the spring pin and move the lever out of the bearing 2 Place the lever along the longer side of the handle 3 Moving the lever BACKWARD increasing pressure FORWARD reducing pressure 44 59 ...

Page 45: ...Setting the rear flexiboard 1 Remove the pin with ring and remove the pin for setting the top stop 2 Remove the pin with ring and remove the pin for setting the bottom stop 3 Location of TOP pin 4 Location of BOTTOM pin 45 59 ...

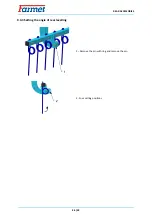
Page 46: ...REAR ACCESSORIES 9 4 3 Setting the angle of rear levelling 1 Remove the pin with ring and remove the pin 2 Four setting positions 46 59 ...

Page 47: ...echnical certificate issued in accordance with the valid regulation on the approval of technical qualification and operation on public communications as amended may be transported on public communications Machines without a valid technical certificate may only be transported on public communications when carried by a towed trailer or other approved means of transport in accordance with the valid r...

Page 48: ...48 59 MACHINE ADJUSTMENT 11 MACHINE ADJUSTMENT 1 Adjusting the front flexiboard 2 Adjusting the working depth of tracing wheels 3 Adjusting the rollers 4 Adjusting the height of the working discs ...

Page 49: ...it Setting the working depth The indicator is correctly adjusted when it shows position 0 from the view of the tractor driver and the working parts are touching the ground 1 Position 0 2 View direction when adjusting the indicator 3 Depth indicator 4 The working parts are touching the ground Resetting depth Lift the machine on to the axle end to end using the yellow circuit Keep the machine under ...

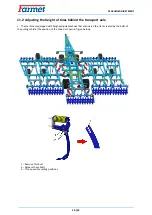
Page 50: ...ansport axle The machine is equipped with height adjustable shoes that eliminated the track created by the belts of the pulling vehicle the position of the shoes is shown in figure below 1 Remove this bolt 2 Release these bolts 3 Three possible setting positions 50 59 ...

Page 51: ...ve in closed position IT ISpossible to set pressure Lifting rollers from the tractor IS NOT possible Pressure setting is displayed on the manometer placed in the front on the connecting rod grey frame If it is required to lift the rollers the ball valve must be in the open position see figure below it is not possible to set the roller pressure in this position The chart below shows the converted w...

Page 52: ... directly from the tractor cabin The flexiboard efficiency is adjusted BY BLUE HYDRAULIC CIRCUIT The flexiboard efficiency is displayed on the value of the display device 1 4 Position 1 on the display device shows the condition in which flexiboards are most efficient most aggressive On the contrary Position 4 shows the condition in which flexiboards are inactive out of operation 52 59 ...

Page 53: ...djustment cleaning maintenance and repair of the machine you must secure those parts of the machine that could endanger the operator by falling or another movement For catching the machine during handling using lifting equipment use only the places marked with self adhesive labels with the chain sign Upon a failure or damage of the machine immediately turn off the tractor s engine and secure again...

Page 54: ...lubrication points and properly lubricate them according to the lubrication plan Store the machine in the position with folded frames in the transport position Store the machine on the axle and the storage leg secure the machine against spontaneous movement using scotches or another suitable tool When storing lower the machine into the lower position using hydraulics The machine must not rest on t...

Page 55: ...LE 14 MACHINE LUBRICATION SCHEDULE The machine is equipped with self lubricating cases therefore the machine does not require any lubrication Lubricatin points only on the brake carms of transport axle 1 Lubricate the wheel bearings 2 ...

Page 56: ...epair hydraulic hoses possibly further parts of the hydraulic system showing signs of damage before oil leaks occur Check the condition of hydraulic hoses and perform their timely replacement The service life of hydraulic hoses includes the time when they were stored Handle oils and greases according to valid waste laws and regulations ...

Page 57: ...ing machine disposal that steel parts and parts in which hydraulic oil or lubricating grease moves are differentiated Steel parts must be cut by the operator while observing safety regulations and handed over to the secondary raw material collection point He must proceed with other parts according to valid laws about waste ...

Page 58: ...ne and while fulfilling the conditions stated in the operating manual 3 The warranty does not apply to wearable spare parts i e regular mechanical wear and tear of replaceable parts of the working sections shares edges etc 4 The warranty does not apply to indirect consequences of possible damage such as service life decrease etc 5 The warranty is bound to the machine and is not void upon an owner ...

Page 59: ...SERVICING AND WARRANTY CONDITIONS 59 59 ...

Reviews: