29
POLY BUILDINGS
Revision date: 03.15.12
NOTE:
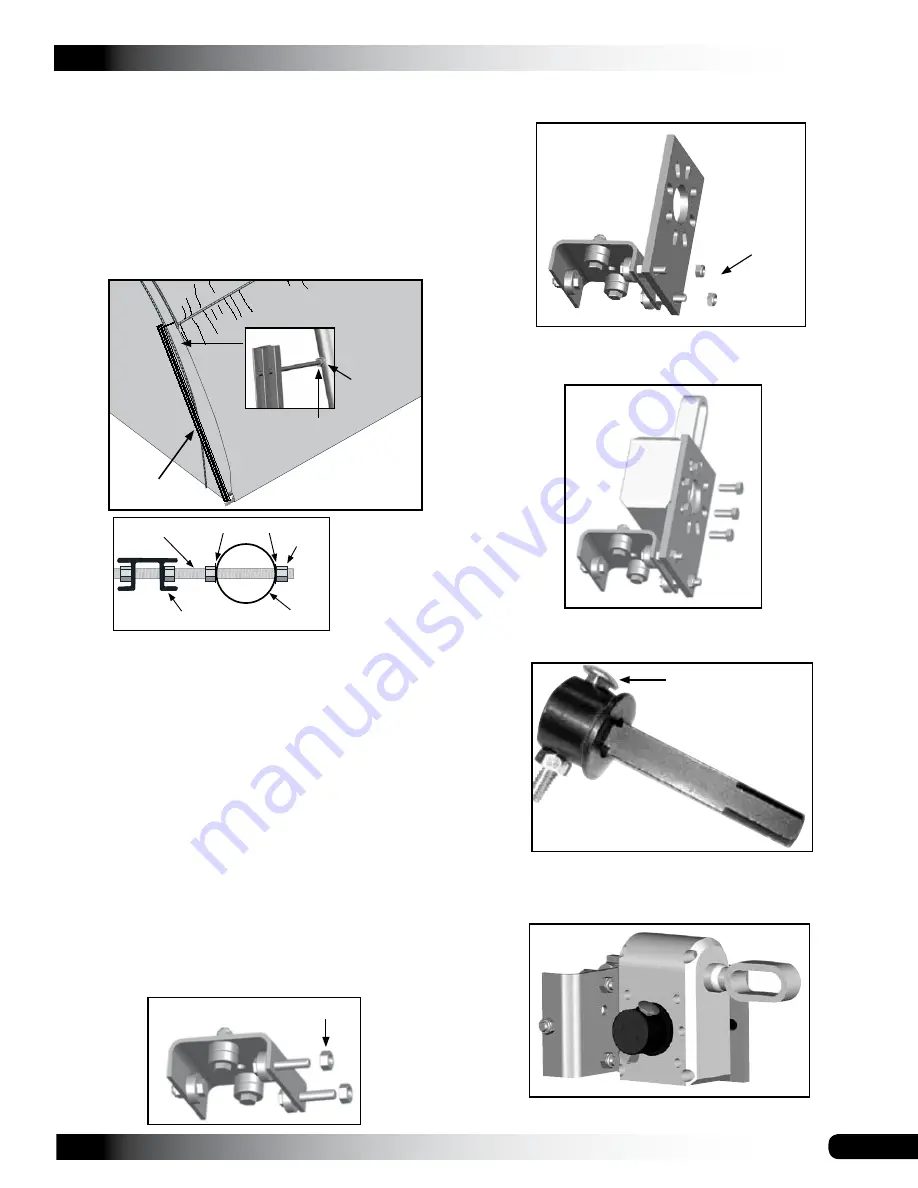
Install a 3/8" flat washer between the 3/8" nut
and the end panel material.
7. Select a bearing roller assembly (#102569) and
attach the bearings if needed. (In some instances, the
bearings may come already attached.) Assemble as
follows:
Attach single bearings to the sides of the bracket
and double bearings to the middle portion of the
bracket using 1/4" hex bolts and locknuts. Install a flat
washer on both sides of each bearing to insure proper
operation of bearings and the assembly.
Install the longer bolts with bearings on the side of the
bracket that has the two holes. Install these
before
installing the double bearing assembles.
8. Slide a 5/16" nut over each long bolt.
These nuts are
used as spacers only.
5/16" Nut
Flat
Washer
Nut
8' Channel
Aluminum Channel
End Rafter
Flat Washers
Threaded
Rod
3/8''
Nut
Top View
9. Slide the Twist-of-the-Wrist mounting plate (#103544)
over the long bolts and secure the plate with lock nuts.
10. Attach the Twist-of-the-Wrist gearbox (#103496) to the
mounting plate using six (6) hex head bolts.
11. Using a 5/16" X 2-1/2" carriage bolt and 5/16" nut,
attach the square shaft to a tubing adapter (#102717).
12. Slide the square shaft through the Twist-of-the-Wrist
gearbox.
Lock Nuts
TWIST-OF-THE-WRIST ASSEMBLY INSTALLATION
(CONTINUED)
5/16" x 2-1/2"
Carriage Bolt
5. Position the channel along the rafter at the desired end
of the building where the Twist-of-the-Wrist assembly
will be located. Place the lower end of the channel
an inch off the ground to allow free movement of the
channel during the operation of the roll-up cover.
6. Secure the upper end of the channel by drilling a 3/8"
hole through the end rafter and attach as shown. The
lower end of the channel will "float" and is not attached.


