background image

45

POLY BUILDINGS

Revision date: 03.15.12

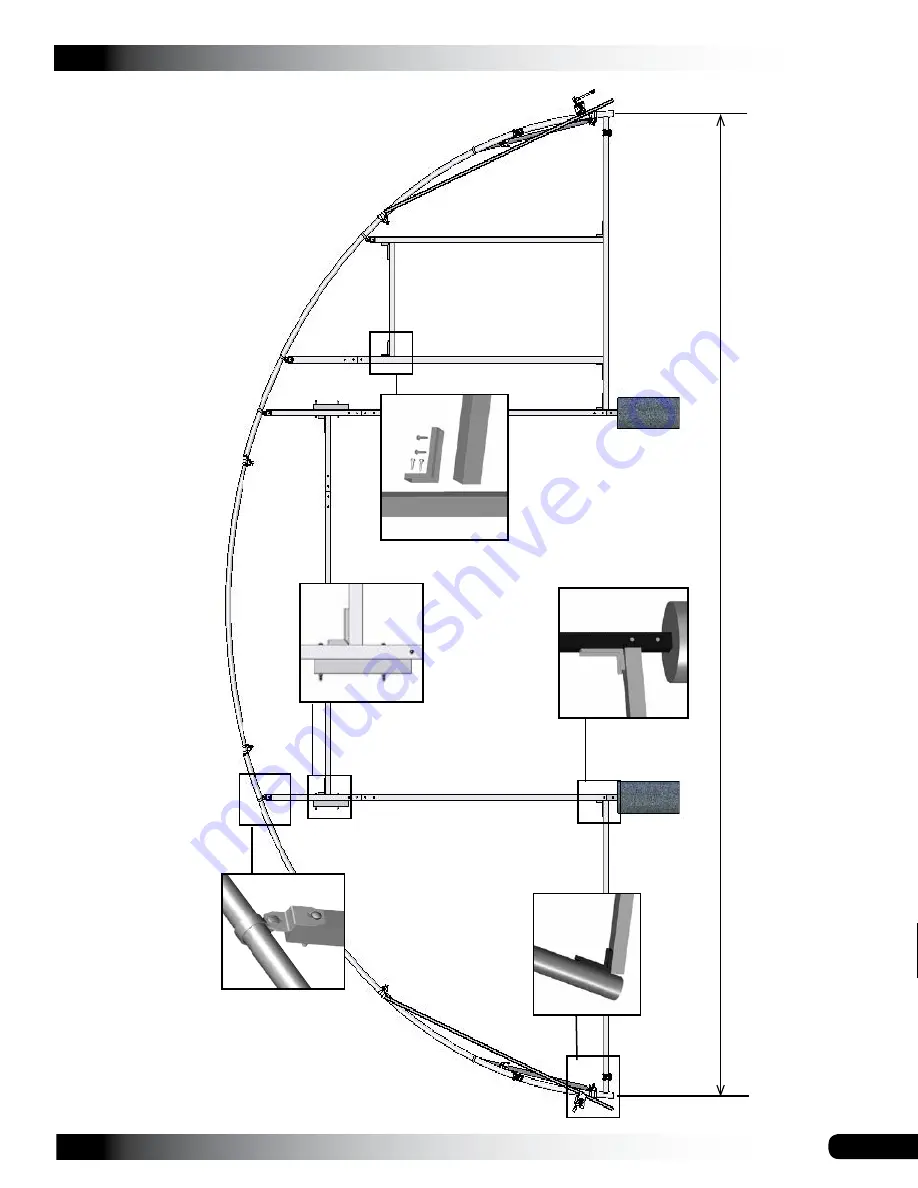
END FRAMING-FRONT DIAGRAM

26' center-to-center

NOTES:

• 

Roll-up door is centered in the end wall.

• 

Pedestrian door is 12" from Roll-up door

.

• 

End wall base rail and door framing consists  of 2" x 2" square tube cut to length.

• 

Pedestrian door rough: Measure the door

and frame the opening based on those  dimensions.

End W

all Diagram (26' Wide)


with Roll-up and Pedestrian Door

.

* Frame shown may differ slightly from actual 


  frame.

QH1330

Summary of Contents for 103739

Page 1: ...date 03 15 12 STK DIMENSIONS 103739 26 W x 24 L 103740 26 W x 36 L 103741 26 W x 48 L Chick Inn 26 Wide Photo may show a different but similar model 2012 FarmTek All Rights Reserved Reproduction is prohibited without permission ...

Page 2: ...y and damage LOCATION Choosing the proper location is an important step before you begin to assemble the structure The following suggestions and precautions will help you determine whether your selected location is the best location Never erect the structure under power lines Identify whether underground cables and pipes are present before preparing the site or anchoring the structure Location sho...

Page 3: ...list spec sheets included with the shipment To aid in the assembly read through the following definitions before you begin to assemble your shelter Conduit An assembly of pipes used to secure the main cover and end panels if equipped Purlins and some strut assemblies also consist of connected pipes to form a conduit Each pipe joint of a conduit assembly is secured with a self tapping Tek screw Cou...

Page 4: ...he Pictorial Parts Guide and all shelter diagrams for clarification or contact Customer Service NOTE At this time you do not need to open the plastic bags containing smaller parts such as fasteners or washers SQUARE THE SITE 1 Identify a corner where a building rafter will be positioned drive in a stake and string a line the exact width of the building and stake in place 2 String a line at least a...

Page 5: ...her FA2071 Eyebolt QH1330 Angled Bracket 100441 Nut Setter CC6212 CC6214 Fabric Clips QH1400 and QH1404 Band Clamp 104074 Square to Round Tube Connect Bracket 103395 Spin Handle 103396 Universal Joint QH1308 Strut 7 102547 Cross Connector 102570 Aluminum Channel 10015108 Tee Fitting 102857 End Clamp 102921 Neobonded Washer Plain End Panel Zippered End Panel 103496 Gearbox 103544 Mounting Plate 102...

Page 6: ...illustration below to identify main parts of the assembly 1 Locate the required parts for each assembly procedure 2 Assemble the rafters and the frame 3 Square and anchor the frame 4 Install the end panels and doors 5 Install the main cover and side roll up assemblies End Rafter Inside Rafter Purlins Strut Door Header Base Rail Strut End Rafter Base Rail Base Rail ...

Page 7: ...ntain an accurate 90 angle 3 After squaring the position of the building and placing a stake at all corners string a line between the stakes to mark the base of the building 4 Next paint or mark a line on the ground using the strings between the stakes as guides NOTE If a baseboard is used drill holes through the board at evenly spaced intervals along the length of the board Drive a rod through ea...

Page 8: ...onto the rafter in the locations noted below Do not secure the clamps to the rafter at this time These clamps are repositioned during the frame assembly when the purlins are added View of the end rafter and clamps as shown is from the outside when the frame is assembled NOTE Position all clamps as shown Use a piece of duct tape to keep the clamps from sliding when the rafter is set in place if des...

Page 9: ...pare for the frame assembly Purlin pipe shown is installed during the frame assembly procedure 3 Repeat the same procedure for the final end rafter 4 Continue with the FRAME ASSEMBLY instructions that follow Space below is reserved for customer notes Toward the inside of the frame when assembled 102857 End Rafter Purlin ...

Page 10: ...end rafter See circles above 5 Verify that both rafters are plumb and properly spaced on center and tighten the upper clamps CAUTION To prevent cover damage the ends of the purlins should extend no more than past the end clamp See diagram that follows Step 1 Do not allow purlin to extend beyond the edge of the end rafter 3 Using the on center rafter to rafter spacing set an inside rafter in positi...

Page 11: ...over damage DO NOT allow the purlin to extend beyond the end rafter If the last end rafter is plumb and the purlin run extends beyond the end of the rafter cut the last section of purlin pipe to the required length Typically purlin pipes do not require cutting Verify that the finished purlin run has the correct plain pipe before cutting any pipe Consult the Side Profile diagrams in the Quick Start...

Page 12: ...OR THE FRAME Once the frame is anchored properly continue with these instructions WARNING Securing the rafter mounting feet if equipped to baseboards set on the site is not a substitute for properly anchoring the shelter You must anchor the shelter as described in the MUST READ document FAILING TO PROPERLY ANCHOR THE SHELTER WILL RESULT IN DAMAGE TO THE SHELTER AND MAY CAUSE PERSONAL INJURY READ T...

Page 13: ...r If found file smooth and cover with layers of duct tape to protect the cover 5 Verify that all bolts are positioned with the heads to the outside of the frame Tape the bolts and rafter joints before installing the cover 6 Continue by installing the main cover Cross Connector to Rafter Tek Screw Purlin to Cross Connector Tek Screw Rafter Purlin ATTENTION Rafter shown may differ from the actual ra...

Page 14: ...e conduit fits the end wall Do not secure the pipe joints of the base rail at this time BACK END WALL PANEL INSTALLATION The back end frame vertical conduits slide into vertical pockets sewn in the back wall panel The base rail slides into a pocket in the bottom of the back wall panel Complete the following steps to install the back wall panel Required parts Assembled vertical conduits Assembled b...

Page 15: ...ing 11 Insert a vertical conduit into a vertical pocket until the end of the conduit can be inserted into the tee fitting 12 Insert the end into the tee fitting and tighten the screw to secure the vertical conduit in the tee fitting NOTE Do not tighten the screw that secures the tee fitting to the base conduit at this time The vertical conduit must be free to turn on the base conduit when the pane...

Page 16: ... snug over the top of the end rafter NOTE Pull the end panel material tight enough that it does not sag but not so tight that the roll up door is pulled out of square 20 Secure the end panel to the end rafter using half the CC6214 fabric clips BACK END WALL PANEL INSTALLATION CONTINUED 21 Space the fabric clips at 24 intervals as you work down the rafter from the top evenly side to side Secure eac...

Page 17: ... conduit to the roll up door using fabric clips CC6212 and Tek screws Evenly space the fabric clips as shown Diagram shows a similar door Actual clip quantity may differ from what is shown 8 Attach the universal joint to the exposed end of the roll up conduit using a Tek screw Fabric Clips and Tek Screws Crank Handle Universal Joint 4 Assemble a roll up door conduit by sliding the swaged end of a ...

Page 18: ...e made as needed 2 Using the dimensions on the End Wall Frame diagrams locate the positions of the vertical door frame members for the door The width of the door determines the frame dimensions for the door opening Consult the documentation sent with the door for the correct spacing of the door frame verticals 3 Dig a 12 diameter hole at the locations found in previous step to a depth that is belo...

Page 19: ...is installed repeat the steps to assemble the remaining end wall framing 104074 Square to Round Bracket FAH320B Carriage Bolt Drill 5 16 Hole Diagram above shows bracket attached to the top of door jamb The lower end of each 2 x 2 door jamb slides over each 1 75 x 1 75 ground post set in concrete Secure the connection by installing Tek screws on the back or inside surface of the verticals To avoid...

Page 20: ... may differ from actual frame Photo to the right shows an installed roll up door as seen from inside the shelter Door mounting brackets are attached to the door frame extensions shown above Door Frame Extension cut from 2 x 2 square end frame tubing and bolted to the 2 x 2 door frame using carriage bolts 10 9 Dimensions are inside to inside Consult the door instructions sent with the door to attac...

Page 21: ...o the backside of the end rafter using a few fabric clips and Tek screws Frame shown above differs from actual frame in design End Panel View shows the inside surface of the end panel 2 With the proper lift or ladders positioned inside the frame and with assistance pull the end panel up and over the top of the end rafter Square the end panel on the end frame and verify that the bottom edge is in t...

Page 22: ...g the rafter 7 Move to the door frame for the overhead door and secure the end panel to the jambs and header Evenly space the screws and washers around the perimeter of the door frame on the outside of the frame NOTE Installing Tek screws and washers through the end panel and into the frame before cutting the door opening helps keep the panel tight See dashed lines 8 After installing both end pane...

Page 23: ...you are not installing doors Remove dark shaded area 1 Working from inside the frame mark a 12 16 border along the door jambs and below the header Consult the diagram below These 12 16 flaps are wrapped around the door framing and secured to the inside of the door frame once the final diagonal cuts are made 2 Using the diagram as a guide cut the end panel to remove the section that is shaded Diagr...

Page 24: ...installation of the pedestrian door Secure the end panel to the inside surface of the frame tube using a Tek screw and washer Door Frame Inside surface of End Panel Install Tek screw here Inside View Sample frame is shown in the diagram Actual frame may differ PEDESTRIAN DOOR INSTALLATION The pedestrian door is installed between the vertical door frame members of the end wall The following steps d...

Page 25: ...eeded 12 Install Tek screws from the outside through the frame of the door and into the door jamb tubes 13 Evenly space the Tek screws and washers 10 12 around the perimeter of the door 14 Continue by installing the overhead 10 x 9 door as instructed using the installation guide that shipped with the overhead door 15 After installing both doors continue with the installation of the ratchets and th...

Page 26: ...sections required for each cover conduit Nylon Strap Insert Conduit NOTE Position the nylon straps of the main cover at the front and back of the frame Do not insert any purlin pipe into any main cover pocket that includes a pre installed strap 5 Insert a conduit into each cover conduit pocket of the main cover Do not install the roll up conduits at this time Actual frame may be a different length...

Page 27: ...g 1 or remove the pocket material as shown Fig 2 to install the strap NOTE Do not fully tighten the side straps at this time Tighten enough to hold the main cover on the frame 11 Beginning at one end of the main cover determine the height of the roll up side and remove the hem area For example if you want a 48 sidewall opening when the sidewall is rolled up remove 48 of the main cover hem Maximum ...

Page 28: ... and gearbox will be located 3 Insert a tubing adapter part of 102717 double drive into the conduit and align the holes of the adapter with the drilled holes in the conduit 4 Select one aluminum channel 102570 and drill a 3 8 hole through the channel approximately 2 from the end Attach a threaded rod FAK26 to the channel using a 3 8 nut on each side of the channel 2 3 8 Nut Threaded Rod 3 8 Nut no...

Page 29: ...8 Channel Aluminum Channel End Rafter Flat Washers Threaded Rod 3 8 Nut Top View 9 Slide the Twist of the Wrist mounting plate 103544 over the long bolts and secure the plate with lock nuts 10 Attach the Twist of the Wrist gearbox 103496 to the mounting plate using six 6 hex head bolts 11 Using a 5 16 X 2 1 2 carriage bolt and 5 16 nut attach the square shaft to a tubing adapter 102717 12 Slide th...

Page 30: ...f the mounting bracket Roll Up Cover Conduit Cover is not shown Fabric Clips TWIST OF THE WRIST ASSEMBLY INSTALLATION CONTINUED ANTI BILLOW ROPE INSTALLATION Gather the parts Anti billow rope CC5310A Fender washers FAMF03B Eyebolt 5 16 FA2071 Nut 5 16 FALB02B Tek screws Anti billow ropes secure the roll up sides when they are in the down position Complete the following steps to install the ropes 1...

Page 31: ...y Regularly check the end panels and main cover to see that they remain tight and in proper repair Check connections and all fasteners to verify that they remain tight Do not climb or stand on the shelter at anytime Remove debris and objects that can accumulate on the shelter Use tools that will not damage the cover when removing debris Remove snow to prevent excess accumulation Use tools that wil...

Page 32: ...POLY BUILDINGS 32 Revision date 03 15 12 QUICK START GUIDE 26 Wide Chick Inn Grid Represents 12 Squares FRONT Height 150 15 16 312 Width Frame length shown may differ from actual frame ...

Page 33: ...1901 26R1901 26R1901 26R1902 Purlin Connection On Joint of Rafter Purlin Connection On Joint of Rafter Purlin Connection On Joint of Rafter Purlin Connection On Joint of Rafter Purlin Connection 8 Above Ground Level Purlin Connection 8 Above Ground Level Ground Level ...

Page 34: ... 03 15 12 SIDE PROFILE 103739 R R R R R 131S075 131S075 131S075 131P0735 1 315 COVER CONDUIT AND ROLL UP PIPE ASSEMBLY 4 on center Rafter Spacing 24 Length center to center R Represents a rafter with a ratchet attached on the inside ...

Page 35: ... SIDE PROFILE 103740 R R R R R 131S075 131S075 131S075 131S075 131S075 131P0735 R 1 315 COVER CONDUIT AND ROLL UP PIPE ASSEMBLY 4 on center Rafter Spacing 36 Length center to center R Represents a rafter with a ratchet attached on the inside ...

Page 36: ...FILE 103741 R R R R R R R 1 315 COVER CONDUIT AND ROLL UP PIPE ASSEMBLY 131S075 131S075 131S075 131S075 131S075 131S075 131S075 131P0735 4 on center Rafter Spacing 48 Length center to center R Represents a rafter with a ratchet attached on the inside ...

Page 37: ...Purlin Mid Rafter Connection View 1 Purlin Connection View 7 Band Clamp Strut Connection E1 1 0 View 3 Purlin End Rafter Connection E1 1 0 View 2 QH1330 Sq Tube Connection View 4 End Wall End Rafter Connection View 6 1 75 Insert Sq Tube Connection View 5 ...

Page 38: ...2 CONNECTION DETAILS VIEW 3 BAND CLAMP STRUT VIEW 4 QH1330 SQ TUBE Sq Tube Sq Tube QH1330 Angle Bracket VIEW 2 PURLIN END RAFTER 1 2 Clamp Purlin Rafter Rafter Strut 1 90 Band Clamp VIEW 1 PURLIN MID RAFTER Purlin Mid Rafter Cross Connector ...

Page 39: ...12 CONNECTION DETAILS VIEW 7 PURLIN CONNECTION Sq Tube Sq Tube 1 75 Sq Tube Insert Inside Tek Screw Rafter Sq Tube Carriage Bolt 104074 Z Bracket 1 90 Band Clamp Purlin Purlin Tek Screw VIEW 5 1 75 INSERT SQ TUBE VIEW 6 END WALL END RAFTER ...

Page 40: ...R END No Door 10 Dimensions are inside to inside ATTENTION Measure the door and construct the door frame based on those dimensions Ground Level 2 x 2 Tube 2 x 2 Tubes 2 x 2 Tubes 1 5 x 1 5 Tube 2 x 2 Tube 9 See Door Jamb Addendum on the next page for details ...

Page 41: ... to conform to the angle created by the rafter curve To bend the plate tightly clamp it in a vise so the bend point is centered between the mounting holes Lightly tap the free end of the plate with a small maul until the desired angle is reached 3 Use four 4 FA4482B Tek screws to attach each 111708 bracket to the end rafter and top of each door jamb Brackets are used to secure the door jambs only ...

Page 42: ...POLY BUILDINGS 42 Revision date 03 15 12 END FRAMING DOOR END Door style shown may differ from actual door Ground Level ...

Page 43: ...43 POLY BUILDINGS Revision date 03 15 12 END FRAMING BACK 1 90 Socket Tee 1 90 Pipe Connection View 2 1 90 Pipe QH1330 Connection View 3 Ground Level ...

Page 44: ...er 1 90 Vertical Pocket Pipe VIEW 3 1 90 PIPE QH1330 VIEW 2 1 90 SOCKET TEE 1 90 PIPE 1 90 Socket Tee 1 90 End Wall Pipe 1 90 Vertical Pocket Pipe QH1330 Angle Bracket 5 16 x 5 Carriage Bolt Sq Tube Roll up Support Sq Tube Roll up Cross Member Sq Tube Vertical Support VIEW 1 ROLL UP SUPPORT ...

Page 45: ...d wall Pedestrian door is 12 from Roll up door End wall base rail and door framing consists of 2 x 2 square tube cut to length Pedestrian door rough Measure the door and frame the opening based on those dimensions End Wall Diagram 26 Wide with Roll up and Pedestrian Door Frame shown may differ slightly from actual frame QH1330 ...

Reviews: