


INSTRUCCIONES DE SEGURIDAD / INSTRUCTION DE SÉCURITÉ / SAFETY INSTRUCTIONS / INSTRUÇÕES DE SEGURANÇA / SICHERHEITSHINWEISE /
VEILIGHEIDSINSTURCTIES / INSTRUZIONI DI SICUREZZA /
Ο∆ΗΓΊΕΣ
ΑΣΦΑΛΕΊΑΣ
/
ИНСТРУКЦИИ
ПО
ТЕХНИКЕ
БЕЗОПАСНОСТИ
Lípari ref 33362
faro - 36
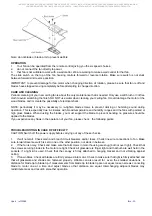
LIGAÇÕES ELÉCTRICAS (CONTROLO REMOTO)
Informação geral :
Instalar a ventoinha usando o controlo remoto :
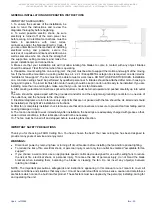
O receptor do controlo remoto, quando instalado dentro do resguardo da ventoinha vai restringir o movimento de
inclinação da bola montada, por conseguinte limitando a máxima inclinação do tecto, permissível a 15 graus. Isto é
equivalente a “3/12 de pendente do tecto”. Se for preciso um maior pendente, recomenda-se que o método de
instalação de controlo de parede mostrado na página anterior seja usado.
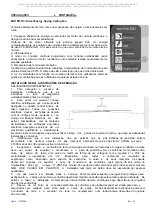
INFORMAÇÃO E INSTRUÇÕES DE OPERAÇÃO :
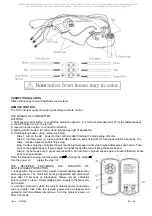
1. Definindo o código :
1.º passo: ligue a corrente alterna do controlador após ter terminado a instalação da lâmina do motor.
2.º passo: ligue a ventoinha, mantenha premido o botão SET na parte posterior do telecomando durante 5 até aos 60
segundos. Depois de concluir a configuração, a luz vermelha pisca duas vezes.
3.º passo: após a configuração do controlador, a ventoinha começa a trabalhar à velocidade mais elevada até ao fim
da configuração, depois de ter premido qualquer um dos botões. Em seguida, volta à velocidade original. Se a
configuração tiver início na velocidade mais elevada, a ventoinha manterá a mesma velocidade.
4.º passo: repita o mesmo procedimento do 3º passo, prima o botão de inversão. A ventoinha volta a trabalhar à
velocidade mais elevada até terminar a configuração. Em seguida, volta à velocidade original.
Nota: substituição das lâminas: desligue substitua as lâminas ligue a corrente repita os passos 3, 4.
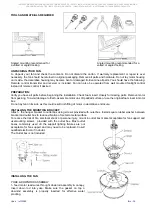
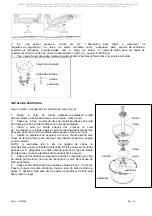
2. Instalando o Receptor no suporte de montagem
A. Precauções de segurança :
Aviso :Alta tensão : Desligue a fonte de corrente eléctrica retirando o fusível ou desligando o disjuntor de circuito.
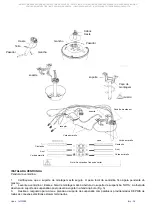
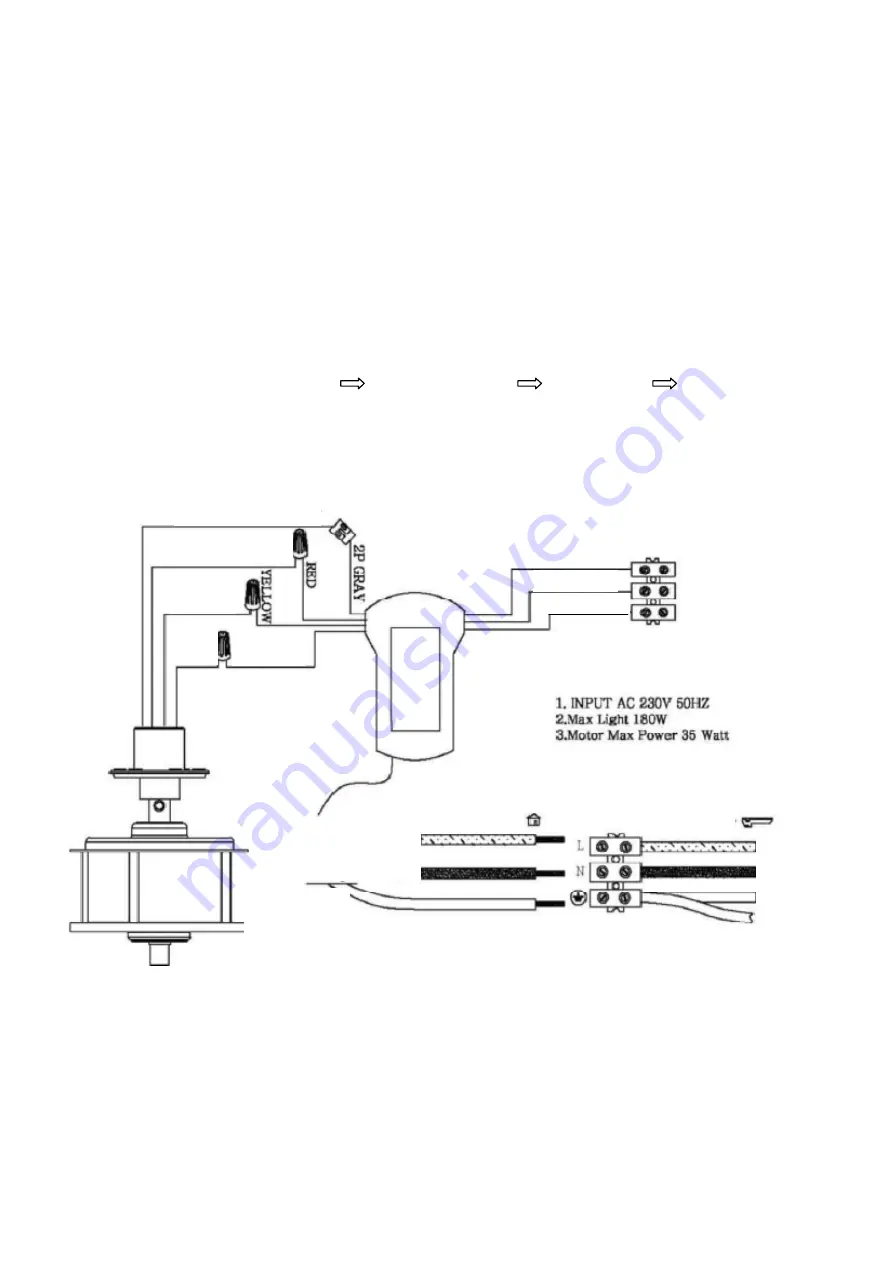
B. Conexões eléctricas :
Faça as conexões como se segue, mismo, encargue la instalación a un electricista autorizado.
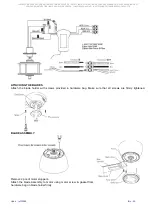
3.
Empurre todos os fios conectados para cima para a caixa de junção
4. Deslize o receptor no suporte de montagem (Fig. 4) e estenda a antena para baixo ao longo do suporte de
montagem.
5. Reinstale o resguardo no suporte de montagem.
6. Operando o transmissor :
A. Instale uma pilha de 12V A23 MN21 (incluída). Para prevenir danos no transmissor, retire a bateria se não
estiver a ser usada por um longo período de tempo.
B. Guarde o transmissor afastado dos excessos de calor e de humidade.
C. Esta unidade de controlo remoto está equipada com 16 combinações de código diferentes para prevenir
possíveis interferências de outros ou a outras unidades remotas tais como comandos de abertura de portas de
garagens, alarmes de carros, ou sistemas de segurança. Se achar que a sua ventoinha e o kit de luzes se ligam e
desligam sem usar o controlo remoto, mude simplesmente o código de combinação no seu transmissor e receptor.
2P cinza
rojo
amarelo
cinza
cinza
castanho
azul
Castanho
Azul
amarelo / verde
(terra)
amarelo / verde
AC/L castanho
AC/N azul
amarelo / verde
tecto
Summary of Contents for Lipari
Page 1: ......


