


Challenger RSS35
7
8. On especially dirty floors we recommend a two-pass
system. Turn off vac system for the first pass. Deposit
detergent and let sit for 3-5 min. Then lower the
squeegee, turn on the vac and run the second pass.
9. Keep an eye on the power consumption of the batteries.
Scrubber should run continuously for five hours with
new batteries before needing recharged.
10. Check the remaining amount of cleaning solution
through the hose on the side of the tank. The control
panel will indicate when the solution tank is empty.
(For conventional scrubbing, the consumption is about
.26 gallons per minute.)
11. When the solution tank is empty, drain the recovery
tank before refilling solution tank.
12. If the machine will be left unattended,: turn off all
operations, park the machine on level ground, engage
parking brake (if equipped), turn off power, and take
out the key.
13. Follow daily maintenance procedures after cleaning
(See "Daily Maintenance").
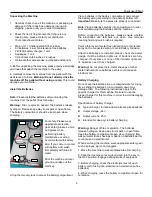
Battery Power Gauge
If equipped with digital % gauge:
the battery power
gauge displays the remaining charge of the batteries (0-
100%). To extend the battery life, it is best to recharge the
batteries when the power gauge is less than 50%. Do not
let batteries run completely out of charge.
If equipped with lights or digital bar gauge:
the battery
power gauge displays the remaining charge of the
batteries. When the battery is fully charged, all indicators
are on. As power is consumed, the indicator lights go out
from right to left. To extend the battery life, it is best to
recharge the batteries as soon as all the indicator lights
have gone out.
Note:
To extend battery life, do not charge the batteries
until the machine has been run for 30min.
Machine maintenance
Your machine can be kept in prime working condition if the
recommended daily, weekly, and monthly maintenance
procedures are followed.
Warning:
Risk of electric shock. Disconnect the battery
cables before performing any electrical maintenance.
Cleaning the Recovery Tank
1. Drive the scrubber over to the maintenance area,
engage parking brake (if equipped), and turn off the
power.
2. Turn the recovery tank hose drain cover counter-
clockwise and remove it. Direct drain hose on back of
recovery tank to drainage area and allow the recovery
tank to completely drain.
Note: We advise wearing gloves during this procedure in
order to avoid contact with dirty water and cleaning
chemicals that will be drained from the recovery tank.
3. Once recovery tank has drained, flush with warm water
(no hotter than 60°C or 140°F) to remove residues.
Allow to completely drain and air dry.
4. Disassemble and wash the floating filter screen in the
recovery tank. Allow to dry before replacing.
5. Leave tank open to air dry completely before storing
the machine.
Daily Maintenance
1. Drive the scrubber over to the maintenance area,
engage parking brake (if equipped), and turn off the
power.
2. Drain and clean the recovery tank. Allow to air dry.
3. Disassemble and clean the floating filter screen in the
recovery tank. Allow to dry before replacing.
4. Drain the solution tank and flush with hot water (no
hotter than 60°C or 140°F) if necessary. Check parts for
corrosion or wear.
5. Remove the scrub brush and clean. Check for foreign
objects entangled in the bristles and remove. Inspect for
wear, and replace if bristles are worn out.
6. Raise squeegee assembly. Wipe the squeegee and
inspect for wear. Lower squeegee assembly and check
to see that leading edge of squeegee is square and
meets the ground properly. Adjust or replace squeegee
as needed.
Note:
Squeegees have four useable edges. Once an edge
has worn down, squeegee may be flipped over and reused
until it is completely worn out.


