SS WSC21
4
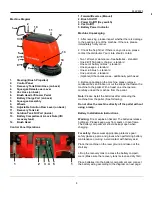
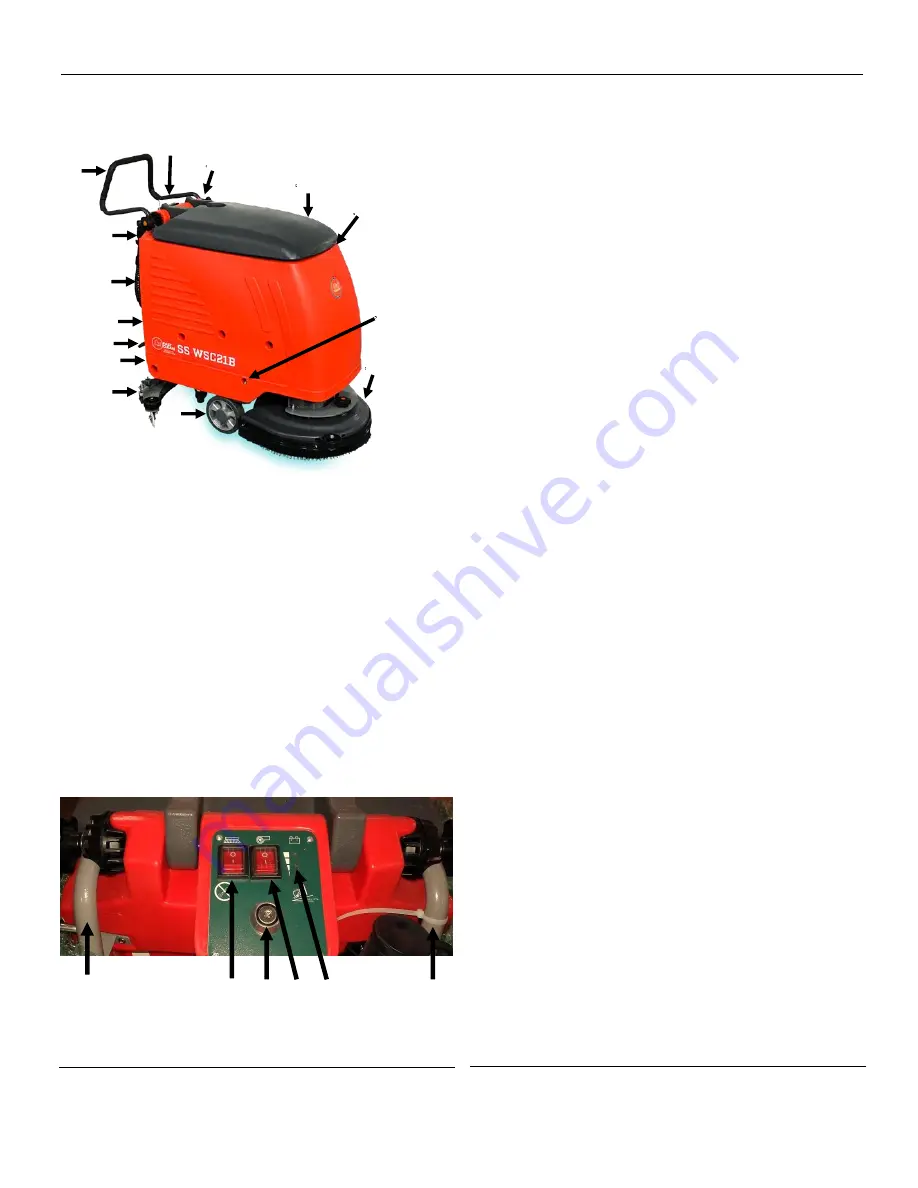
Machine Diagram
1.
Steering (Brush Propelled)
2.
Control Panel
3.
Recovery Tank Drain Hose (on back)
4.
Squeegee Raise/Lower Lever
5.
Vac Hose (on back)
6.
Brush Head Lift/Lower Pedal
7.
Battery Charge Port (on back)
8.
Squeegee Assembly
9.
Wheels
10.
Adjustable Solution Flow Lever (on back)
11.
Recovery Tank Lid
12.
Solution Tank Fill Port (inside)
13.
Battery Compartment & Lock Nuts (lift\
recovery tank)
14.
Brush Head
Control Panel Operations
1. Forward/Reverse (Manual)
2. Brush On/Off
3. Power On/Off (Key switch)
4. Vac On/Off
5. Battery Power Indicator
Machine Unpackaging
1. After receiving, please inspect whether there is damage
to the packing crate of the machine. If there is, please
immediately notify carrier.
2. Check the freight list. If there is any omission, please
contact the distributor. Your crate should contain:
- Two 12V wet, maintenance
–free batteries - standard
- One 24V/15A battery charger - standard
- One set of battery cables - standard
- One squeegee - standard
- One scrub brush - standard
- One pad driver - standard
- (Optional) Other accessories - additionally purchased
3. Before unpackaging the machine, please remove
cardboard box and loosen or cut the straps that fasten the
machine to the pallet. With at least one other person,
carefully unload the machine from the pallet.
Note:
Please install the batteries after unloading the
machine from the pallet. (See following).
Do not drive the machine directly off the pallet without
using a ramp.
Battery Installation & Instructions
Warning:
Fire or explosion hazard. The batteries release
hydrogen. Please keep away from spark or open flame.
The battery compartment should be kept open when
charging.
For safety:
Please wear appropriate protective gear:
safety glasses, apron and gloves when performing battery
maintenance or wiring. Avoid contact with battery acid.
Place the machine on the level ground and take out the
start key.
Lift up the recovery tank to access the battery compart-
ment. (Make sure the recovery tank is clean and dry first).
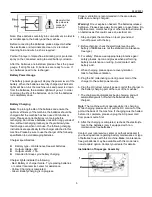
Place batteries into the battery compartment and connect
the battery wiring according to the diagram on next page:
1
2
1
3 4 5
Black
Red
Be careful that
the poles are
connected
properly!
1
2
3
5
6
7
8
9
12
13
14
10
4
11


