background image

10

sideKick HD Manual, Fast Forward Video, Inc

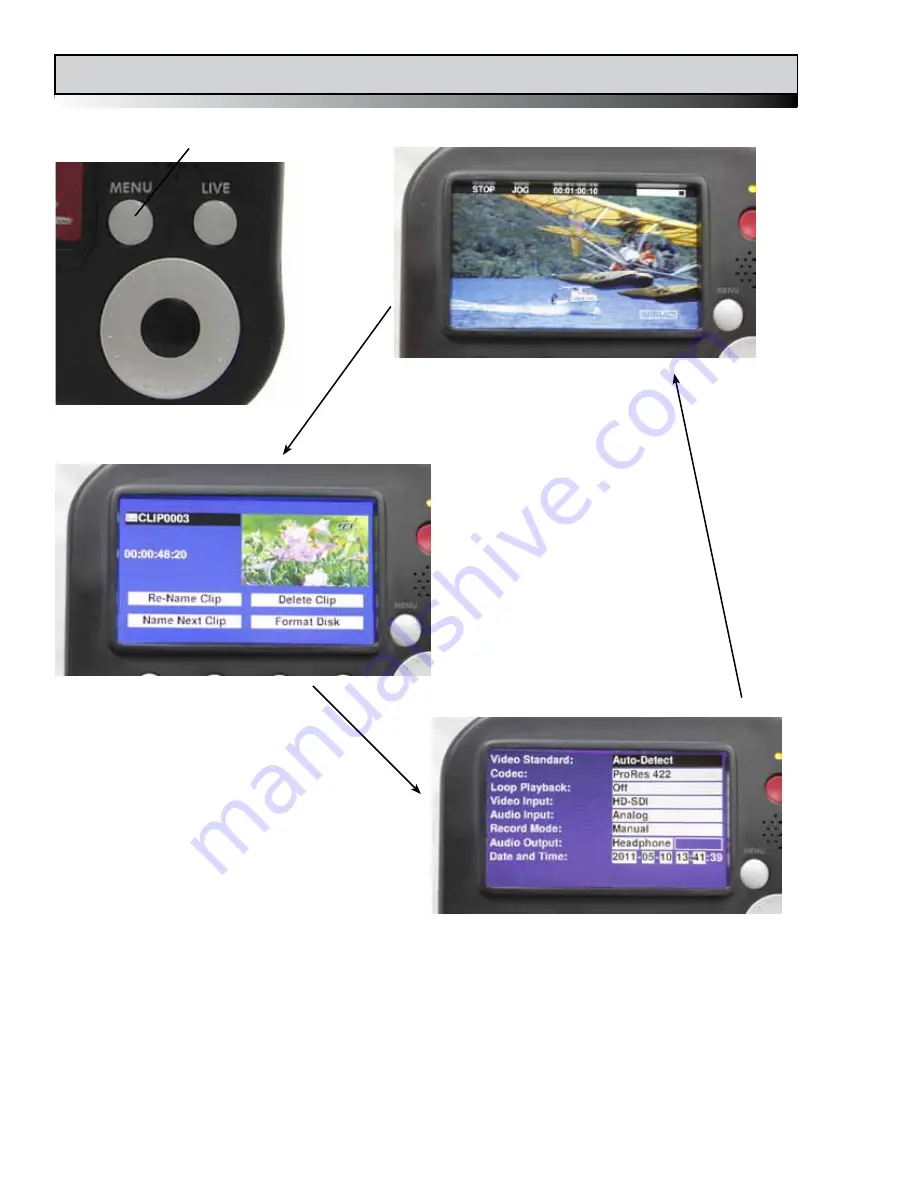
The Screen Scheme

The MONITOR Screen

The Menu Button

The CLIP Menu

The SET-UP Menu

sideKick HD has a few different 

screens, each with special purposes.

The 

MONITOR Screen

 is your main operational 

view. This screen will be used for a few things, 

such as camera pass-thru, a confidence monitor 

when recording and basic playback of clips.

The 

CLIP Menu

 deals with operations involving the clip such as selecting, naming or deleting 

clips. The 

SET-UP Menu

 has a variety of recorder configuration settings. 

The MENU button is used to switch between the different screens. Pressing the MENU button 

moves from the MONITOR Screen to the CLIP Menu to the SET-UP Menu and back again to the 

MONITOR Screen in a cyclical manner.

Summary of Contents for sideKick HD

Page 1: ...nual is proprietary No part of the sideKick HD Manual may be copied or modified without the written consent of Fast Forward Video Inc Printed in the U S A June 2011 Phone 949 852 8404 Fax 949 852 1226...

Page 2: ...6 Drive Installation 7 Connections 8 Front Panel Controls 9 The Screen Scheme 10 The Menu Button The Monitor Screen 11 Live View Live Button Record Mode Playback Mode Jog Scrub The CLIP Menu 12 Clip L...

Page 3: ...Video Standard Codec The SET UP Menu continued 15 Loop Playback Video Input Auto Record Audio Input Audio Output Record Format Date Time Factory Defaults Firmware Version Serial Number Updating Firmwa...

Page 4: ...e http www ffv com tech support DO NOT ATTEMPT to repair or modify the unit as this might cause further damage which could void your warranty A technician will determine whether your problem is caused...

Page 5: ...Mount the sideKick HD anywhere with the standard 1 4 20 mount and ample power options including varible voltage battery input from 7 16 volts DC or from AC line voltage using the included power adapte...

Page 6: ...the scroll wheel to move through the menu options and the wheel s center black button to select your settings See SET UP Menu for addtional details 6 Format Drive If the drive is new it should be for...

Page 7: ...on the back of the unit figure 1 3 Take the drive and gently slide it within the drive bay until you feel a connection which will align the end of the drive with the drive lock tab located on the bac...

Page 8: ...Power locking Mini XLR connector Variable voltage power supply requirements 7 16VDC consumption 3 21W Power changes with different modes i e record vs pass thru and fan changes due to temperature 5 H...

Page 9: ...P MENU 6 Scroll Wheel Use this wheel to move through the video clip in either a JOG or SCRUB fashion Also used for navigating through the menus 7 Center Select Button Used to switch between the playba...

Page 10: ...few things such as camera pass thru a confidence monitor when recording and basic playback of clips The CLIP Menu deals with operations involving the clip such as selecting naming or deleting clips Th...

Page 11: ...monitor so the Camera Operator knows what is actually being recorded 3 In PLAYBACK MODE the operator can play clips forward normally JOG one frame at a time in either direction or using the SCRUB fea...

Page 12: ...the and buttons while in this view RE NAME CLIP Pressing the center button on the scroll wheel when this field is highlighted will bring up another window displaying the alphabet and some symbols Navi...

Page 13: ...your choice 6 If you choose to proceed with the formatting a second pop up warning window will appear use the scroll wheel to highlight OK and press the center black selection button on the wheel 7 A...

Page 14: ...clips will not playback Why worry let us do the hard work Available Formats 1080 29 97 P 1080 59 94 I 720 59 94 P 1080 25 00 P 1080 50 00 I 720 50 00 P 1080 23 98 P 720 29 97 P 720 25 00 P 720 23 98 P...

Page 15: ...on to finish the clip Assuming the camera is providing timecode through the video input cable CAMERA TIME CODE will allow sideKick HD to begin and stop recording based on rolling timecode from the cam...

Page 16: ...ort htm 1 Locate the latest revision of sideKick HD firmware on www ffv com 2 Download the firmware file and copy it to a solid state drive SSD that will be used in the sideKick HD 3 Install that SSD...

Page 17: ...r the provided USB to SATA cable or insert the SSD into an already hooked up SATA drive dock 2 Wait for your computer to recognize the drive Once you see the icon that represents the drive click on th...

Page 18: ...OMPRESSION Method Apple ProRes 422 standard upgradable via www ffv com Apple ProRes 422 HQ future codecs available Maximum Bit Rate 220 Mbit s codec dependent POWER Power Supply 12 VDC Power Connector...

Page 19: ...Kick HD within 30 days from date of purchase to receive the extended warranty period Warranty Limitations THIS WARRANTY SHALL NOT APPLY IF THIS PRODUCT a IS DAMAGED BY NEGLIGENCE ACCIDENT MISUSE OR BY...

Reviews: