55
Make sure the three-way valve (if so equipped) is open
to the product tank.
4.
Fold out the boom. (Refer to the “Hydraulic Booms”
section of this manual for instructions).
5.
Start the tractor. Start the pump and operate at desired
speed.
6.
Toggle the MASTER switch on the sprayer control box
to the ON position to open the boom control valves. The
individual boom switches on the control box must also
be ON.
7. Make the pressure adjustment using the PRESSURE
ADJUST switch on the control box.
8. Check and adjust for adequate agitation in the sprayer
tank. If the pressure drops, adjust the pressure setting
at the sprayer control box.
9. Check for uniform flow at all the spray nozzles.
The sprayer is now ready for calibration.
9.17.1 Priming The Sprayer Equipped With A
RAVEN Rate Controller
If your sprayer is equipped with a RAVEN rate controller, you
must do the following to allow the spray boom to function
while standing still.
1. Disconnect the radar cable between the tractor and the
sprayer.
2. Turn RAVEN console master switch ON.
3. Press the “Self Test” button so the red light stays on.
4.
Press “Enter” so the red light stays on.
5.
Press the No.5 key and the No. 0 key.
6.
Press “Enter” again.
Now the RAVEN rate controller is programmed with a signal
telling it that it is moving, allowing the spray boom to operate
while standing still.
To Disengage Signal
1. Reconnect the radar cable between the tractor and the
sprayer.
2.
Move the tractor and sprayer or turn the rate controller
OFF and then back ON.
9.18 Calibrating The Sprayer
Your sprayer will be equipped with one of two different
control systems:
• TeeJet Electric Control System (standard)
• Raven Rate Control System (optional)
The two systems need to be calibrated in different ways.
9.18.1 TeeJet Electric Control System
1.
Make sure sprayer is clean.
2. Select nozzle and pressure.
3. Fill sprayer half full with water. DO NOT add chemical.
4.
Set up two stakes at the following measurements,
depending on nozzle spacing:
• 272 feet apart for 15” nozzle spacing
• 204 feet apart for 20” nozzle spacing
• 136 feet apart for 30” nozzle spacing
• 102 feet apart for 40” nozzle spacing
5.
Under field conditions and at spraying speed, drive the
distance and note both engine RPMs and the time. Do
this at least twice to get the average time.
6.
Stop the tractor. Put the tractor in park.
7. Unfold the sprayer booms. (Refer to the “Hydraulic
Booms” section of this manual for instructions).
8. Start the sprayer and run at desired RPMs and pressure.
9. While parked, collect the liquid from the nozzle. Hold a
container graduated in ounces below a nozzle. Record
the output for the same time period as the average
driving time determined in step 5. The average output
in ounces is equivalent to the application rate in gallons
per acre (GPA).
NOTE: Measuring the output from each tip helps assure
balanced spraying from the tips. It will also help you identify
worn tips which may need replacement.
10. Repeat the procedures for the remaining nozzles.
11. Compare the actual application rate with the intended
rate. If the actual rate varies from the desired rate, you
must adjust the pressure or speed or change tip size to
compensate.
Summary of Contents for BW750
Page 18: ...18...
Page 19: ...19 Decal A Decal B Decal C Decal D...
Page 20: ...20 Decal E Decal F Decal G Decal H Decal I Decal J...
Page 21: ...21 Decal K Decal L...
Page 36: ...36 9 6 Spray Tip Wear...
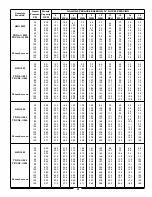
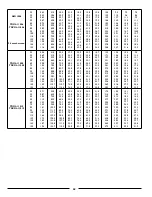
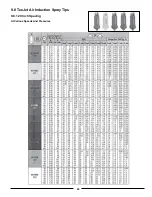
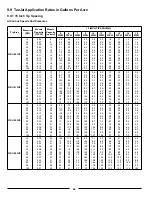
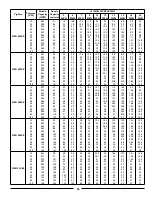
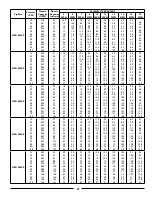
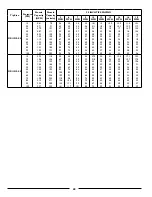
Page 43: ...43 9 8 TeeJet Air Induction Spray Tips 9 8 1 20 Inch Spacing At Various Speeds And Pressures...
Page 81: ...81 12 3 Raven Console Calibration Information...
Page 83: ...83 Notes...

