
REBUILD INSTRUCTIONS
www.fastestinc.com
Roseville, MN
Toll Free at 1-800-444-2373
Fax 651-645-7390
PAT# 6,039,303
WP085 Rev B 04/2009
PUSH
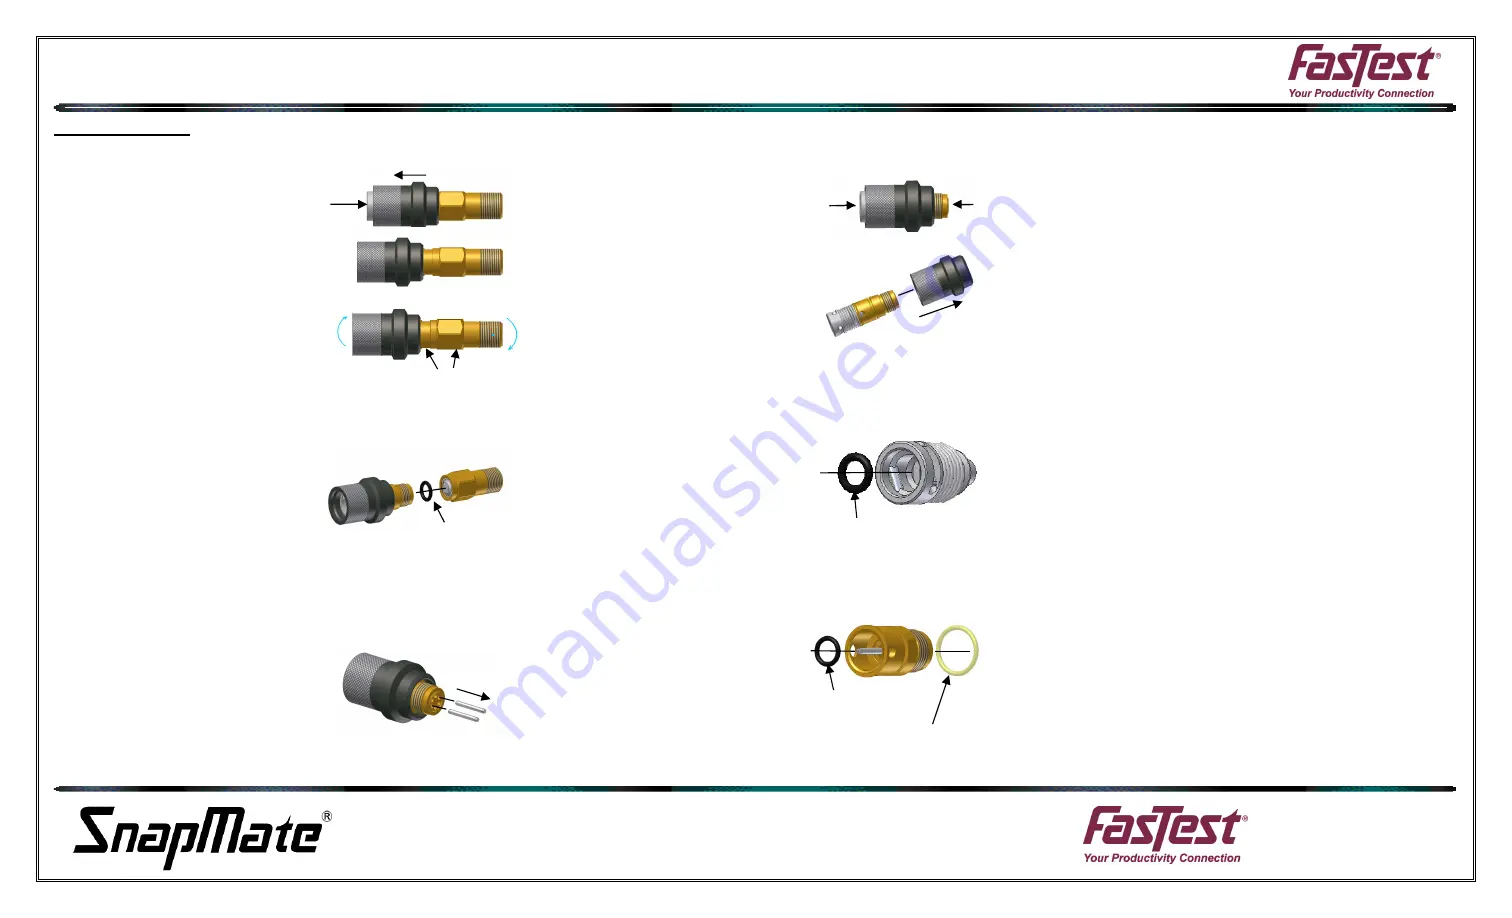
DISASSEMBLY:
1) Push against the piston and slide the
sleeve forward. Similar movement
as actual connection. This will ex-
pose the wrench flats on the front
body.
2) Thread apart the two halves of the
body by counter rotating the wrench
flats. Use caution when taking apart
body as internal components may
fall out.
3) Once the two halves of the body are
apart, remove the poppet seal using
a repair pick, or similar tool. If the
seal remains below the poppet, re-
move poppet by pushing through
from termination end. It may not be
necessary to remove the poppet
and spring if the seal is easily ac-
cessible. Exercise caution so as not
to scratch or deform the seal
groove. This could cause a poten-
tial leak path.
4) Remove the poppet activation pins. If
the pins are not easily removed, the
connector could require repair and
should be inspected for unusual
wear.
5) Remove the front sleeve. To remove
the sleeve, the front assembly must
be compressed. (Can be finger
compressed.) Once compressed,
the sleeve will slide off the back of
the assembly. Hold compression
while removing the sleeve. Once
compression is removed, the inter-
nal balls will be forced out of their
respective holes. Use caution when
taking apart the assembly as in-
ternal components may fall out. A
catch basin or cloth is recommend-
ed.
6) Remove the main seal from the pis-
ton. Using a repair pick, or similar
tool, remove the main seal. Exer-
cise caution so as not to scratch or
deform the seal groove. This could
cause a potential leak path.
7) Remove the internal piston seal and
the external sleeve o-ring from the
front body. Using a repair pick, or
similar tool, remove the seal. Exer-
cise caution so as not to scratch or
deform the internal seal groove.
This could cause a potential leak
path.
FasTest, Inc. Product Warranty
FasTest, Inc. warrants its products against defects of workmanship and/or ma-
terial for 12 months from the date of the sale by FasTest, Inc. This warranty is
void if the product is misused, tampered with or used in a manner that is not in
accordance with FasTest, Inc. recommendations and/or instructions. FasTest,
Inc. is not liable for consequential or other damages including, but not limited
to, loss, damage, personal injury, or any other expense directly or indirectly
arising from the use of or inability to use its products either separately or in
combination with other products. ALL OTHER WARRANTIES EXPRESSED
OR IMPLIED, WHETHER ORAL OR WRITTEN, INCLUDING BUT NOT
LIMITED TO WARRANTIES OR MERCHANTABILITY OR FITNESS FOR A
PARTICULAR PURPOSE ARE EXPRESSLY EXCLUDED.
Remedy under this warranty is limited to replacement of the product or an account credit in the
amount of the original selling price, at the option on FasTest, Inc. All allegedly defective products
must be returned prepaid transportation to FasTest, Inc. along with information describing the
products performance, unless disposition in the field is authorized in writing by FasTest, Inc.
WRENCH FLATS
POPPET SEAL
COMPRESS
MAIN SEAL
REMOVE
SLEEVE
INTERNAL PISTON SEAL
SLEEVE O-RING
REMOVE


