Step 3
–
For safety reasons, please always make sure to
test the stability and safety of the product before use.
Double check all nuts and bolts, knobs and connectors,
make sure that these are tight and securely fastened
before use of your product. Test the product under light
use or light loads the first time to confirm assembly and
structure of the product is correct.
Step 1
–
Attach
the stick on pads
(Part No. 6) to
parts 5, 9 and 12.
Use two stick on
pads per part. One
in the front and
one in the back.
Please scan the QR Code below for the product
demonstration video. Or go to the URL shown here and find
the product video. www.FattoadPro.com/Videos
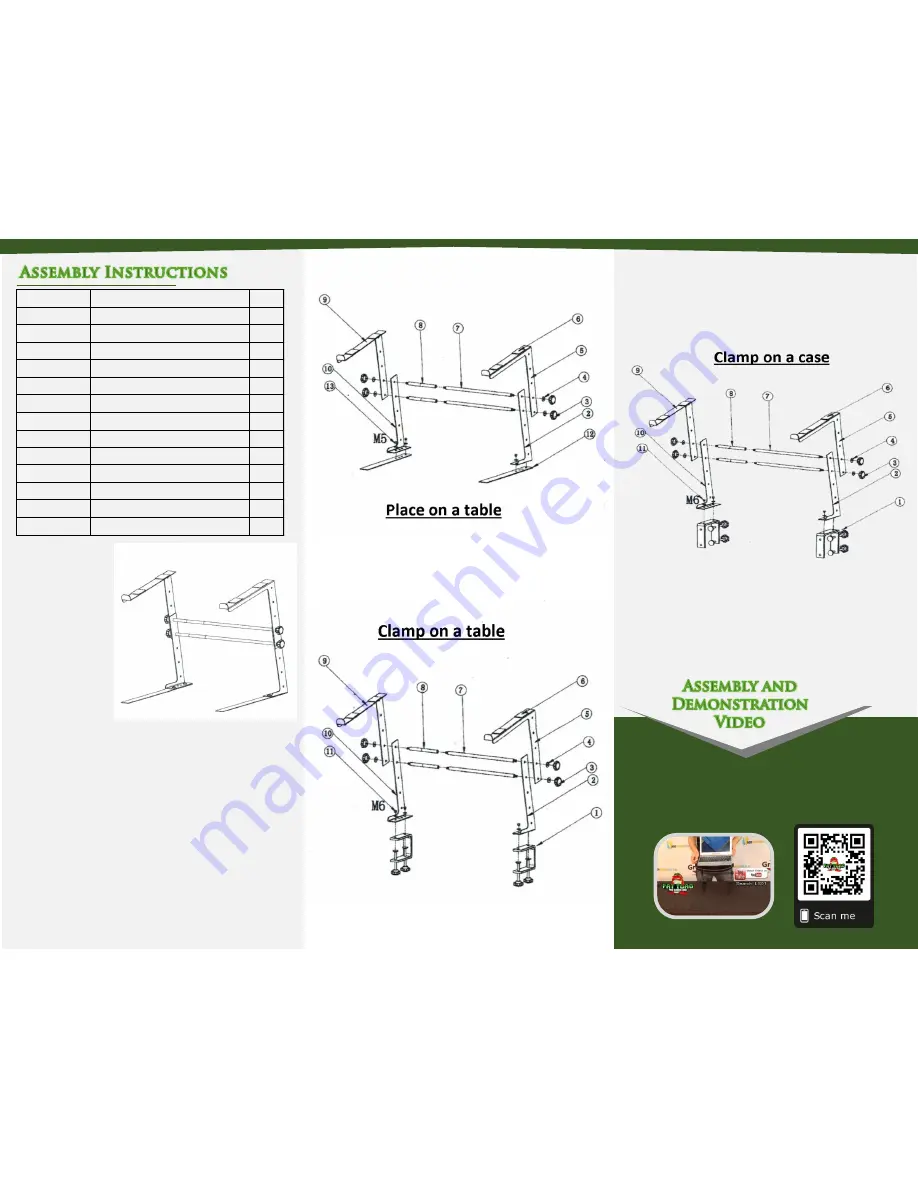
FOR TABLE TOP
1. Attach part 2 to part to part 12 as shown in the
diagram using the four of the smaller screws (M5
screws). NOTE: The base has four holes. Only two
holes are threaded. Repeat using parts 10 and 12 for
the other side.
2. There are six round cross supports included. The two
long ones (part 7) are the main cross supports. The
stand can be widened by attaching either one or two
of the shorter rods (part 8) to each of the main cross
supports. Line up the holes of the left top holder
(Part 9) with the holes of the left bottom support
(part 10) to the desired height and insert the rods
through the holes. Place a washer (part 4) on the end
and secure with the plastic knobs (part 3). Repeat for
the right side using parts 5 and 2.
PART NO.
PART NAME
QTY
1
Table or case clamp
2
2
Right bottom support
1
3
Plastic knob
4
4
Rubber wash
8
5
Right top holder
1
6
EVA Pad
4
7
Cross rod
2
8
Width adding piece
2
9
Left top holder
1
10
Left bottom support
1
11
M6 Screw
4
12
Level table bar
2
13
M5 Screw
4
TO CLAMP TO A TABLE
1. Attach part 2 to part 1 using the larger M6 screws
(part 11) with the knobs pointed down. Repeat using
parts 1 and 10 for the other side.
2. Repeat step two from the table top instructions.
TO CLAMP TO A STAND
1. Attach part 2 to part 1 using the larger M6 screws
(Part 11) with the knobs pointed toward the rear of
the stand. Repeat using parts 1 and 10 for the other
side.
2. Repeat step 2 from the table top instructions


