1.
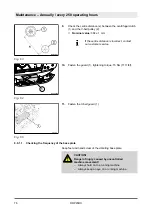
Loosen screw (3) on the rocker arm.
2.
Adjust the hexagon nut (2), until the feeler gauge (1) can be
inserted and pulled out with noticeable resistance after the
screw (3) has been tightened.
1.
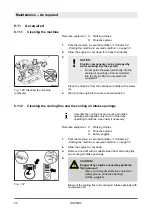
Install the valve cover (2) with a new gasket.
2.
Tighten the fastening screws (1) evenly.
3.
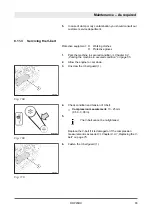
Assemble covering (1) and air filter cover (2).
4.
After a short test run check the valve cover for leaks.
8.9.3 Changing the engine oil and cleaning the oil filter
NOTICE!
Danger of engine damage!
–
Change the oil only with the engine at oper-
ating temperature.
–
Use only oil of the permitted specification
Chapter 8.3.1 „Engine oil“ on page 65
–
Chapter 8.4 „List of fuels and
Adjusting the valve clearance
Fig. 69
Final work
Fig. 70
Fig. 71
Maintenance – Annually / every 250 operating hours
DRP45DX
79
Summary of Contents for DYNAPAC DRP45DX
Page 2: ...2 ...
Page 6: ...Table of contents DRP45DX 6 ...
Page 7: ...1 Introduction Introduction DRP45DX 7 ...
Page 11: ...2 Technical data Technical data DRP45DX 11 ...
Page 15: ...3 Concerning your safety Concerning your safety DRP45DX 15 ...
Page 40: ...Concerning your safety Signage DRP45DX 40 ...
Page 41: ...4 Indicators and control elements Indicators and control elements DRP45DX 41 ...
Page 43: ...5 Checks prior to start up Checks prior to start up DRP45DX 43 ...
Page 49: ...6 Operation Operation DRP45DX 49 ...
Page 56: ...Operation Parking the machine in secured condition DRP45DX 56 ...
Page 57: ...7 Loading transporting the machine Loading transporting the machine DRP45DX 57 ...
Page 61: ...8 Maintenance Maintenance DRP45DX 61 ...
Page 96: ...6 Check the oil levels 7 Clean the machine thoroughly Maintenance As required DRP45DX 96 ...
Page 97: ...9 Troubleshooting Troubleshooting DRP45DX 97 ...
Page 106: ...Troubleshooting Malfunctions during operation DRP45DX 106 ...
Page 107: ...10 Disposal Disposal DRP45DX 107 ...
Page 109: ......
Page 110: ......

