background image

- The user should be able to stop the device's power supply in case of emergencies. At least one of the 
following should therefore be accessible at all times:

- the power cable connector on the back of the unit
- the power socket the cable is plugged in to
- the power socket switch or extension cable switch

- Should the device not be used in the manner described in this user manual, damages or even injuries could
occur. Fazley cannot be held responsible for any injuries or damages that occur as a result of improper use 
of this product.

Storage and transport:

- This product is designed for mobile use. It can be transported separately and without its original packaging 
as long as it’s well-protected against shocks and collisions. For optimal protection and damage prevention, 
it’s recommended to use a matching flight bag or flight case fitted with foam padding.
- This device is not designed for permanent (24/7) use. The expected lifespan of the device will not be 
affected by occasionally turning the device off. Disconnect the device or turn off the power when it is not 
actively in use.
- If the device will not be used for a longer period of time, it should be disconnected and stored in a dust-free 
environment. 
- Do not expose the device to extreme temperature differences.

Housing

- Inspect the device's housing frequently, and always just before use. Avoid operating the device if there are 
large dents or cracks, or if screws are missing. Do not use the device if the housing is not in good condition. 
Contact your dealer or a qualified technician if you are unsure about the state of the device.
- Check the device and the screws for corrosion. Corrosion must not be present on this device. Contact your 
dealer or a qualified technician if you find any corrosion on the screws.
Every power and signal connector should be securely mounted. Do not use the device if the connectors are 
not secure.
Avoid dust and dirt build-up. Clean the device once a month by disconnecting it from the power supply and 
wiping it down with a dry or slightly moist cloth. If the device is used frequently, the cleaning intervals should 
increase.

Symbol explanation:

WEEE: 

Ensure that this device is disposed of properly. This product falls under the WEEE 

(Waste Electrical and Electronic Equipment) directive. The requirements of this directive apply
to all manufacturers and producers of electronic devices in the EU. Do not throw this product 
away with regular rubbish. Please contact your local authority for more information about how 
to recycle and dispose of these products in your region. By recycling this product in the proper
manner, we can work together to ensure that we can continue to enjoy these kinds of 
products and still protect the environment as much as possible from pollution. 

CE:

 The CE logo indicates that this product meets the European norms and requirements to 

which it must legally conform.

Only suitable for indoor use

: this product was only designed for indoor use. The maximum 

environmental temperature must not exceed 40 degrees Celsius (104 degrees Fahrenheit). 

All information and illustrations shown in this user manual are subject to change without further notice.

User manual version: 1.0

Creation date + author initials: 07-05-2020 RV Revision date + author initials: 

Summary of Contents for DDK-080

Page 1: ...rum Kit User Manual All information and illustrations shown in this user manual are subject to change without further notice User manual version 1 0 Creation date author initials 07 05 2020 RV Revision date author initials ...

Page 2: ... Drum Frame 1x Central Cable Tree 1x Kick Drum Trigger Pedal 1x Hi Hat Pedal 1x Drum Key 1x Quick Start Guide 1x Assembly Instruction Book Check the electronic drum kit and any included accessories If you notice that the drum kit or any included accessories are defective or have been damaged in transit immediately contact your retailer Please note The products seen in the images included in this m...

Page 3: ...he device needs to be cleaned Do not pull on the cable to remove a connector as this could cause damage Do not use any cables other than the ones described in this manual Do not use defective cables Please contact your dealer if the included or necessary cables do not function properly with this device In the event that the device is exposed to extreme temperature changes e g transported through a...

Page 4: ...d technician if you are unsure about the state of the device Check the device and the screws for corrosion Corrosion must not be present on this device Contact your dealer or a qualified technician if you find any corrosion on the screws Every power and signal connector should be securely mounted Do not use the device if the connectors are not secure Avoid dust and dirt build up Clean the device o...

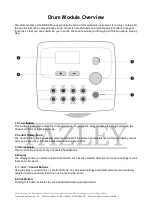
Page 5: ...he various parameters scroll through display menus and can be used as a fast track parameter and volume control 3 Volume Knob This controls the volume of any connected headphones 4 Display The display shows you all the relevant information such as the selected drum kit and various settings menus that can be browsed 5 and Control Buttons Using the plus and minus control buttons any individual setti...

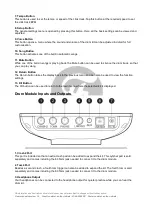
Page 6: ...so be used to view the function settings 13 Kit Button The Kit button can be used to return to the main menu where the selected kit is displayed Drum Module Inputs and Outputs 1 Crash2 Port This port is included so that an extra crash pad can be added to expand the kit This cymbal pad is sold separately and comes including the 6 35mm jack needed to connect it to the drum module 2 Tom4 Port Besides...

Page 7: ...be connected Music can then be played through the drum module from the external audio device so that you can play along Here you can play along to a library of your own tracks or follow online video tutorials 6 USB MIDI Port The drum module has a USB B port that can be used to connect it to a computer This can be used to send MIDI data to a computer and can only be used in combination with music p...

Page 8: ... levels down to a minimum to avoid any shock for anyone who strikes one of the drums if the volume has been left at too high a level This may not only damage any connected headphones but may also damage the hearing of the person wearing them Always counter this by beginning at a lower volume and slowly adjusting as needed while gently striking one of the triggers Power Button Switching Off When sw...

Page 9: ...h the song yourself Press the mute button once more to un mute the drum part of the song Playing Along with an External Audio Source The DDK 080 is able to take a signal from an external audio source like a phone tablet MP3 player or computer This puts the sound of any music tutorials or other audio media through the module and any connected headphones so that you can play along To connect an exte...

Page 10: ...strike has a more extreme effect on the volume of the sample LOG1 LOG2 Logarithmic curves where LOG2 is the more extreme curve where a lighter trigger strike has more effect on the volume of the sample SPLINE Large volume difference between soft and hard trigger strikes LOUD1 LOUD2 Get a powerful volume when the trigger is struck lightly Dynamic Range 0 80 This controls the dynamic range of the tr...

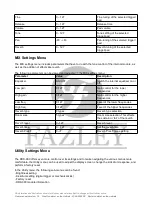
Page 11: ... happen due to the vibrational transference of the strike Experiment with the Head Rim value to hit the right balance but be aware that when set to a high value it can be more difficult to trigger a rim shot MIDI Settings Via the Set up menu six different MIDI parameters can be adjusted For example the MIDI channel can be set and the USB MIDI interface can be switched on and off Parameter Value De...

Page 12: ...ower frequencies High freq 0 127 Level of the higher frequencies Reverb type 8 types Reverb type selection Room size 5 types Room size selection This effects the sustain or tail of the reverb Reverb level 0 127 Reverb level Reverb time 0 127 Set the reverb time Reverb PreLF 0 7 Reverb PreLF range setting Utility Settings Menu The DDK 080 offers even more control over its settings and to make navig...

Page 13: ...anical kick trigger Factory Reset By using the Factory Reset function any adjusted settings of the drum module will be returned to their original factory settings Any adjustment made manually including user kits and so on shall be removed If you select Yes next to System Reset the factory reset shall be carried out and cannot be reversed Module Information This displays information about the drum ...

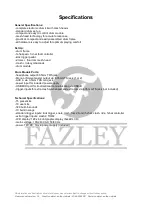
Page 14: ...mm TRS mini jack power input for included power supply USB MIDI port for bi directional communication via USB B trigger inputs for extra crash cymbal pad and extra tom via 6 35 mm TS jack not included Technical Specifications 15 preset kits 10 user kits 329 built in sounds 10 built in songs standard trigger inputs kick trigger snare tom1 tom2 tom3 hi hat crash ride hi hat controller extra trigger ...

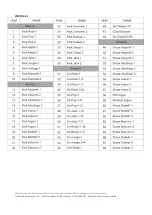
Page 15: ...KIT List All information and illustrations shown in this user manual are subject to change without further notice User manual version 1 0 Creation date author initials 07 05 2020 RV Revision date author initials ...

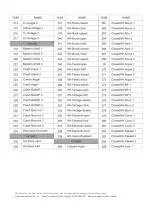
Page 16: ...List All information and illustrations shown in this user manual are subject to change without further notice User manual version 1 0 Creation date author initials 07 05 2020 RV Revision date author initials ...

Page 17: ...All information and illustrations shown in this user manual are subject to change without further notice User manual version 1 0 Creation date author initials 07 05 2020 RV Revision date author initials ...

Page 18: ...All information and illustrations shown in this user manual are subject to change without further notice User manual version 1 0 Creation date author initials 07 05 2020 RV Revision date author initials ...

Page 19: ...All information and illustrations shown in this user manual are subject to change without further notice User manual version 1 0 Creation date author initials 07 05 2020 RV Revision date author initials ...

Page 20: ...All information and illustrations shown in this user manual are subject to change without further notice User manual version 1 0 Creation date author initials 07 05 2020 RV Revision date author initials ...

Reviews: