background image

4

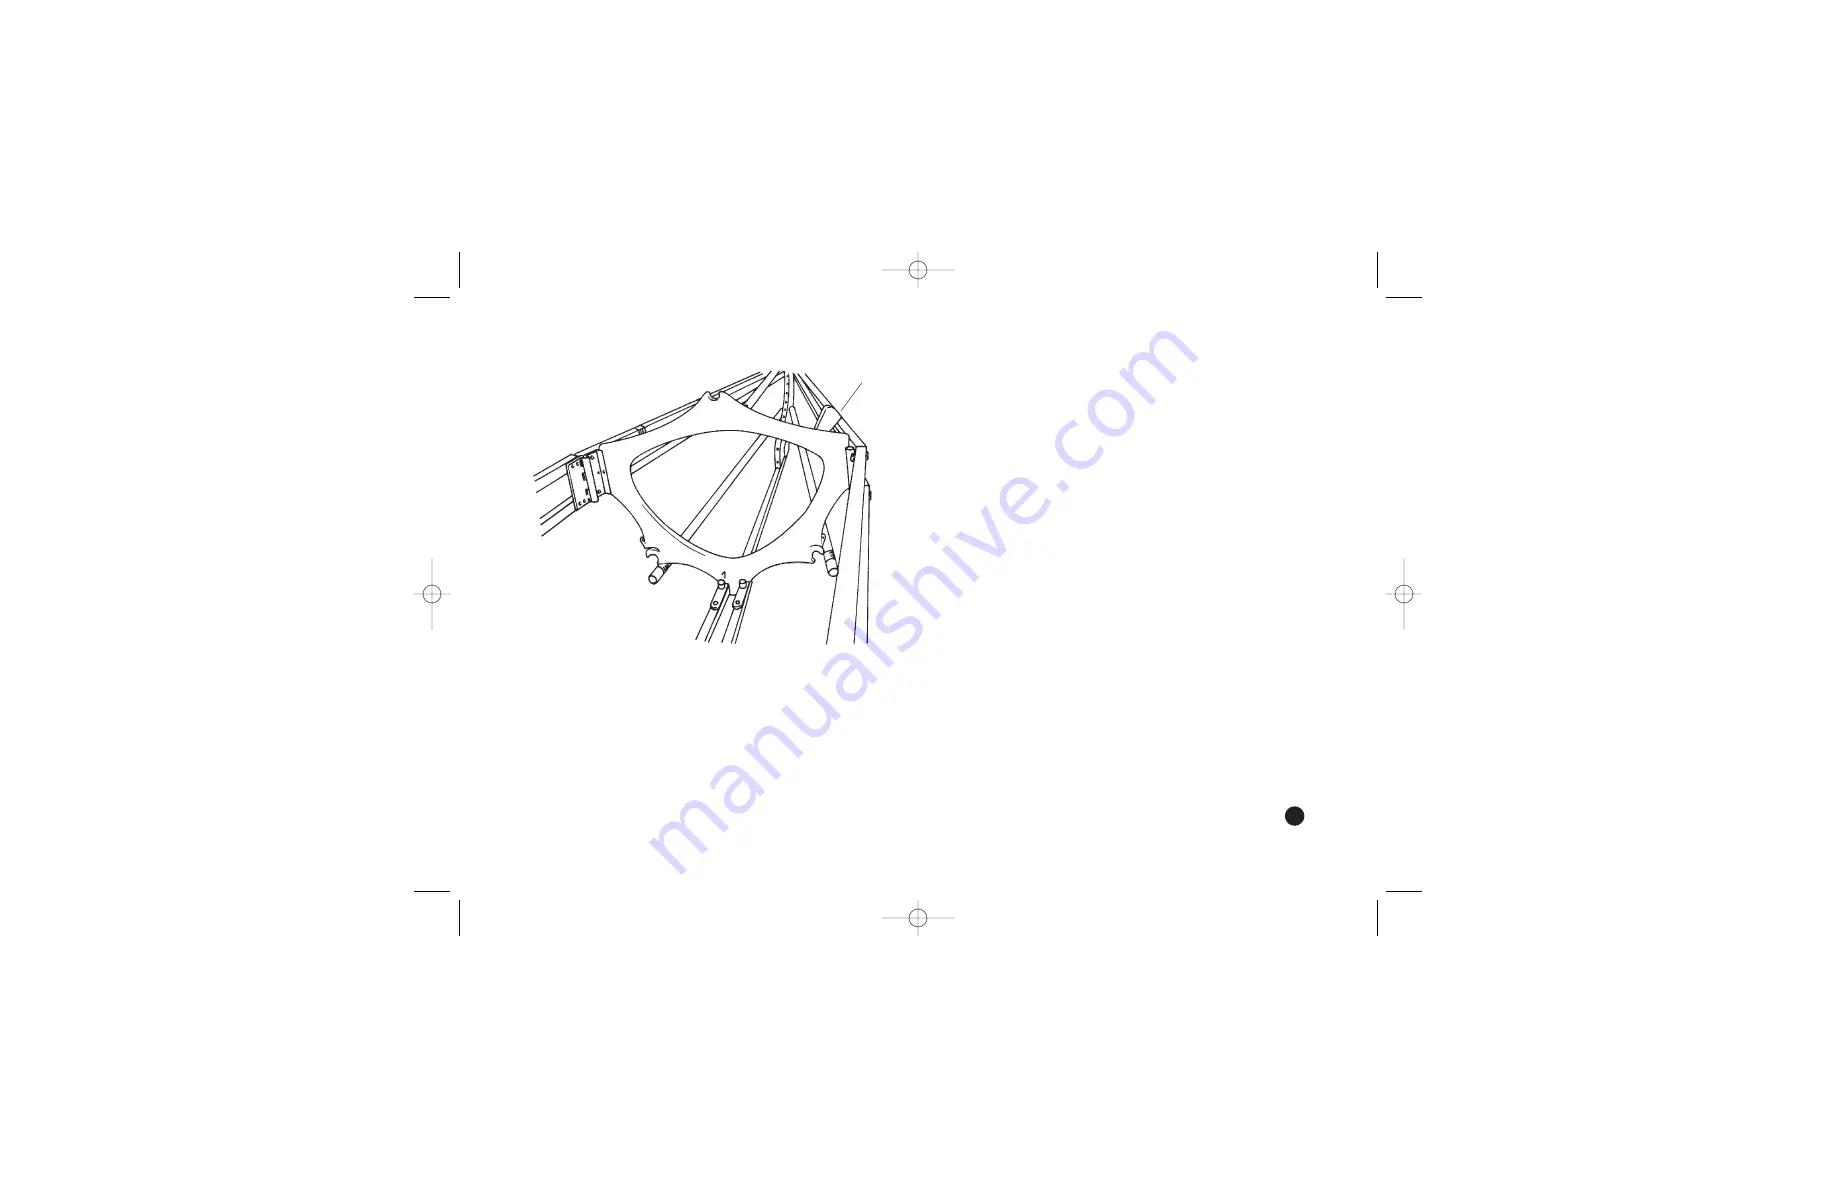
ATTACH #1 CROSSRIB TO KEEL. 

Hold crosspiece at 45 angle with “pin” at the bottom fac-
ing the bow. 

Insert pin into the end of the single keel tube on the bow
end frame section.

Bring crosspiece to vertical position. Attach gunwales to
side of crosspiece.

With the plastic “wing” in the “up” position, slide pin on
crosspiece into hole on frame. Lock into position by turn-
ing “wing” down.

Feathercraft

K2 Expedition Double

9

Wing

K2English_Coaming.xpr  1/18/06  9:38 AM  Page 9

Summary of Contents for K2 Expedition Double

Page 1: ...244 Cartwright Street on Granville Island Vancouver British Columbia Canada V6H 3R8 Telephone 604 681 8437 Toll Free 1 888 681 8437 Fax 604 681 7282 www Feathercraft com info feathercraft com K2 Exped...

Page 2: ...ion Folding Kayak Page 2 Specifications Page 3 K2 Frame Page 4 Care and Maintenance Page 5 Disassembly Page 6 K2 Assembly Instructions Page 7 Feathercraft K2 Expedition Double 1 K2English_Coaming xpr...

Page 3: ...are the culmination of many years of design development and testing The Feathercraft K2 is a stable high volume ocean touring kayak that performs exceptionally well in rough conditions Feathercraft K...

Page 4: ...gs 2 nylon spray skirts 2 sea socks Large duffel style pack bag with shoulder straps hip belt Packcloth over the shoulder carrying bag Repair kit Assembly video Specifications Length 6 m 20 Beam 85 cm...

Page 5: ...t braces Keel plate stiffener bar Chine tubes with oversleeves Mast attachment Hinged gunwale Chines gunwales and deck bars permanently through bolted to HDPE keel plate similar for both bow and stern...

Page 6: ...If you should leave your boat assembled for a maximum of two months this will assist in preventing tubes seizing Other maintenance musts every two months completely disassemble the kayak wash the fra...

Page 7: ...he chamber Ensure sponson is not twisted in the chamber Repeat with the opposite side Urethane glue and patches are included in the repair kit Duct tape works well on the sponsons Disassembly Let the...

Page 8: ...s Bow Chines Skin Foot Braces Stern Chines Mast Deck Bar Bow Section Stern Section Gunwale Bar Sections Keel Bars Rudder Stern Foot Slings attached in stern seasock Crossribs Hatch Rims Seat Slings Se...

Page 9: ...GE 2 FOLD OUT THE BOW END FRAME SECTION 1 IS STAMPED ON KEEL 3 SLIDE 1 KEEL SECTION OVER BOW FRAME INSERT LIFT PLASTIC CONNECTORS TO LOCK INTO PLACE Feathercraft K2 Expedition Double 8 Plastic connect...

Page 10: ...gle keel tube on the bow end frame section Bring crosspiece to vertical position Attach gunwales to side of crosspiece With the plastic wing in the up position slide pin on crosspiece into hole on fra...

Page 11: ...With the twister in the open position line up the dogpoint screw with the hole on the delrin block Close the twister and lock into place Feathercraft K2 Expedition Double 10 Block in open position Bl...

Page 12: ...d with the Feathercraft logo is the bow Velcro tabs are attached to the center of the inside of the hull Open the tabs Insert the frame section as far as it will go snug to the end Use a slide lift mo...

Page 13: ...9 INSTALL RIM INSERTS Feathercraft K2 Expedition Double 12 Rim Insert Stern Slide into pocket on underside of coaming rim K2English_Coaming xpr 1 18 06 9 38 AM Page 12...

Page 14: ...ions together The end with the two plates faces the bow Attach the 5 keel section to the 5 frame section 11 ATTACH BOW AND STERN KEEL Reach through the bow cockpit and lift keel up enough to allow joi...

Page 15: ...hole in the middle of the hinge section to secure into place 13 ATTACH GUNWALES BLUE TAPE TO THE STERN SECTION The gunwale section is attached with the blue tape on the top bar and the plastic connect...

Page 16: ...sides 15 INSERT 3 CROSSRIB FIRST Lay crossrib horizontally between the gunwale frame work Push frame out and twist crossrib down into position Repeat with crossribs 2 and 5 With crossrib 4 attach bot...

Page 17: ...ether If necessary pull tube towards center of skin to allow tubes to slide easily together b Attach stern section by pulling tube apart extending shockcord and sliding tubes together If necessary pul...

Page 18: ...he delrin latch or twister in the open position Insert the pin on the 3 cross rib into the delrin block Close the twister Feathercraft K2 Expedition Double 17 Stern Block in open position Block in clo...

Page 19: ...n tape a Slide bow deck bar through the hole in the 2 crossrib and stern deck bar through hole in 5 crossrib Black plug faces towards cockpit b Reach through hatch opening and connect with forward dec...

Page 20: ...rosspiece Locate mast hole towards bow and holes in the ends of the tube facing up 19 ATTACH COAMING BRACKET Screw down coaming knob on bracket on crosspiece so that bolt extends through hole in deckb...

Page 21: ...stern of cockpit Insert bow end b through hole in crossrib at bow of cockpit Slide oversleeve towards stern till spring button appears in 2nd hole Feathercraft K2 Expedition Double 20 Gunwale Bar Reba...

Page 22: ...casting Rotate rudder into position Attach stainless steel rudder cable to sister clips on rudder delta Feathercraft K2 Expedition Double 21 Sister Clips two of these clips are mounted on each side o...

Page 23: ...rim over hatch opening Wrap fabric sleeve with bungee over rim Roll down hatch neck Close with buckle Cover with hatch cover Secure with toggle Feathercraft K2 Expedition Double 22 Cord Lock K2English...

Page 24: ...t bars have single band of white tape Stern seat bars have double white tape Secure Velcro sandwich below sling portion around chine bars Slide seat bars outside crossribs and between gunwale bars Pus...

Page 25: ...ed around the base of the 3 crossrib in front of the seat and secured with buckle 24 INFLATE SPONSONS Turn the top of the valve to open When inflating sponsons alternate sides to ensure the frame and...

Page 26: ...only enter the sock and not the whole boat It s also great for keeping the inside of your kayak clean Tips on Usage and Installation The shiny side of the fabric faces in towards the kayak frame When...

Page 27: ...ntrols foot slings are attached to the inside of the stern sea sock Attach stainless steel rudder cables to brass snaps on outside of sock Shockcord Inside of the sea sock Webbing with loop for adjust...

Page 28: ...ith loop To lengthen lift tab of ladder lock buckle We strongly recommend the use of Sea Socks at all times as a safety item and as a means of keeping the inside of the kayak free of sand and dirt The...

Page 29: ...s from the sock Unclip the foot sling from the brass snap on the inside of the sock Webbing is passed through a loop sewn to the inside of the sock a To detach slide end of webbing through slider buck...

Page 30: ...teel rudder cable Fold or pinch webbing to make a V Re thread webbing through slider buckle c Shockcord attached to base of foot sling is pulled forward and looped around the 2 crossrib Feathercraft K...

Page 31: ...Feathercraft Products Limited 1998 Printed in Canada 12 2005 Recycled paper K2English_Coaming xpr 1 18 06 9 38 AM Page 30...

Reviews: