background image

8

Maintenance

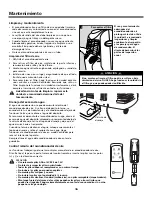
Draining excess water

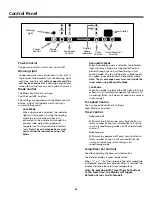
Condensed water may accumulate in the unit. If the

internal tank becomes full, the Warning Light will shine
and the unit will not operate until the unit has been
drained.

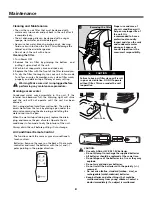
First, uplug electrical cord from wall outlet. Then, drain
excess water from the tank by placing a pan under the
drain valve, removing the drain plug, and letting the
water drain into the pan. 

When the water stops draining out, replace the drain
plug, and remove the pan of water. Operate the air
conditioner in fan mode to dry the interior of the unit.

Always drain the unit before putting it into storage.

Cleaning and Maintenance

• The unit has an air filter that must be cleaned with

water every two weeks and put back in the unit after it
is completely dry.

• The air discharge grille can be cleaned with a rag or

sponge, warm water and mild detergent.

• Never use hot water, bleach, gasoline, acids, cleaning

fluid or a brush to clean the unit. This will damage the
cabinet and the air discharge area.

• Do not wash the unit with a hose.

Cleaning the filter.

1. Turn Power OFF.
2. Remove the air filter by grasping the bottom  and

pulling it up and out of the unit.

3. Wash in hot soapy water, rinse and shake dry.
4. Replace the filter with the front of the filter toward you. 
5. To dry the filter thoroughly, run your unit in fan mode

for a few minutes. Remember, only a clean filter works
properly and delivers top efficiency at every setting.

Air Conditioner Remote Control 

AAA

IEC R03

1.5V

+

-

AAA

IEC R03

1.5V

The functions work the same as your air conditioner’s
touch controls.

Batteries:  Remove the cover on the back of the remote
controller and insert the batteries with the (+) and (-)
poles pointing in the proper direction.

Drain Valve

Warning: Make sure unit is unplugged before
performing any maintenance procedure.

Proper use and care of
your air conditioner will
help ensure longer life of
the unit. It is
recommended to have a
professional annually
inspect and clean the coils
and condensate water
passages. Expense of
annual inspection is the
consumer’s responsibility.

CAUTION:

• Use only AAA or IEC R03 1.5V batteries.
• Do not attempt to recharge the supplied batteries
• All batteries should be replaced at the same time.
• Do not dispose of the batteries in a fire as they may

explode.

• Do not mix old and new batteries.
• Do not install the batteries with the polarity (+/–)

reversed.

•  Do not mix alkaline, standard (carbon - zinc), or

rechargeable (nickel-cadmium) batteries.

• Keep batteries and other things that could be

swallowed away from young children. Contact a
doctor immediately if an object is swallowed.

10

11

CAUTION

Failure to keep air filter clean will result
in poor air circulation. DO NOT operate
without filter. This can render the unit
inoperative.

Removing the filter

Summary of Contents for Portable Dehumidifier

Page 1: ...s rie Date of Purchase Fecha de compra Date d achat Keep these instructions for future reference Guarde estas instrucciones para referencia futura Gardez ces instructions pour les consulter ult rieure...

Page 2: ...nside with blinds curtains or furniture A A B B C C 125V 15A Power Supply 115V 60HZ AC Only 1 Phase Outlet Requirement 3 Prong Grounding Type 125 V 15 Amp Minimum Wire Size 14 A W G 3 Wire Use Copper...

Page 3: ...alve Power Cord Exhaust Port Serial Plate Room Air Intake System Air Intake 3 Description of Parts on the Portable Cooling Unit Control Panel Use the electronic control panel to select the mode fan sp...

Page 4: ...dow panel Window panel extensions Window adapter kit An installation parts kit is packed with your unit in a separate carton Before you discard the packaging that your unit came in please locate the c...

Page 5: ...dow frame and adjust to width of window fig B Window adapter kit may be installed vertically as well as horizontally This installaton may also be used for crank style windows fig E 3 Tighten the four...

Page 6: ...ght will shine orange Air is dehumidified as it passes through the unit without being in full cooling mode The fan will operate in Med speed Fan speed is not adjustable in Dehumidify mode Note The air...

Page 7: ...n Med speed Fan speed is not adjustable in Dehumidify mode Fan Mode 1 Press the On Off button to turn the unit on The unit will power up and display the room temperature 2 Press the Mode button until...

Page 8: ...filter thoroughly run your unit in fan mode for a few minutes Remember only a clean filter works properly and delivers top efficiency at every setting Air Conditioner Remote Control AAA IEC R03 1 5V...

Page 9: ...r by unreasonable use of the unit including without limitation failure to provide reasonable and necessary maintenance or to follow the written Installation and Operating Instructions If the unit is p...

Page 10: ...conexi n a tierra 125V 15Amp Tama o m nimo del alambre No 14 A W G de 3 alambres Use solamente alambre de cobre Protector del circuito Fusible con retardo de tiempo o interruptor de circuito de 15 Amp...

Page 11: ...caci n de las piezas del acondicionador de aire port til Panel de control Use el panel de control electr nico para ajustar la funci n la velocidad del ventilador o el temporizador o para ver y ajustar...

Page 12: ...ntana Extensiones del panel de la ventana Juego de adaptador de ventana Con su acondicionador de aire se incluye en una caja separada un juego de piezas de instalaci n Antes de deshacerse del material...

Page 13: ...a ventana para asegurar las extensiones del panel 4 Cierre la ventana fig C 5 El juego de adaptador de ventana ahora debe calzar firmemente dentro del marco de la ventana Ahora puede instalar los tubo...

Page 14: ...o Fan Ventilador Cuando se selecciona el modo Ventilador la luz indicadora brillar de color amarillo El aire circular a trav s de la habitaci n sin enfriamiento Nota El acondicionador no necesita evac...

Page 15: ...odo Fan Ventilador 1 Oprima el bot n On Off para encender el acondicionador de aire El acondicionador se encender y mostrar la temperatura de la habitaci n 2 Oprima el bot n Mode Modo hasta que la luz...

Page 16: ...ua del dep sito colocando un recipiente debajo de la v lvula de drenaje retire el tap n de drenaje y deje que el agua escurra hacia el recipiente Cuando se termine de drenar el agua coloque nuevamente...

Page 17: ...o realizar mantenimento razonable y necesario ni seguir las instrucciones escritas sobrela instalaci n y operaci n Si la unidad se destina a uso comercial de negocios para alquiler u otro uso o aplica...

Page 18: ...as bloquer la circulation de l air vers les claires voies ext rieures de la caisse Ne pas bloquer la circulation de l air au voisinage de l appareil l int rieur stores rideaux meubles ou l ext rieur a...

Page 19: ...e commande Utilisez le tableau de commande lectronique pour s lectionner le mode et la vitesse de ventilateur et pour r gler la minuterie ou observer la temp rature ambiante et la temp rature programm...

Page 20: ...e adaptateur pour fen tre Un ensemble de pi ces d installation est fourni avec votre appareil dans un cartonnage s par Avant de jeter l emballage de l appareil rep rez celui qui contient ces pi ces et...

Page 21: ...fixer les rallonges 4 Fermez la fen tre fig C 5 L ensemble adaptateur pour fen tre doit maintenant se trouver bien adapt dans le cadre de la fen tre et vous pouvez alors installer les tubes d change...

Page 22: ...shumidification Remarque En mode de d shumidification les tubes d change d air doivent vacuer l air l int rieur de la pi ce Mode Ventilateur Quand le mode Ventilateur est s lectionn le t moin devient...

Page 23: ...vitesse du ventilateur n est pas r glable en mode D shumidification Mode Ventilateur 1 Appuyez sur le bouton Marche Arr t pour mettre l appareil en marche L appareil se met en marche et l afficheur do...

Page 24: ...N essayez pas de recharger les piles fournies Toutes les piles doivent tre remplac es en m me temps Ne jetez pas les piles dans un feu elles pourraient exploser Ne mettez pas ensemble des piles neuves...

Page 25: ...ar une d fectuosit ou un mauvais fonctionnement une installation incorrecte une utilisation inappropri e un entretien inad quat ou insuffisant ou le non respect des consignes d installation et d utili...

Page 26: ......

Page 27: ......

Page 28: ...is plugged into an outlet Make sure the unit is not in the off position Make sure the circuit breaker has not been tripped If the unit does not cool sufficiently Make sure the exhaust tube and nozzle...

Reviews: