- 10 -
Refrigerated CRR Remote Models:
Cabinet Preparation
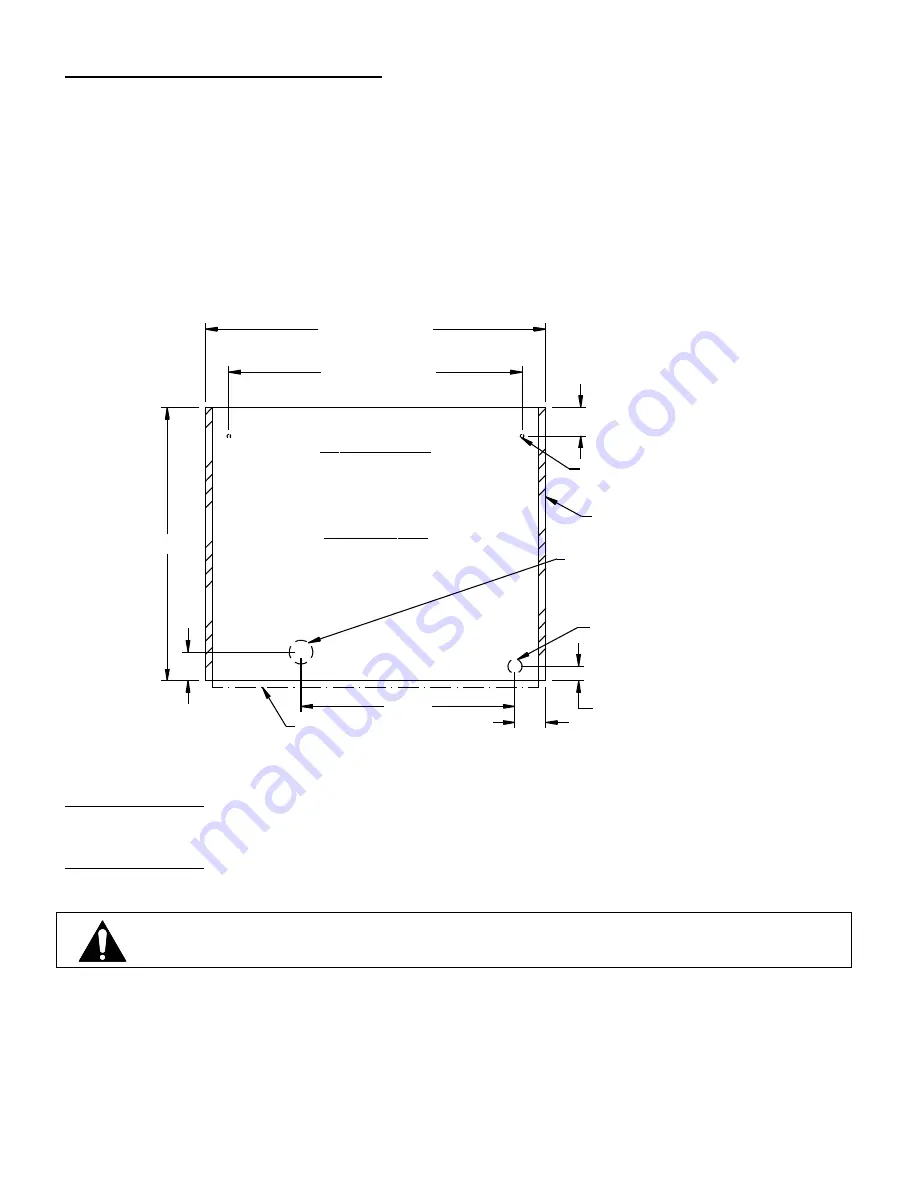
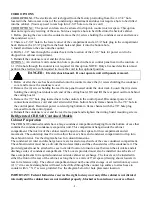
The CRR remote sets directly on top of the counter and refrigeration and evaporator condensate drain lines
must run through the counter top surface. The evaporator condensate drain must runs to a floor drain and
refrigeration lines to a remote condenser unit
(2) ½”dia. case fastening holes will need to be drilled through the counter top surface to attach case to
counter with ¼” X 2” screws provided. A 2-1/2”dia. hole will also need to be drilled through counter top
for refrigeration lines and evaporator condensate tube connections. Use the diagram below for hole
placement location.
IMPORTANT:
When placing cases in a line up the number of end panels used will be different. The cut
out and hole placement dimension will need to be adjusted for each particular line up circumstance. See
LINE UP INTALLATION section of this manual.
CASE TOP VIEW
3/4" END
PANELS
(2) 1/2" DIA
MTG. HOLES
1-1/2" HOLE
FOR CORD
STANDARD OPT.1
11/16 DOOR HANDLE
CLEARANCE
1.53
3.26
3.03
36.0 (36" UNIT)
47.0 (48" UNIT)
31.0 (36" UNIT)
43.0 (48" UNIT)
FRONT
22.62
3.0
29.0
2-1/2" HOLE REFRIGERATION
AND EVAPORATOR
CONDENSATE DRAIN
CUSTOMER SIDE
CORD OPTIONS
CORD OPTION 1:
The electrical cord is shipped from the factory protruding from the bottom rear corner
of the cases base. A 1-1/2”dia. hole must be drilled through the counter for the power cord clearance. See
diagram below for hole placement location.
CORD OPTION 2: An additional electrical cord connection hole is provided in the rear control panel next
to the case’s controls. A 1-1/2”dia hole through the counter is not required for this option. NOTE: Only a
licensed electrician must perform the electrical work required to move the cord to this optional position.
DANGER:
Electric shock hazard. Do not operate unit with panels removed.
1.
Remove the (8) screws holding the rear frame panel located under the door track and also remove
the 7/8” hole plug located next to the controls in the control panel.
2. Disconnect the power cord connections and move the cord and cord strain relief from the bottom
hole in the frame channel to the hole in the control panel and reconnect power cord. Plug bottom
hole in frame channel with the 7/8” hole plug removed from the control.
3. Reinstall the rear frame panel.






![FRIGOGLASS ICM2000 [R290] User Manual preview](http://thumbs.mh-extra.com/thumbs/frigoglass/icm2000-r290/icm2000-r290_user-manual_2338092-01.webp)


