32
Installing the Mobile Camera System
DRILLING PRECAUTIONS
When drilling holes, check the area into which you are drilling to
be sure you do not damage vehicle components while drilling. All
drilled holes should be deburred and all sharp edges should be
smoothed. All wire routings going through drilled holes should be
protected by a grommet or convolute/split loom tubing.
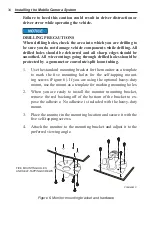
1. Mark a location on the vehicle for the 2.0 in/50.8 mm diameter,
heavy-duty, 7-pin connector. Be sure to have enough depth be-
hind the vehicle surface at this location to accommodate the full
length of the connector.
2. Mark two holes 2.935 in (74.55 mm) apart to accommodate user-
supplied 5/16 in (8 mm) bolts/screws to attach the connector to
the vehicle surface.
3. Double-check your marks by referring to the connectors includ-
ed in the kit, then drill the holes.
4. Attach the connector with user-supplied hardware.
Installing the Monitor (
CAMLCD-INT-56, CAMLCD-INT-70,
CAMLCD-INT-70-B, CAMLCD-70)
Before the installation, find an appropriate location for the monitor with
these considerations in mind:
• The location should be able to support 9 lb (4 kg) and should not
obstruct the view of the driver.
• The monitor should be installed so that the driver can easily view
the rear-view mirrors of the vehicle. This system does not replace the
need for these mirrors, it is strictly a supplement. Typically a center
console in the cab or dashboard can be a good mounting location;
mounting from the ceiling of the vehicle is also possible.
• Avoid placing the monitor where it will be constantly exposed to
direct sunlight, moisture, a strong magnetic field (as near a speaker)
or a heat source (A/C or heater duct).
• Before choosing a mounting location, decide where to route the
monitor cable. The installation requires an appropriately sized hole to
accommodate whichever cable your system has:

