background image

8


Installation and Maintenance Instructions

Model G-SND Global Series Sounder

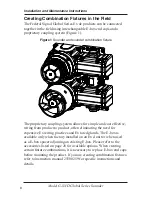
Creating Combination Fixtures in the Field

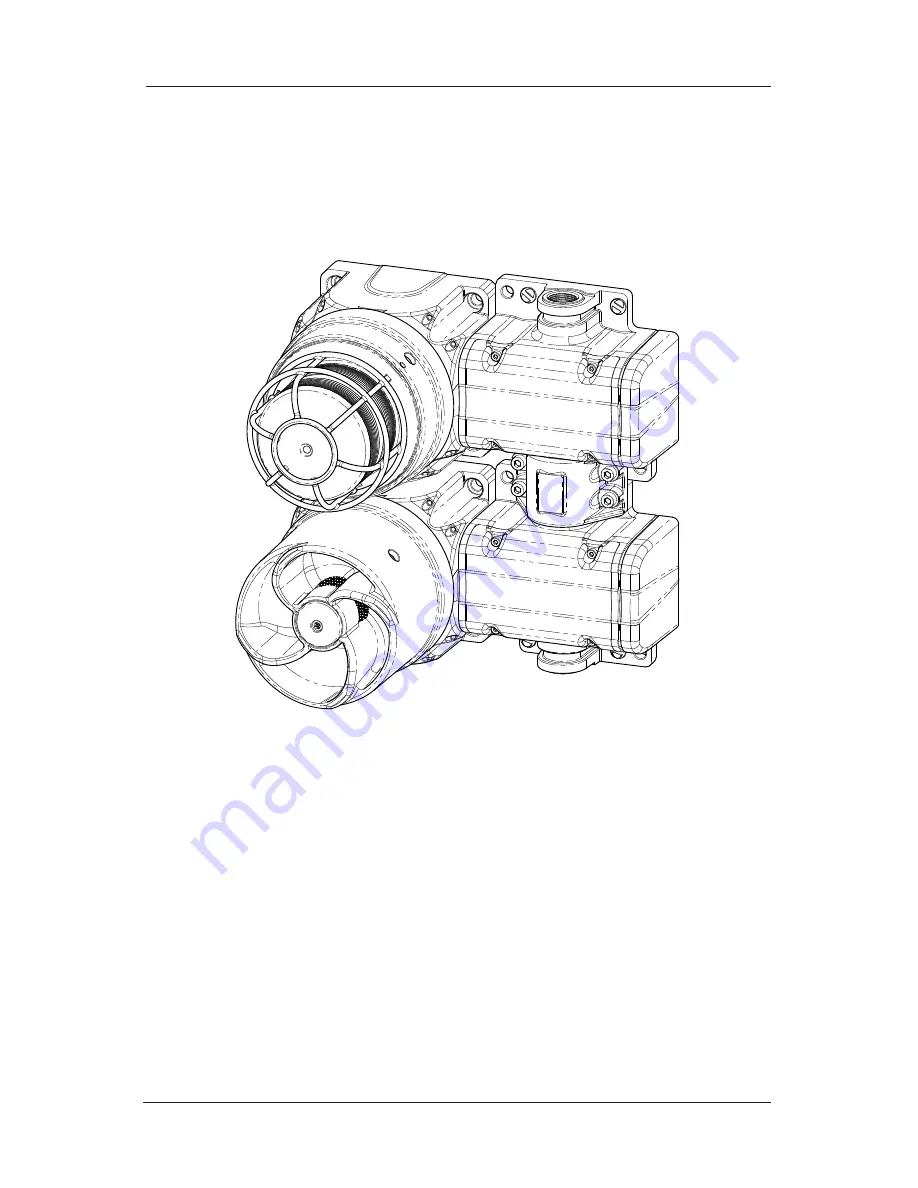
The Federal Signal Global Series Ex de products can be connected 

together in the field using interchangeable E-box end caps and a 

proprietary coupling system (Figure 1). 

Figure 1 Sounder and sounder combination fixture

The proprietary coupling system allows for simple and cost effective, 

wiring from product to product, often eliminating the need for 

expensive Ex wiring practices and Ex rated glands. The E-box is 

available only when factory installed on an Ex d unit or when used 

as a E-box spacer adjoining an existing E-box. Please refer to the 

accessories listed on page 28 for available options. When creating 

certain fixture combinations, it is necessary to replace E-box end caps 

before mounting the product. If you are creating combination fixtures, 

refer to instruction manual 25500259 for specific instructions and 

details.

Summary of Contents for G-SND-024-E

Page 1: ...25500187 Rev B5 0918 Printed in U S A Installation and Maintenance Instructions Global Series Model G SND Sounder For Use in Hazardous Locations Ex d Surface Mount Ex de Surface Mount ...

Page 2: ...60484 email to info fedsig com or call 1 708 534 3400 This limited warranty is in lieu of all other warranties express or implied contractual or statutory including but not limited to the warranty of merchantability warranty of fitness for a particular purpose and any warranty against failure of its essential purpose 2645 Federal Signal Drive University Park Illinois 60484 3167 www fedsig com Cust...

Page 3: ...rface Mount Sounder 10 Safety Messages for Wiring 13 Preparing to Wire the Ex d Flameproof Models 14 Wiring the Ex d Models 15 Preparing to Wire the Ex de Increased Safety Models 21 Wiring the Ex de Models 22 Selecting the Tone for Ex de Models 25 Safety Messages to Maintenance Personnel 26 Maintaining the Sounder 27 Cleaning the Enclosure 27 Lubricating the Threaded Joints 27 Ordering Replacement...

Page 4: ...e Atmospheres 29 Figures Figure 1 Sounder and sounder combination fixture 8 Figure 2 Side view of Ex d sounder 9 Figure 3 Front view of Ex d sounder 10 Figure 4 Front view of Ex d e surface mount 11 Figure 5 Side view of Ex d e surface mount 12 Figure 6 Ex d in out PCB connections 15 Figure 7 Locations of tone and volume switches 16 Figure 8 Connections for DC or AC Ex d e sounder 22 Figure 9 Disp...

Page 5: ...en power is applied Failure to observe this warning may lead to serious injury or death Never alter the unit in any manner Safety in hazardous locations may be endangered if additional openings or other alterations are made in units specifically designed for use in these locations Do not connect this sounder to the system when power is on All effective warning sounders produce loud sounds which ma...

Page 6: ...ons of Use under normal conditions of use these devices are for fixed installations and not generally in contact with people The risk of ignition is low In addition maintenance cleaning and extreme environmental factors ex high velocity dust laden atmospheres or high pressure steam should be taken into account by the end user using local Explosive Atmosphere Ex Electrical installations design sele...

Page 7: ...ructions for further information cULus Zone Certifications The following models are C1 Zone 1 and 21 certified G SND MV D and G SND MV T Models not mentioned are not suitable for Class Zone locations These models use protections Class I Zone 1 A Ex db IIC T4 AEx tb IIIC T4 135 C IP66 Tamb 55 C to 70 C Ex db IIC T4 Ex tb IIIC T4 135 C IP66 Tamb 55 C to 70 C UL Fire Alarm Certifications See page 30 ...

Page 8: ...lows for simple and cost effective wiring from product to product often eliminating the need for expensive Ex wiring practices and Ex rated glands The E box is available only when factory installed on an Ex d unit or when used as a E box spacer adjoining an existing E box Please refer to the accessories listed on page 28 for available options When creating certain fixture combinations it is necess...

Page 9: ...event injury this apparatus must be securely attached to the mounting surface in accordance with the installation instructions Use installer supplied fasteners suitable for the mounting surface The mounting method and the installer supplied mounting hardware depend on which of the two G SND models you are installing Mounting the Surface Mount Ex d Sounder Mount the sounder to a flat surface using ...

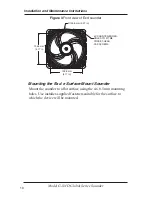
Page 10: ... 105 9 mm 4 17 in Ø133 8 mm 5 27 in 4X COUNTER BORED HOLES TO FIT M8 SOCKET HEAD CAP SCREWS 105 9 mm 4 17 in Mounting the Ex d e Surface Mount Sounder Mount the sounder to a flat surface using the six 8 5 mm mounting holes Use installer supplied fasteners suitable for the surface to which the device will be mounted ...

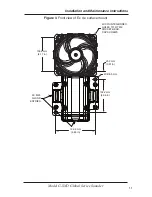
Page 11: ...ctions Model G SND Global Series Sounder Figure 4 Front view of Ex d e surface mount 2X Ø8 5 mm 103 2 mm 4 06 in 122 6 mm 4 83 in 3X M20 GLAND ENTRIES 4X COUNTER BORED HOLES TO FIT M8 SOCKET HEAD CAP SCREWS 105 9 mm 4 17 in 23 2 mm 0 91 in ...

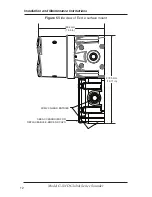
Page 12: ...tion and Maintenance Instructions Model G SND Global Series Sounder Figure 5 Side view of Ex d e surface mount 272 0 mm 10 71 in 190 6 mm 7 50 in SEE ACCESSORIES FOR REPLACEABLE E BOX END CAPS 3X M20 GLAND ENTRIES ...

Page 13: ...s other than those applied by Federal Signal Corporation are not permitted Cable termination should be in accordance with specifications applying to the application Federal Signal recommends that all cables and cores should be fully identified Ensure that only the correct equipment certified glands are used and that the assembly is shrouded and correctly earthed Gland entries are M20 1 5 6H with a...

Page 14: ...ent This section has wiring instructions for the flameproof models G SND 24 Vdc 120 Vac 220 240 Vac Ex d units are supplied with an eleven position PCB mounted screw terminal block The maximum wire gauge is 4 mm2 12 AWG The wire must be rated 85 C or higher Use only stranded cable to terminate the sounder The cross sectional area of the primary earth ground must equal the cross sectional area of t...

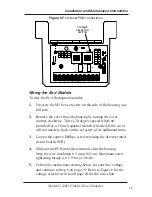
Page 15: ...ing the cover counter clockwise Three 120 degree spaced reliefs are provided for a 3 8 inch spanner wrench if needed If the cover will not unscrew back out the set screw a few additional turns 3 Loosen the captive Phillips screw retaining the driver printed circuit board PCB 4 Slide out the PCB until the terminals clear the housing Strip the wire insulation 6 5 mm 0 25 in Maximum screw tightening ...

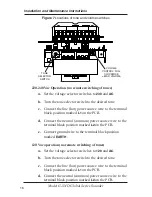
Page 16: ... source wire to the terminal block position marked L1 on the PCB d Connect the neutral common power source wire to the terminal block position marked L2 on the PCB e Connect ground wire to the terminal block position marked EARTH 120 Vac operation no remote switching of tones a Set the voltage selector switches to 120 and AC b Turn the tone selector switch to the desired tone c Connect the line ho...

Page 17: ...tion marked EARTH 220 240 Vac operation remote switching of tones a Set the voltage selector switches to 230 and AC b Set the tone selector switch to 0 c Connect the line hot power source wire to the terminal block position marked L1 on the PCB d Connect the neutral common power source wire to the terminal block position marked L2 on the PCB e Connect ground wire to the terminal block position mar...

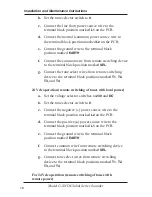
Page 18: ...vice to the terminal block positions marked T1 T2 T3 and T4 24 Vdc operation remote switching of tones with local power a Set the voltage selector switches to 230 and DC b Set the tone selector switch to 0 c Connect the negative power source wire to the terminal block position marked L2 on the PCB d Connect the positive power source wire to the terminal block position marked L1 on the PCB e Connec...

Page 19: ...the ground wire to the terminal block position marked EARTH 6 Insert the PCB into the enclosure and fully tighten the PCB captive screw 7 Place the cover on the housing and tighten it by turning it clockwise 8 To ensure O ring compression the cover must be fully seated against the housing when the threads are tightened Turn the M3 set screw on the side of the housing until the screw contacts the h...

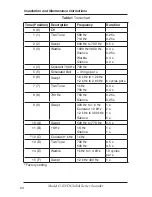
Page 20: ...onstant 700 Hz 700 Hz 5 5 Simulated Bell 3 rings per s 6 6 Swept 1 6 kHz to 1 2 kHz 1 2 kHz to 2 6 kHz 6 cycles per s 7 7 Two Tone 1 kHz 700 Hz 0 4 s 0 4 s 8 8 700 Hz 700 Hz Silence 0 25 s 0 25 s 9 9 Swept 400 Hz to 1 6 Hz Constant 1 2 kHz 1 2 kHz to 400 kHz Silence 1 s 2 s 1 s 5 s 10 A Swept 500 Hz to 770 Hz 0 5 s 11 B 1 KHz 1 KHz Silence 1 s 1 s 12 C Constant 1 kHz 1 kHz 13 D Two Tone 700 Hz 500...

Page 21: ...l area of the primary earth ground must equal the cross sectional area of the phase conductor Cable termination should be in accordance with specifications applying to the application It is recommended that all cables and cores should be fully identified Use the appropriate cable gland for the application Gland entry threads are M20 1 5 6H Conductive metalwork including cable glands must be a mini...

Page 22: ... the wire insulation 8 mm to 9 mm 0 33 in NOTE When using more than one single or multiple strand lead the connection into either side of any terminal must be joined in a suitable manner e g two conductors into a single insulated crimped bootlace ferrule 3 To connect wires press the pushbutton on the terminal block with a Phillips screwdriver and insert the wire into the round opening Release push...

Page 23: ...lock b Connect the neutral common power source wire to the position marked L2 on the terminal block c Connect the ground wire to the position marked Alt01 on the terminal block 24 Vdc operation no remote switching of tones a Connect the positive power source wire to the position marked L1 on the terminal block b Connect the negative power source wire to the terminal block position marked L2 on the...

Page 24: ...to the position marked L2 on the terminal block c Connect the ground wire to the position marked Alt01 on the terminal block d Connect the common wire from the remote switching device to the terminal block position marked Alt02 e Connect the tone select wires from the remote switching device to the terminal block positions marked Alt03 and Alt 04 Please note that only two tones are remotely select...

Page 25: ... cover from the housing by turning the cover counter clockwise Three 120 degree spaced reliefs are provided for a 3 8 inch spanner wrench if needed If the cover will not unscrew back out the set screw a few additional turns 3 Loosen the captive Phillips screw retaining the driver printed circuit board PCB 4 Slide out the PCB and set the tone selector switch to the desired tone 5 Insert the driver ...

Page 26: ...applicable national and local codes in the country of use Any maintenance to the sounder system must be done with power turned off Check the sounder periodically to ensure that the effectiveness of the device has not been reduced because it has been clogged with a foreign substance or because objects have been placed in front of it Never alter the unit in any manner Safety of the unit may be affec...

Page 27: ...osure The enclosure should be cleaned periodically with a damp cloth to maintain maximum sound output Periodic checks should be made to ensure the effectiveness of this device has not been reduced because the sounder has become clogged with a foreign substance or because objects have been placed in front of the sounder Lubricating the Threaded Joints A silicone based non hardening chemically compa...

Page 28: ... KIT RP G Indicator Ring Legend Kit Magenta G KIT RP M Indicator Ring Legend Kit Red G KIT RP R Indicator Ring Legend Kit Yellow G KIT RP Y E Box Endcap with M20 Opening K859500805 02 E Box Endcap with M20 Opening with Flange K859500805 03 E Box Endcap with M25 Opening K859500805 01 E Box Cover Assembly Includes two terminal blocks mounting plate retention hardware K859501414 E Box Coupler Kit K85...

Page 29: ... E Gas For the flameproof enclosure cable entry devices shall be equipment certified as flameproof To maintain the ingress protection of the flameproof enclosure we recommend the cable entry device be IP66 certified For the increased safety terminal enclosures terminal boxes cable entry devices shall be equipment certified as increased safety and shall maintain an IP rating of IP54 G SND XXX D Ex ...

Page 30: ...tional voltage range It was not evaluated to 80 to 110 of the voltage range The sounder is factory set with the tone selector switch set to the No 12 setting This is a constant 1 kHz tone This is the only tone setting that has been evaluated for fire alarm applications At this tone the sounder has a sound pressure level of 79 0 dB See Figure 9 for the dispersion characteristics The units can be mo...

Page 31: ...nce with any problems that cannot be handled locally Any units returned to Federal Signal for service inspection or repair must be accompanied by a Return Material Authorization RMA Obtain a RMA from a local Distributor or Manufacturer s Representative Please provide a brief explanation of the service requested or the nature of the malfunction For technical support and service visit https www feds...

Reviews: