Mounting Instructions for Viper
®
EXT and IMPAXX
®
Lightheads
2
IPX-PBL1 Mounting Bracket Kit
NOTE:
For electrical installation instructions, refer to the Installation and Maintenance Instructions packed
with the IMPAXX or Viper EXT.
Mounting the Light
AIRBAG DEPLOYMENT: Do not install equipment or route wiring in the deployment
path of an air bag. Failure to observe this warning will reduce the effectiveness of
the airbag, or potentially dislodge the equipment, causing serious injury or death.
IMPORTANT:
Plan all cable routing before the installation.
1.
Position a bracket on the selected mounting location. Mark the center of the two mounting holes.
DRILLING PRECAUTIONS: Before drilling holes, check the area you are drilling
into to be sure you do not damage vehicle components. All drilled holes should be
de-burred and all sharp edges should be smoothed. All wire routings going through
drilled holes should be protected by a grommet or convolute/split loom tubing.
2.
Use a #21 drill bit to drill a 0.159-inch hole at each mark.
3.
Route the wires from the lighthead through the mounting bracket.
DO NOT OVERTIGHTEN SCREWS/NUTS: To avoid damage to the lightheads do not
overtighten the screws and nuts.
4.
Mount the lighthead to the mounting bracket:
a)
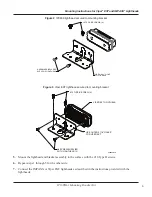
IPX300 Series lightheads use the bezel that came with the lighthead and the #6 screws and KEPS
nuts (Figure 1).
b)
IPX600 Series lightheads use the 8-32 thread forming screws that came with the lighthead
(Figure 2).
c)
Viper EXT lightheads use the #8 screws that came with the lighthead (Figure 3 ).
Figure 1 IPX300 lighthead secured to mounting bracket
#10 TYPE B SCREWS (4)
#6-32 x 0.5 PAN HEAD
SCREW (4)
IPX300 LIGHTHEAD
WITH BEZEL
290A6206B
#6-32 KEPS NUT (4)
USE OUTER 0.116"
HOLE FOR IPX300.


