Mounting Rumbler
®
Speakers in a 2011 and Newer Chevy
®
Caprice
6
Model RB-CAP11 Speaker Mounting Kit
4.
With the sound projector (with Rumbler insignia) facing the outside of the vehicle, place this assembly
against the cross member, the long 5/16" bolts going through the 3/8" holes. Install flat washers, lock
washers, and nuts loosely. Install two 1/4" Type B screws into the 3/16" drilled holes. Adjust the speaker
for maximum clearance from the tailpipe, and tighten all the bolts.
5.
Position the heatshield on the tailpipe and secure it with the two hose clamps.
6.
Repeat steps 2 through 5 for the other side of the vehicle.
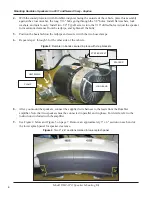
Figure 3
Rumbler in bands secured in place with step brackets
8.
After you mount the speakers, connect the supplied wire harness to the leads from the Rumbler
amplifier. Note that two speakers must be connected in parallel and in phase. For details, refer to the
instructions included with the amplifier.
9.
See Figure 4 below and Figure 5 on page 7. Remove an approximately 3" x 6" section on each end of
the lower splash panel for speaker clearance.
Figure 4
Two 3
"
x 6
"
sections marked in lower splash panel
SPACERS
STEP BRACKET
CLAMP
HEATSHIELD
LONG BAND

