
Quick Installation Guide
6
ZP 500 Thermal Printer
8.
Click
Next
to save the printer driver files to the designated
directory (e.g., C:\ZUD4233) or click
Change
to save the
printer driver files to another directory. After the printer driver
files have been saved to the selected directory, the Language
Selection popup displays showing UK–English (United States)
as the default entry in the Language field.
9.
Click
Cancel
.
10.
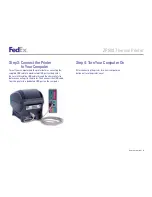
Turn on the printer. The printer starts the auto-calibration
process and feeds out one or more labels. After the printer
completes the auto-calibration process, remove these
excess labels. The Welcome to the Found New Hardware
Wizard screen displays.
11.
Click the
Install from a list or specific location
(Advanced)
radio button.
12.
Click
Next
. The Hardware Type screen displays.
13.
Scroll down the list and select
Printers
.
Note: If the Hardware Type screen does not display, continue on
with the next step.
14.
Click
Next
. The Please Choose Your Search and Installation
Options screen displays.
Note: If the Hardware Type screen does not display, the Please Choose
Your Search and Installation Options screen automatically displays.
15.
Click the
Search for the best driver in these locations
radio button. Also select the
Include this location in the
search
checkbox.
16.
Click
Browse
to navigate to the designated directory where
you saved the printer driver files. The default directory
is C:\ZUD4233. Click
OK
.
17.
Click
Next
. The Completing the Found New Hardware Wizard
screen displays.
Note: If the Windows Logo testing message displays, click
Continue Anyway
.
The Completing the Found New Hardware Wizard screen displays.
18.
Click
Finish
. Close the Zebra Printers for FedEx Shipping
Applications screen and remove the Zebra ZP 500 and
Z4Mplus DT FedEx Shipping System Printers Mini-CD
from your CD drive.
19.
To print a test label, click
Start > Settings > Printers
and Faxes
. The Printers and Faxes screen displays.
20.
Right-click
Zebra ZP 500 (ZPL)
and select
Properties
.
The Zebra ZP 500 (ZPL) Properties screen displays.
21.
Click
Print Test Page
to print a test label. The test label
prints and the Zebra ZP 500 (ZPL) screen displays. Click
OK
to close this screen.
22.
Click
OK
to close the Zebra ZP 500 (ZPL) Properties screen.
Close the Printers and Faxes screen.
Note: If the test label does not print, repeat the Install ZP 500 Thermal
Printer Driver procedure.
23.
When you have completed this process, reboot your
computer again. The ZP 500 thermal printer driver is now
installed on your system.
Step 5: Install the Printer Driver (cont.)


