background image

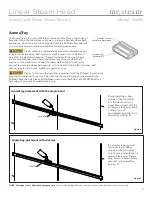
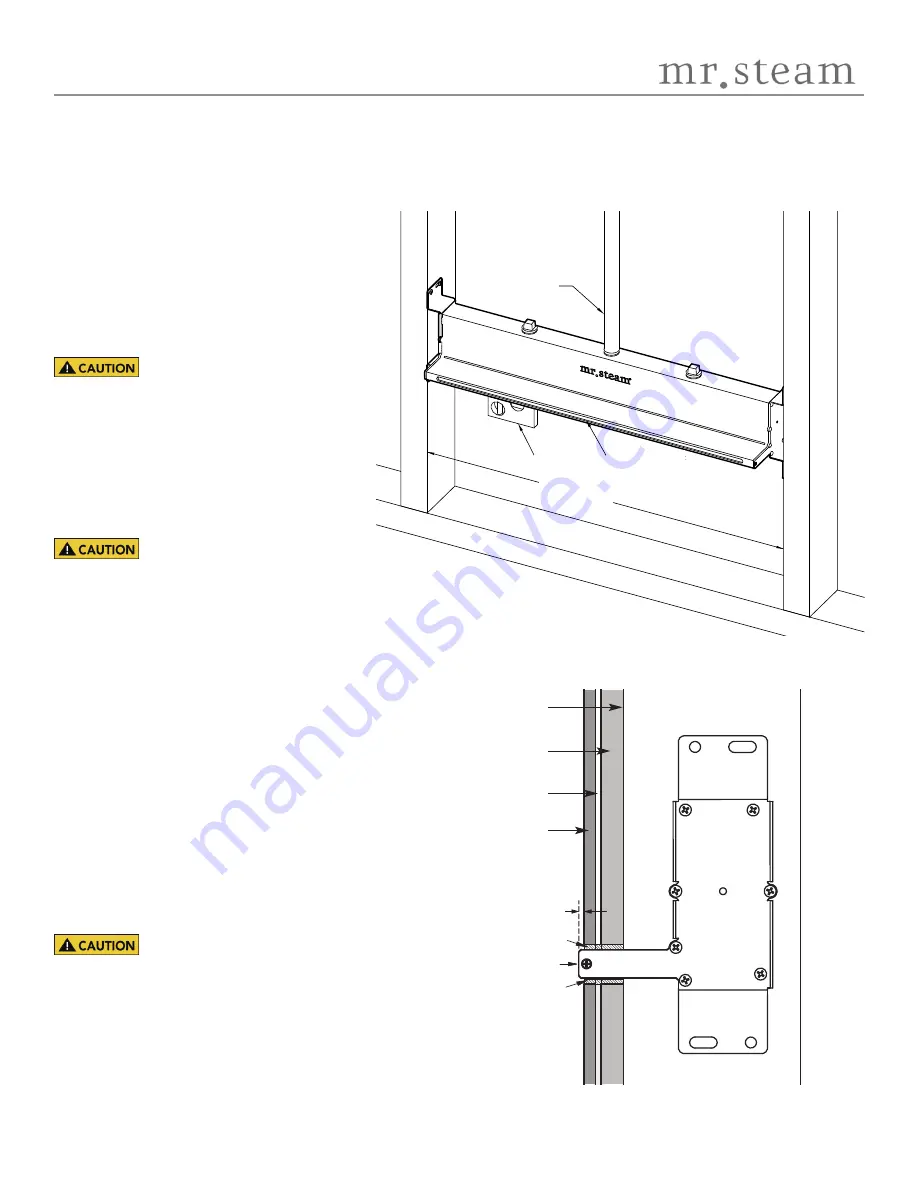
Cement Board

Thin Set

Finished

Wall Surface

Steam Outlet Face

Silicone

Silicone

Flush to

1

/

8

STEP 1.

 Locate the steam head 6-12” above 

the finished floor.  


STEP 2. 

Confirm proper stud spacing: The 

studs must have a minimum spacing of 25-1/8” 

and a maximum spacing 25-1/4". If the stud 

spacing is outside the required range then shim 

or otherwise reposition the studs as required.  


   Installing the steam head between 

incorrectly spaced studs may result in damage to 

the steam head and result in a leak within the 

wall cavity and cause property damage.  


STEP 3. 

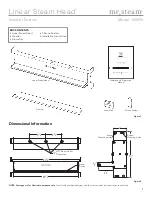
Position the steam head so that the 

steam head face will end up flush or 1/8” proud 

with the finished wall surface. (see fig. 4) Install 

four screws in the horizontal slotted mounting 

holes. 


  Failure to position the steam head 

face or faceplate to be flush or extended 1/8” 

from the finished wall surface may result in a leak 

within the wall cavity and cause problems 

associated with leaks, moisture and property 

damage from leaks.  


STEP 4.

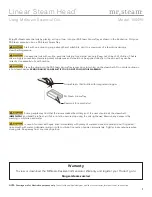
 Position steam head between 2 

appropriately spaced studs. Use a level to ensure 

the steam head is level (see Fig. 3). Install four 

screws in mounting holes to secure the steam 

head to the studs.  


STEP 5. 

Plumb rigid copper tubing or brass 

pipe from the steam generator to the steam 

head. Plumbing must not form traps or valleys. 

Thread sealant must be used as required to 

ensure a leak free joint between the piping and 

steam head.  


STEP 6. 

Before continuing or closing the wall 

test the installation, piping and steam head for 

leaks.  


  Failure to test the steam head 

installation may result in leaks, and cause 

problems associated with leaks, moisture and 

property damage from leaks.

4

Linear Steam Head

®

®

NOTE:

 Drawings are for illustrative purposes only.


Consult with qualified designer, architect or contractor for steam room construction.

Installer Section 

Model 104495

Figure 3

Figure 4

SteamHead

Stud

Stud

Level

25

1/8

” - 25

1/4

Steam Outlet

Copper Tubing 

or Brass Pipe  

(not Provided

Cement Board

Moisture Barrier

Thin Set

Finished Wall 

Surface

Flush to 1/8”

Silicone

Silicone

Steam Outlet Face

Summary of Contents for mr.steam 104495

Page 1: ...lation Operation and Maintenance Manual Residential Model 104495 ____________________ MP _O _ RT _ AN _ T _ Le _ ave _th _is _ ma _ teri _al _ wit _ h t _ he _ ho _ me _ ow _ ner _ IMPORTANT Leave thi...

Page 2: ...nt 3 Dimensional Information 3 Steamhead Installation 4 Steam Emission Zone 5 User and Installer Section Diverter 6 AromaTray 7 Essential Oil 8 Warranty 8 Replacement Parts 9 mr steam hello mrsteam co...

Page 3: ...m leaks Using Linear Steam Heads for commercial installations or installations with commercial steam generators may result in a hazardous condition scalding or personal injury Do not use the Linear St...

Page 4: ...rovided with all system components generator controls accessories etc If the installation and operation manuals are not available go to www mrsteam com for an online copy or contact MrSteam Customer o...

Page 5: ...TENTS Linear Steam Head Diverter AromaTray Silicone Sealant Installation Instructions mr steam Feel Good Inc Installation Operation and Maintenance Manual Residential Model 104495 ____________________...

Page 6: ...leaks moisture and property damage from leaks STEP 4 Position steam head between 2 appropriately spaced studs Use a level to ensure the steam head is level see Fig 3 Install four screws in mounting ho...

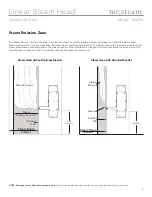
Page 7: ...tional Diverter 6 12 Above Floor 6 12 Above Floor Steam Emisson Zone 24 The Steam Emission Zone is the area in front of the steam head that contains dense hot steam as it exits the steam head Steam di...

Page 8: ...MrSteam if a placement diverter is required Failure to use a diverter to reduce the steam emission zone as required to avoid contact between a steam bather and direct steam emissions may cause persona...

Page 9: ...ing the Aroma Tray during a steam bath session or for a period of time after the steam bath session may result in burns scalding or personal injury Failure to first read theinstructions provided with...

Page 10: ...for external ra oils are s and should be irritants m steamhead not place CAN RNING Some people may find that the aroma makes them dizzy and the user should exit the steambath IMMEDIATELY and breathe...

Page 11: ...104484 Diverter for Linear SteamHead 104482 AromaTray for Linear SteamHead 104483BB 104483BN 104483MB 104483ORB 104483PB 104483PC 104483PN 104483SB LSH Faceplate Brush Bronze LSH FaceplateBrush Nicke...

Page 12: ...M I 9410 S La Cienega Blvd Inglewood CA 90301 TEL 1 800 72 STEAM 2020 MrSteam and des A Lifetime of Pleasure AirTempo AromaFlo AudioWizard AutoFlush AutoSteam Butler Package ChromaSteam Clean Steam Ev...

Reviews: