background image

Sahre / MVK  01.07 

All rights reserved by FEIN, in particular as these apply to trademarks.  
FEIN retains all powers of disposition such as copying and right of transfer

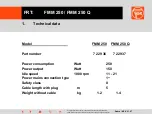
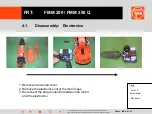
FRT:         FMM 250 / FMM 250 Q 

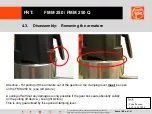
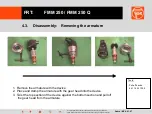
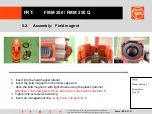
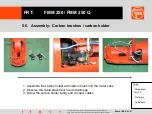
4.2.   Disassembly:   Carbon brushes 

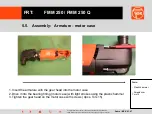
1. Lift up spring and pull out the carbon brush 
2. Remove screws and detach the carbon holder 
3. 

ATTENTION - Observe R / L during carbon holder assembly!!!!!!!! 

4. During field magnet disassembly - Expose the flex from the  
    field magnet ! 

Tools: 
 
- Torx 15  
 Screwdriver 
 
- Cable hook  

Summary of Contents for FMM 250

Page 1: ...Sahre MVK 01 07 All rights reserved by FEIN in particular as these apply to trademarks FEIN retains all powers of disposition such as copying and right of transfer FRT FMM 250 FMM 250 Q Starting page ...

Page 2: ...all powers of disposition such as copying and right of transfer FRT FMM 250 FMM 250 Q Contents 1 Technical data 2 Maintenance 3 Electrical function test 4 Disassembly 5 Assembly 6 Tools 7 Operating manual available on the Internet www fein com 8 Spare parts list available on the Internet www fein com ...

Page 3: ...position such as copying and right of transfer FRT FMM 250 FMM 250 Q 1 Technical data Model FMM 250 FMM 250 Q Part number 7 229 36 7 229 37 Power consumption Watt 250 Power output Watt 150 Idle speed 1000 rpm 11 21 Power mains connection type 1 Safety class lI Cable length with plug m 5 Weight without cable kg 1 2 1 4 ...

Page 4: ...these apply to trademarks FEIN retains all powers of disposition such as copying and right of transfer FRT FMM 250 FMM 250 Q 3 Electrical function test 3 1 Function test 3 2 Test data 3 3 Testing devices and aids 3 4 Wiring diagram Connection plan 3 5 Safety test ...

Page 5: ...disposition such as copying and right of transfer FRT FMM 250 FMM 250 Q 3 1 Function test Checking the motor without electronics Disconnect motor lead from electronics Apply testing voltage to motor lead according to table Rated voltage 100 120 V AC 220 240 V AC Testing voltage max 65 V AC max 130 V AC 3 1 1 Motor ...

Page 6: ...ectronics The electronics cannot be tested without load motor the control circuit has to be closed The function of the electronics is released when the speed values correspond to the test data Attention At supply voltage the machine may only be operated with correctly loaded electronics otherwise the control circuit is interrupted and the speed increases to prohibited levels 3 1 Function test ...

Page 7: ...Q 3 2 Test data Model FMM 250 and FMM 250 Q Mark of conformity CE Dimensioning voltage Volt 230 Dimensioning current ampere 2 3 No load current ampere 0 60 0 54 0 69 Dimensioning output Watt 250 Power output Watt 150 Idle speed 1000 rpm 11 0 21 0 Idle speed max 1000 rpm 19 0 21 0 Power mains connection type 1 Safety class lI Cable length with plug m 5 Weight without cable kg 1 2 1 4 ...

Page 8: ...disposition such as copying and right of transfer FRT FMM 250 FMM 250 Q 3 3 Testing devices and aids h Multimetre for effective measuring voltage current resistance h Speed gauge impulse counter suitable for oscillating movement h Adjustable isolating transformer for motor test without electronics at 65 and 130 VAC ...

Page 9: ...tion such as copying and right of transfer FRT FMM 250 FMM 250 Q 3 4 Connection plan Wiring 075 carbon holder 2x 090 grounding cable 120 supply line field magnet electronics blue 140 supply line field magnet carbon holder blue 210 supply line field magnet electronics brown 220 supply line field magnet carbon holder brown ...

Page 10: ... 1 Disconnect from mains 2 Connect L1 and N to plug 3 ON switch Measuring points Gear head 405 and screws 160 170 against L1 N Testing voltage 500 VDC Insulation resistance min 2 0 M Ohm 3 High voltage test HV test according to EN 60745 1 Art 15 2003 1 Disconnect from mains 2 Connect L1 and N to plug 3 ON switch Measuring points Gear head 405 and screws 160 170 against L1 N Testing time at least 3...

Page 11: ...pply to trademarks FEIN retains all powers of disposition such as copying and right of transfer FRT FMM 250 FMM 250 Q 4 Disassembly 4 1 Electronics 4 2 Carbon brushes carbon holder 4 3 Removing the armature 4 4 Changing the armature bearing 4 5 Removing the field magnet ...

Page 12: ...ns all powers of disposition such as copying and right of transfer FRT FMM 250 FMM 250 Q 4 Disassembly Before the disassembly of the device is begun motor and gears the machine should always be disconnected from the mains Furthermore it is recommended to also disconnect the tool and clamping piece ...

Page 13: ...50 Q Because of quality guidelines about pressing in force on the spindle which can not be guaranteed after repair the gear head of the new FMM 250 and FMM 250 Q can only be replaced or offered as a complete spare part unit 405 Only the small parts as seen on the picture can be purchased separately see drawing and spare parts list at www fein com 4 Disassembly general information ...

Page 14: ...ns all powers of disposition such as copying and right of transfer FRT FMM 250 FMM 250 Q 1 Remove screws and cover 2 Remove the electronics out of the motor case 3 Disconnect the plug connection between the motor and the electronics 4 1 Disassembly Electronics Tools Torx 15 Screwdriver Flat pliers ...

Page 15: ...opying and right of transfer FRT FMM 250 FMM 250 Q 4 2 Disassembly Carbon brushes 1 Lift up spring and pull out the carbon brush 2 Remove screws and detach the carbon holder 3 ATTENTION Observe R L during carbon holder assembly 4 During field magnet disassembly Expose the flex from the field magnet Tools Torx 15 Screwdriver Cable hook ...

Page 16: ...ply to trademarks FEIN retains all powers of disposition such as copying and right of transfer FRT FMM 250 FMM 250 Q 4 3 Disassembly Removing the armature 1 Remove all 4 screws 2 Disconnect the gearbox case with the armature from the motor case Tools Torx 15 Screwdriver ...

Page 17: ...4 3 Disassembly Removing the armature Tools Pull off device 6 41 14 031 000 Attention For pulling off the armature out of the gear box the clamping lever must be open on the FMM 250 Q see left picture A pulling off without any damages is only possible if the gear box seats absolutly solidly on the pulling off device see right picture This is only guaranteed by the opened clamping lever ...

Page 18: ...ying and right of transfer FRT FMM 250 FMM 250 Q 4 3 Disassembly Removing the armature 1 Remove the armature with the device 2 Place and clamp the armature with the gear head into the device 3 Twist the top section of the device against the bottom section and pull off the gear head from the armature Tools Pull off device 6 41 14 031 000 ...

Page 19: ...isassembly Changing the armature bearing 1 Pull of the bearing on the collector side with the 19mm pull off device 2 Remove the snap ring on the fan side with the pliers remove the spherical bearing with the 16mm pull off device pull off bearing ring 3 Remove the ball bearing from the armature shaft with the 26mm pull off device Tools Circlip pliers Pull off device 16 19 26mm Plastic hammer ...

Page 20: ...ransfer FRT FMM 250 FMM 250 Q 4 5 Disassembly Removing the field magnet 1 Take out the air management ring release and take out both screws on the field magnet 2 Release the field magnet out of the motor case with light strokes from the plastic hammer remove the field magnet 3 Remove the switch rod and switch slide Tools Torx 15 Screwdriver Plastic hammer ...

Page 21: ...etains all powers of disposition such as copying and right of transfer FRT FMM 250 FMM 250 Q 5 Assembly 5 1 Switch slide switch rod 5 2 Field magnet 5 3 Armature 5 4 Armature gear head 5 5 Armature motor case 5 6 Carbon holder carbon brushes 5 7 Electronics cables 5 8 Case cover Clamping piece ...

Page 22: ...se apply to trademarks FEIN retains all powers of disposition such as copying and right of transfer FRT FMM 250 FMM 250 Q 5 1 Assembly Switch slide switch rod 1 Click switch slide into motor case 2 Insert switch rod into the motor case and hook into the switch slide ...

Page 23: ... Q 5 2 Assembly Field magnet 1 Insert into the field magnet interior 2 Insert the field magnet into the motor case and drive the field magnet in with light strokes using the plastic hammer Attention The stamped in ID no has to be on the switch slide side 3 Tighten the screws for fastening 4 Insert air management ring Only fits in one position Tools Plastic hammer Screwdriver Torx 15 ...

Page 24: ...ins all powers of disposition such as copying and right of transfer FRT FMM 250 FMM 250 Q 5 3 Assembly Armature 1 Pressing on bearing and bearing ring 2 Press the ball bearing onto the mandrel press with the press on tool 3 Press on the bearing ring 4 Press on the spherical bearing and circleclip ...

Page 25: ...er FRT FMM 250 FMM 250 Q 5 4 Assembly Armature Gear head 1 Press the completed armature with the pressing on device on the mandrel press into the gear head Caution The armature has to be placed onto the case centrically otherwise the bearing fitting is destroyed during the pressing in Burr Caution Observe the position of the fork during the pressing in centred ...

Page 26: ...ing and right of transfer FRT FMM 250 FMM 250 Q 5 5 Assembly Armature motor case 1 Insert the armature with the gear head into the motor case 2 Drive it into the bearing fitting motor case with light strokes using the plastic hammer 3 Tighten the gear head on the motor case with screws 4pcs Torx 15 Tools Plastic hammer Screwdriver Torx 15 ...

Page 27: ...ition such as copying and right of transfer FRT FMM 250 FMM 250 Q 5 6 Assembly Carbon brushes carbon holder 1 Assemble the carbon holder with carbon brush into the motor case 2 Observe the cable placement to avoid damage 3 Screw the carbon holder tightly and connect cables Tools Screwdriver Torx 15 Flat pliers Cable hook ...

Page 28: ...7 Assembly Electronics cables 1 Assemble the electronics with the mains power cable into the motor case 2 Connect cable to the electronics as seen in the picture 3 Assemble the electronics into the motor case Caution observe the switch position during the assembly has to engage with the switch rod otherwise no function of the machine Tools Screwdriver Torx 15 PH 1 Flat pliers Cable hook ...

Page 29: ...and right of transfer FRT FMM 250 FMM 250 Q 5 8 Assembly Case cover clamping piece 1 Place case cover onto the motor case and screw tightly 2 Insert clamping piece and close clamping lever 3 Only inspect the machine with closed clamping lever Danger of injury during opened clamping lever clamping piece and previously placed tool can fall out ...

Page 30: ...EIN in particular as these apply to trademarks FEIN retains all powers of disposition such as copying and right of transfer FRT FMM 250 FMM 250 Q 6 Tools 6 1 General tools 6 2 Special tools 6 3 Lubricants 6 4 Adhesive sealing and other agents ...

Page 31: ...marks FEIN retains all powers of disposition such as copying and right of transfer FRT FMM 250 FMM 250 Q 6 1 All mechanical tools Machine vice Retail Mandrel press Retail Plastic hammer Retail Circlip pliers Retail Screwdriver Torx 15 PH 1 Retail Flat pliers Retail Cable hook Retail ...

Page 32: ...cap 6 41 04 150 00 8 Clamping chuck 16mm 6 41 07 016 00 1 19mm 6 41 07 019 00 7 26mm 6 41 07 026 00 0 Press on tool for ball bearing Ball bearing support 19mm Ball bearing support 26mm Pull off device armature gear head 6 41 14 031 000 Straining screw 6 41 07 013 02 1 T handle 6 41 07 013 03 7 Pressing in device armature gear head 6 41 22 108 000 Pull off device spindle only FMM 250 6 41 04 601 00...

Page 33: ...Technical data consistency class Use Article code of compl package and type of package Grease quantity and position Lubricants 0 40 101 0100 4 old Sst1 Light brown beige naturally cloudy ointment consistency Drop point approx 180 C Range of usage 30 C to 120 C NLGI 2 Normally loaded spur gear and roller bearing also slide bearing with higher speed 85g tube 32160003014 800g tin 3213200701 4500g tin...

Reviews: