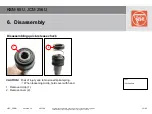
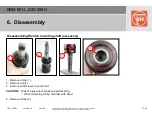
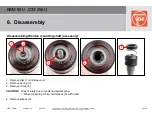
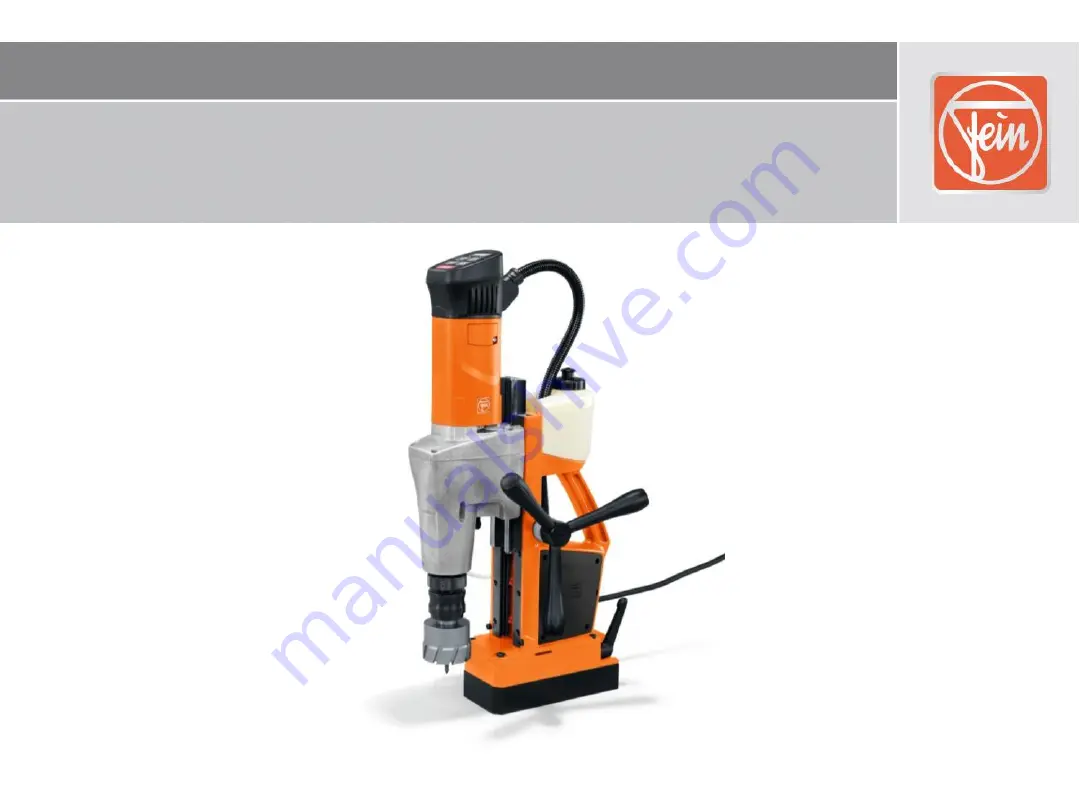
background image

KBM 65U, JCM 256U


All rights reserved by FEIN, especially in case of industrial rights registration.  
FEIN retains all rights of disposal, such as copying and circulation. 

C-SC_CSSM 

2013.06 

1/82 

Version 1.0 

Repair instructions 

Summary of Contents for KBM 65 U

Page 1: ...CM 256U All rights reserved by FEIN especially in case of industrial rights registration FEIN retains all rights of disposal such as copying and circulation C SC_CSSM 2013 06 1 82 Version 1 0 Repair instructions ...

Page 2: ...n FEIN retains all rights of disposal such as copying and circulation C SC_CSSM 2013 06 2 82 Version 1 0 1 Models described 2 Technical data 3 Notes requirements 4 Tools required 5 Lubricants and auxiliary substances required 6 Disassembly 7 Assembly 8 Troubleshooting 9 Connection diagram Contents ...

Page 3: ...ial rights registration FEIN retains all rights of disposal such as copying and circulation C SC_CSSM 2013 06 3 82 Version 1 0 These instructions describe how to repair the following models Model Order no KBM 65 U 7 270 43 00 23 0 JCM 256U 7 270 47 12 36 0 1 Models described ...

Page 4: ...data The complete technical data can be found in the operating instructions for the model Test data Up to date test data for all models can be found on the FEIN Extranet Customer Service Repair Guides Lubricants The lubricants and container sizes available from FEIN can be found on the FEIN Extranet Customer Service Repair Guides Lists of spare parts Lists of spare parts and exploded views are ava...

Page 5: ...aining Only use original FEIN spare parts Requirements Please note that power tools may only be repaired maintained and checked by a trained electrician as improper repair can result in serious risks to the user The provisions set out in DIN VDE 0701 0702 should be observed after repairs The relevant accident prevention regulations of the employers liability insurance associations are to be observ...

Page 6: ...river Slotted screwdriver Socket wrenches sizes 2 5 3 4 5 Size 17 ring wrench Arbor press Plastic hammer Punch Rubber hammer Circlip pliers for inner and outer rings Inner bearing puller 6 10 mm Inner bearing puller 12 16 mm Inner bearing puller 18 22 mm Drift key 6 33 05 003 00 3 Press on fixture 6 41 01 019 00 8 Drawing off socket cap 6 41 04 150 00 8 Chuck cone 19 mm 26 mm 6 41 07 019 00 7 6 41...

Page 7: ...ndard tool Sleeve Outer diameter Inner diameter 65 mm 55 mm Outer diameter Inner diameter 55 mm 40 mm Outer diameter Inner diameter 35 mm 25 mm Outer diameter Inner diameter 28 mm 21 mm Outer diameter Inner diameter 21 mm 10 mm Outer diameter Inner diameter 25 mm 15 mm Outer diameter Inner diameter 30 mm 15 mm Outer diameter Inner diameter 30 mm 26 mm NOTE You can only order special tools with an ...

Page 8: ...tains all rights of disposal such as copying and circulation C SC_CSSM 2013 06 8 82 Version 1 0 4 Tools required Standard tool Sleeve Outer diameter Inner diameter 53 mm 45 mm Ball bearing support 19 mm 26 mm Base Height Width 66 mm 20 mm NOTE You can only order special tools with an order number from FEIN ...

Page 9: ...on FEIN retains all rights of disposal such as copying and circulation C SC_CSSM 2013 06 9 82 Version 1 0 5 Lubricants and auxiliary substances required Lubricants Grease 0 40 106 0100 1 5 g NILOS ring sealing rings shaft spider guide mounting shaft four balls Grease 0 40 118 0300 9 120 g Gearbox ...

Page 10: ...served by FEIN especially in case of industrial rights registration FEIN retains all rights of disposal such as copying and circulation C SC_CSSM 2013 06 10 82 Version 1 0 1 Remove container 1 6 Disassembly Disassembling container 1 ...

Page 11: ...ns all rights of disposal such as copying and circulation C SC_CSSM 2013 06 11 82 Version 1 0 1 Loosen nut 1 left handed thread 2 Remove drill chuck with help of drift key 2 3 Remove circlip 3 4 Pull off nut 4 6 Disassembly Disassembling quick release chuck Tool Circlip pliers Plastic hammer Drift key 4 3 1 2 ...

Page 12: ...h as copying and circulation C SC_CSSM 2013 06 12 82 Version 1 0 CAUTION Risk of injury due to tensioned spiral spring When loosening circlip hold disc with hand 1 Push up sleeve 1 and hold 2 Remove circlip 2 3 Remove disc 3 and bolt 4 4 Remove spiral spring 5 6 Disassembly Disassembling quick release chuck Tool Circlip pliers 1 2 5 4 3 ...

Page 13: ...retains all rights of disposal such as copying and circulation C SC_CSSM 2013 06 13 82 Version 1 0 CAUTION Risk of injury due to tensioned spiral spring When loosening circlip hold cover with hand 1 Remove circlip 1 2 Remove cover 2 6 Disassembly Disassembling quick release chuck Tool Circlip pliers 2 1 ...

Page 14: ...al rights registration FEIN retains all rights of disposal such as copying and circulation C SC_CSSM 2013 06 14 82 Version 1 0 1 Remove spiral spring 1 2 Remove inner sleeve 2 3 Remove outer sleeve 3 4 Remove four balls 4 6 Disassembly 3 Disassembling quick release chuck 4 2 1 ...

Page 15: ...isposal such as copying and circulation C SC_CSSM 2013 06 15 82 Version 1 0 1 Remove circlip 1 2 Remove nut 2 3 Push up outer sleeve 3 and hold CAUTION Risk of injury due to tensioned spiral spring When loosening circlip hold disc with hand 4 Remove circlip 4 6 Disassembly 3 Disassembling Weldon mounting shaft accessory 2 1 4 ...

Page 16: ...sposal such as copying and circulation C SC_CSSM 2013 06 16 82 Version 1 0 1 Remove disc 1 and sleeve 2 2 Remove spring 3 3 Remove circlip 4 CAUTION Risk of injury due to tensioned spiral spring When loosening circlip hold sleeve 5 with hand 4 Remove sleeve 5 6 Disassembly Disassembling Weldon mounting shaft accessory 4 1 2 5 3 ...

Page 17: ...n FEIN retains all rights of disposal such as copying and circulation C SC_CSSM 2013 06 17 82 Version 1 0 1 Remove spiral spring 1 2 Remove inner sleeve 2 3 Remove outer sleeve 3 4 Remove two pins 4 5 Remove two sealing rings 5 6 Disassembly 3 Disassembling Weldon mounting shaft accessory 2 1 4 5 ...

Page 18: ...trial rights registration FEIN retains all rights of disposal such as copying and circulation C SC_CSSM 2013 06 18 82 Version 1 0 1 Loosen two screws 1 and take off cover 2 2 Remove switch insert 3 6 Disassembly Disassembling switch insert of drill unit 3 2 Tool Torx T20 1 ...

Page 19: ...etains all rights of disposal such as copying and circulation C SC_CSSM 2013 06 19 82 Version 1 0 1 Loosen two screws 1 and remove housing half 2 2 Unlock plug 3 and pull off ribbon cable 4 3 Pull off plug 5 4 Remove electronics PCB 6 6 Disassembly Disassembling PCB of drill unit 1 2 Tool Torx T20 5 6 4 3 ...

Page 20: ...al such as copying and circulation C SC_CSSM 2013 06 20 82 Version 1 0 1 Remove second housing half 1 2 Disconnect and remove all cables which are connected on the PCB 2 3 Use two screwdrivers to remove the electronics PCB 2 4 Pull cable shoes off brush holders 6 Disassembly Disassembling PCB of drill unit 1 2 Tool Two screwdrivers ...

Page 21: ...eaded screw 1 and loosen drill unit with the two levers 2 CAUTION Risk of injury and damage to the tool Once the levers have been loosened the drill unit has nothing to stop it from falling out This may result in hand injuries and damage to the tool Hold drill unit firmly when loosening levers 2 Slide up drill unit 3 and remove 3 Remove pressure piece 4 6 Disassembly Disassembling drill unit 3 4 1...

Page 22: ...ins all rights of disposal such as copying and circulation C SC_CSSM 2013 06 22 82 Version 1 0 1 Loosen the four socket head screws 2 Disconnect gearbox housing from motor housing with intermediate bearing 6 Disassembly Disconnecting gearbox housing from motor housing Tool Size 5 socket wrench Plastic hammer ...

Page 23: ...osal such as copying and circulation C SC_CSSM 2013 06 23 82 Version 1 0 1 Remove seal 1 2 Pull off spur gear shaft 2 by hand 3 turn the switch pushbutton 3 in position two 4 Pull off second gear wheel 4 by hand 5 Remove circlip 5 6 Remove rotary switch 6 6 Disassembly Disassembling gearbox housing Tool Circlip pliers 1 2 4 6 5 3 ...

Page 24: ...hts of disposal such as copying and circulation C SC_CSSM 2013 06 24 82 Version 1 0 1 Loosen circlip 1 and remove gear wheel 2 2 Remove feather key 3 3 Remove circlip 4 4 Press out shaft 5 with grooved ball bearing 6 Disassembly Disassembling gearbox housing Tool Circlip pliers Sleeve outer 65 mm inner 55 mm 4 5 2 1 3 ...

Page 25: ...d circulation C SC_CSSM 2013 06 25 82 Version 1 0 1 Remove grooved ball bearings 1 2 Remove the three sealing rings 2 with hook 3 Remove circlip 3 4 Press grooved ball bearing 4 off shaft 6 Disassembly Disassembling gearbox housing Tool Inner bearing puller 6 10 mm Inner bearing puller 12 16 mm Hook Circlip pliers Sleeve outer 55 mm inner 40 mm 1 4 3 2 ...

Page 26: ...ghts registration FEIN retains all rights of disposal such as copying and circulation C SC_CSSM 2013 06 26 82 Version 1 0 1 Remove circlip 1 2 Remove gear wheel 2 3 Remove second gear wheel 3 and feather key 4 6 Disassembly Disassembling gearbox housing Tool Circlip pliers 4 3 1 2 ...

Page 27: ...of industrial rights registration FEIN retains all rights of disposal such as copying and circulation C SC_CSSM 2013 06 27 82 Version 1 0 1 Press gear wheel 1 off shaft 2 6 Disassembly Disassembling gearbox housing Tool Arbor press Sleeve outer 35 mm inner 25 mm 1 2 ...

Page 28: ...g and circulation C SC_CSSM 2013 06 28 82 Version 1 0 1 Remove cover 1 and take out spring 2 2 Pull out carbon brushes 3 with hook Only pull carbon brush out to point where it no longer scrapes the armature 3 Loosen four screws 4 4 Take off intermediate bearing 5 5 Remove armature 6 6 Disassembly Disassembling motor Tool Torx T15 Hook 6 1 2 3 4 4 5 ...

Page 29: ... industrial rights registration FEIN retains all rights of disposal such as copying and circulation C SC_CSSM 2013 06 29 82 Version 1 0 1 Remove bearings 1 6 Disassembly Disassembling gearbox housing Tool Inner bearing puller 6 10 mm Inner bearing puller 12 16 mm 1 1 ...

Page 30: ... disposal such as copying and circulation C SC_CSSM 2013 06 30 82 Version 1 0 1 Unscrew two screws 1 and take off air guide ring 2 2 On both sides loosen screw 3 and take off carbon brush holder 3 Remove supply cable 4 to stator 4 Remove stator 6 Disassembly Disassembling stator Tool Torx T15 Torx T20 Plastic hammer 2 1 3 4 ...

Page 31: ...ng and circulation C SC_CSSM 2013 06 31 82 Version 1 0 6 Disassembly Tool 2 x screwdriver Drawing off socket cap Chuck cone 19 mm 26 mm Disassembling armature 1 Pull off insulating sleeve and magnet ring 1 2 Pull off grooved ball bearing 2 3 Remove sealing ring 3 4 Remove NILOS ring 4 5 Pull off grooved ball bearing 5 6 Remove plate 6 2 6 5 3 4 1 ...

Page 32: ...al such as copying and circulation C SC_CSSM 2013 06 32 82 Version 1 0 6 Disassembly 1 Loosen the four socket head screws 1 and take off cover 2 2 Disconnect all connecting cables mains and magnet cables To loosen the plugs press down clip 3 and hold 3 Remove earthing conductors 4 Tool Torx T20 Disassembling the electronics 2 1 4 3 ...

Page 33: ...ion C SC_CSSM 2013 06 33 82 Version 1 0 6 Disassembly 1 Loosen screw 1 and remove cover 2 2 Loosen screw 3 and remove strain relief 4 3 Remove supply cable 5 4 Loosen four screws 6 and remove PCBs 7 and 8 Just one PCB 8 is fitted in the 110 V 120 V variant of the tool Tool Torx T15 Disassembling the electronics 3 4 6 7 8 8 230 V variant 110 V 120 V variant 5 2 1 ...

Page 34: ...ustrial rights registration FEIN retains all rights of disposal such as copying and circulation C SC_CSSM 2013 06 34 82 Version 1 0 6 Disassembly 1 Pull protective hose 1 up and out 2 Remove sealing ring 2 Tool Torx T15 Cross screwdriver Disassembling protective hose 2 1 ...

Page 35: ...tion FEIN retains all rights of disposal such as copying and circulation C SC_CSSM 2013 06 35 82 Version 1 0 1 Unscrew the four socket head screws 1 2 Unscrew the two nuts 2 and remove together with discs 6 Disassembly Disassembling magnetic foot Tool Ring wrench 17 mm Size 5 socket wrench 1 2 ...

Page 36: ...ndustrial rights registration FEIN retains all rights of disposal such as copying and circulation C SC_CSSM 2013 06 36 82 Version 1 0 1 Take intermediate plate off magnetic foot and remove contact bolts 1 2 Pull out lever 2 6 Disassembly 2 Disassembling magnetic foot 1 ...

Page 37: ...N retains all rights of disposal such as copying and circulation C SC_CSSM 2013 06 37 82 Version 1 0 1 Move guide up to stop with help of spider 2 Unscrew socket head screw 1 until spider can be turned one more revolution 3 Remove guide 2 6 Disassembly Disassembling guide Tool Size 4 socket wrench 2 1 ...

Page 38: ...ghts registration FEIN retains all rights of disposal such as copying and circulation C SC_CSSM 2013 06 38 82 Version 1 0 1 Unscrew socket head screws 1 2 Remove gear rack 2 3 Unscrew flat headed screw 3 6 Disassembly 2 Disassembling guide 1 Tool Size 4 socket wrench Screwdriver 3 ...

Page 39: ...ghts of disposal such as copying and circulation C SC_CSSM 2013 06 39 82 Version 1 0 1 Unscrew screw 1 and remove together with spider 2 Loosen screw 2 and remove leaf spring 3 3 Unscrew handles 4 from connecting piece 4 Remove scale 5 6 Disassembly Disassembling spider 4 5 1 2 3 Tool Cross screwdriver Circlip pliers ...

Page 40: ...stration FEIN retains all rights of disposal such as copying and circulation C SC_CSSM 2013 06 40 82 Version 1 0 1 Remove circlip 1 2 Slide out shaft 2 3 Remove spring washer 3 4 Remove two bushes 4 6 Disassembly 3 Disassembling spider 2 1 Tool Circlip pliers Inner bearing puller 18 22 mm 4 ...

Page 41: ...etains all rights of disposal such as copying and circulation C SC_CSSM 2013 06 41 82 Version 1 0 1 Unscrew six socket head screws 1 on each of the guide rails 2 Remove pressure piece and guide rails 3 Unscrew the six thread bolts 2 6 Disassembly 1 1 Disassembling guide rails Tool Size 2 5 socket wrench 2 ...

Page 42: ...5U JCM 256U All rights reserved by FEIN especially in case of industrial rights registration FEIN retains all rights of disposal such as copying and circulation C SC_CSSM 2013 06 42 82 Version 1 0 7 Assembly ...

Page 43: ...tains all rights of disposal such as copying and circulation C SC_CSSM 2013 06 43 82 Version 1 0 1 Slide pressure piece 1 behind guide rail 2 Secure each guide rail with six socket head screws 2 Tighten socket head screws to torque of 2 0 Nm 7 Assembly 2 2 Assembling guide rails Tool Size 3 socket wrench 1 ...

Page 44: ...g and circulation C SC_CSSM 2013 06 44 82 Version 1 0 1 Press in both plastic bushes 1 2 Slide spring washer 2 over shaft 3 3 Coat shaft 3 with thin layer of grease and slide through bushes 4 Secure shaft on opposite side with a circlip 4 7 Assembly 2 Assembling spider 3 4 Tool Sleeve outer 30 mm inner 26 mm Circlip pliers Grease 0 40 106 0100 1 1 ...

Page 45: ...ts of disposal such as copying and circulation C SC_CSSM 2013 06 45 82 Version 1 0 1 Screw handles 1 on to connecting piece 2 Slide scale 2 on to connecting piece 3 Screw down spider 3 with screw 4 Spider can be assembled on the left or right 7 Assembly 3 4 Assembling spider 1 2 Tool Circlip pliers Size 5 socket wrench ...

Page 46: ...ulation C SC_CSSM 2013 06 46 82 Version 1 0 1 Fit gear rack 1 on guide 2 2 Support screw 3 with circlip so that gear rack runs over shaft s gear wheel 3 Screw down screw 4 with a circlip Tighten screw to torque of 3 Nm 4 Screw on flat headed screw 5 Tighten screw to torque of 1 2 Nm 7 Assembly 1 2 Assembling guide 3 Tool Size 4 socket wrench Screwdriver 5 4 ...

Page 47: ...SSM 2013 06 47 82 Version 1 0 1 Screw leaf spring 1 to housing 2 Apply thin layer of grease to guide 2 and thread in to guide strips 3 3 Turn spider to move guide down a little 4 Tighten socket head screw 4 Tighten screw to torque of 3 Nm Socket head screw serves as stop 7 Assembly Assembling guide Tool Cross screwdriver Size 4 socket wrench Grease 0 40 106 0100 1 1 2 3 4 ...

Page 48: ...rial rights registration FEIN retains all rights of disposal such as copying and circulation C SC_CSSM 2013 06 48 82 Version 1 0 1 Install the six set screws 1 The guide is adjusted after the drill motor is assembled 7 Assembly Assembling guide Tool Size 2 5 socket wrench 1 ...

Page 49: ...of industrial rights registration FEIN retains all rights of disposal such as copying and circulation C SC_CSSM 2013 06 49 82 Version 1 0 1 Slide clamping lever 2 in to intermediate plate 1 2 Slide both bolts 3 in to bushes 7 Assembly 1 2 Assembling magnetic foot 3 ...

Page 50: ...irculation C SC_CSSM 2013 06 50 82 Version 1 0 1 Fit intermediate plate with discs and screw nuts on magnetic foot Tighten socket head screws to torque of 15 Nm 2 Screw magnetic foot down to housing with four socket head screws 1 Tighten socket head screws to torque of 8 Nm 7 Assembly Assembling magnetic foot Tool Ring wrench 17 mm Size 5 socket wrench 1 ...

Page 51: ... 2013 06 51 82 Version 1 0 7 Assembly 1 Insert sealing ring 1 For better assembly coat sealing ring with thin layer of grease 2 Install protective hose 2 3 Secure the two PCBs 4 and 5 with four screws 3 Just one PCB 5 is fitted in the 110 V 120 V variant of the tool Tool Torx T15 Grease 0 40 106 0100 1 Assembling the electronics 3 4 5 1 5 230 V variant 110 V 120 V variant 2 ...

Page 52: ...l such as copying and circulation C SC_CSSM 2013 06 52 82 Version 1 0 7 Assembly 1 Insert cover half 1 in housing 2 Install feed cable and fit strain relief 2 Tighten screw to torque of 0 9 Nm 3 Attach cover 3 and secure with screw 4 Tighten screw to torque of 0 9 Nm Tool Torx T15 Cross screwdriver Assembling the electronics 1 2 4 3 ...

Page 53: ..._CSSM 2013 06 53 82 Version 1 0 7 Assembly 1 Wire all connecting cables in accordance with connection diagram When installing the electronics ensure that the protective hose lies in the recess as shown 2 Connect earthing conductors 1 2 as shown Comply with order shown when connecting earthing conductor see photo on right Tool Torx T15 Assembling the electronics 1 2 1 2 ...

Page 54: ... registration FEIN retains all rights of disposal such as copying and circulation C SC_CSSM 2013 06 54 82 Version 1 0 7 Assembly 1 Attach second cover half 1 2 Use the four socket head screws 2 to screw down the first and second cover halves Tool Torx T20 Assembling the electronics 1 2 ...

Page 55: ...opying and circulation C SC_CSSM 2013 06 55 82 Version 1 0 1 Insert feather key 2 in shaft 1 2 Slide gear wheel 3 on to shaft 1 3 Slide second gear wheel 4 on to shaft and secure with a circlip 5 4 Press gear wheel 7 on to shaft 6 7 Assembly Assembling gearbox housing Tool Circlip pliers Arbor press Sleeve outer 25 mm inner 15 mm 2 3 5 4 7 1 6 ...

Page 56: ...stration FEIN retains all rights of disposal such as copying and circulation C SC_CSSM 2013 06 56 82 Version 1 0 1 Press grooved ball bearing 1 on to shaft 2 Slide circlip 2 on to shaft 7 Assembly Assembling gearbox housing Tool Circlip pliers Arbor press Sleeve outer 55 mm inner 40 mm 1 2 ...

Page 57: ...ip when the grooved ball bearings are pressed in 2 Apply thin layer of grease to the three sealing rings 2 and insert Do not assemble sealing rings with a sharp tool as this could damage them 3 Press shaft and grooved ball bearings in to housing 3 4 Secure shaft with a circlip 4 7 Assembly Assembling gearbox housing Tool Circlip pliers Arbor press Sleeve outer 21 mm inner 10 mm Sleeve outer 28 mm ...

Page 58: ... rights registration FEIN retains all rights of disposal such as copying and circulation C SC_CSSM 2013 06 58 82 Version 1 0 1 Insert feather key 1 in shaft 2 Press gear wheel 2 on to shaft and secure with circlip 3 7 Assembly Assembling gearbox housing Tool Circlip pliers 2 1 3 ...

Page 59: ...f grease to switch pushbutton 1 insert in gearbox housing and secure with circlip 2 2 Insert first shaft with gear wheel 3 Insert gear wheel such that dowel pin of switch pushbutton sits in gear wheel s guide 3 Insert spur gear shaft 4 4 Insert seal 5 in the correct position The seal is inserted such that it is fixed by the dowels 7 Assembly Assembling gearbox housing Tool Circlip pliers Grease 0 ...

Page 60: ...013 06 60 82 Version 1 0 Tool Arbor press Pressing fixture Ball bearing support D 26 Ball bearing support D 19 Assembling armature 1 2 3 6 7 3 1 Fit end plate 1 2 Press on grooved ball bearing 2 3 Press on sealing ring 3 and attach NILOS ring 4 4 Press on grooved ball bearing 5 5 Press in insulating sleeve 6 until stop is reached 6 Press on magnet ring 7 by hand 2 5 7 Assembly ...

Page 61: ... motor housing Insert stator such that the two connecting cables 2 are on the right as shown Press stator in to motor housing until stop is reached 2 Lead stator s connecting cables on the right upwards when looking at type plate 3 Thread blue connecting cable in to recess 2 4 Use screw 3 to fit one brush holder 4 on each side 5 Insert air guide ring 5 and screw down 7 Assembly Assembling stator T...

Page 62: ...ch as copying and circulation C SC_CSSM 2013 06 62 82 Version 1 0 1 Insert armature 1 Insert armature such that the connection plate is fitted as shown Ensure that carbon brushes are pulled to the rear 2 Insert carbon brushes 2 and fit springs on both sides 3 Insert cover 3 and screw down 7 Assembly Assembling stator Tool Torx T20 1 3 2 ...

Page 63: ...Version 1 0 1 Press grooved ball bearings 1 in to intermediate bearing 2 2 Fit intermediate bearing on motor housing 3 Use four screws 3 and sealing rings to screw intermediate bearing down on motor housing Sealing rings must be replaced during each assembly 7 Assembly Assembling motor housing Tool Torx T20 Arbor press Sleeve outer 30 mm inner 15 mm Sleeve outer 21 mm inner 10 mm 2 3 3 1 1 ...

Page 64: ...C SC_CSSM 2013 06 64 82 Version 1 0 1 Fill gearbox housing with 120g of grease 2 Assemble motor housing with intermediate bearing 1 on gearbox housing 2 3 Use socket head screws to connect two assemblies together Tighten socket head screws to torque of 7 5 Nm 7 Assembly Assembling gearbox housing on motor housing 1 2 Tool Grease 0 40 118 0300 9 Size 5 socket wrench ...

Page 65: ...trial rights registration FEIN retains all rights of disposal such as copying and circulation C SC_CSSM 2013 06 65 82 Version 1 0 1 Insert pressure piece 1 2 Slide drill unit 2 on to guide rails 3 3 Use two levers 4 to fix drill unit 7 Assembly Assembling drill unit 2 3 4 1 ...

Page 66: ... of industrial rights registration FEIN retains all rights of disposal such as copying and circulation C SC_CSSM 2013 06 66 82 Version 1 0 1 Screw down flat headed screw 1 Tighten screw to torque of 1 2 Nm 7 Assembly Assembling drill unit 1 Tool Slotted screwdriver ...

Page 67: ...rculation C SC_CSSM 2013 06 67 82 Version 1 0 1 Insert electronics PCB 1 in correct position 2 Press connecting cables in to the intended holders 2 3 Connect connecting cables 3 to carbon brush holders For correct connection of connecting cables see connection diagram 4 Install connecting cables correctly 4 7 Assembly Assembling PCB of drill unit 1 2 4 2 3 ...

Page 68: ...ins all rights of disposal such as copying and circulation C SC_CSSM 2013 06 68 82 Version 1 0 1 Connect connecting cables 1 2 Attach first housing half 2 3 Position protective hose 3 and install connecting cables 4 and 5 as shown 4 Position ribbon cable 6 7 Assembly Assembling PCB of drill unit 4 5 3 2 1 6 ...

Page 69: ...SM 2013 06 69 82 Version 1 0 1 Ensure that end of yellow mark 1 is in correct position on mark 2 2 Connect plug 3 to electronics PCB 3 Slide ribbon cable 4 in to connection 5 and seal connection 4 Attach second housing half 6 5 Screw the two housing halves together 7 6 Place electronics PCB 8 on housing 7 Assembly Assembling PCB of drill unit 6 8 Tool Torx T20 1 5 4 3 7 2 ...

Page 70: ...registration FEIN retains all rights of disposal such as copying and circulation C SC_CSSM 2013 06 70 82 Version 1 0 1 Place switch insert 1 on electronics PCB 2 Place cover 2 on housing and switch insert and screw down 7 Assembly Assembling switch insert of drill unit 1 2 Tool Torx T20 ...

Page 71: ...s copying and circulation C SC_CSSM 2013 06 71 82 Version 1 0 1 Insert the four balls 1 in shaft Fix balls with a drop of grease 2 Place outer sleeve 2 on shaft 3 Place inner sleeve 3 on shaft 4 Insert spiral spring 4 between inner and outer sleeve 7 Assembly 2 Assembling quick release chuck 1 3 4 Tool Circlip pliers Grease 0 40 106 0100 1 ...

Page 72: ...EIN retains all rights of disposal such as copying and circulation C SC_CSSM 2013 06 72 82 Version 1 0 1 Place cover 1 on spring and press down 2 Use circlip 2 to secure cover 3 Insert spiral spring 3 4 Insert sleeve 4 and disc 5 7 Assembly Assembling quick release chuck Tool Circlip pliers 1 2 3 5 4 ...

Page 73: ...on C SC_CSSM 2013 06 73 82 Version 1 0 1 Push up outer sleeve 1 and hold The outer sleeve must be held at the top otherwise the circlip cannot be assembled 2 Press disc 2 and sleeve 3 down at the same time 3 Insert circlip 4 and press all the way down together with disc and sleeve 7 Assembly Assembling quick release chuck Tool Circlip pliers Size 6 punch 4 3 2 1 ...

Page 74: ...case of industrial rights registration FEIN retains all rights of disposal such as copying and circulation C SC_CSSM 2013 06 74 82 Version 1 0 1 Slide nut 1 over shaft 2 Secure circlip 2 on shaft 7 Assembly Assembling quick release chuck Tool Circlip pliers 1 2 ...

Page 75: ...ings 1 on shaft Replace the two sealing rings each time housing is assembled 2 Insert two pins 2 in shaft Insert the two pins such that the flattened end faces the interior of the shaft Fix pins with a drop of grease 3 Place outer sleeve 3 on shaft 4 Place inner sleeve 4 on shaft 5 Insert spiral spring 5 between inner and outer sleeve 7 Assembly Assembling Weldon mounting shaft accessory 2 1 3 4 5...

Page 76: ...tains all rights of disposal such as copying and circulation C SC_CSSM 2013 06 76 82 Version 1 0 1 Place cover 1 on spring and press down 2 Use circlip 2 to secure cover 3 Insert spiral spring 3 4 Insert sleeve 4 and disc 5 7 Assembly Assembling Weldon mounting shaft accessory 5 4 3 1 2 Tool Circlip pliers ...

Page 77: ...ersion 1 0 7 Assembly Assembling Weldon mounting shaft accessory 3 4 2 Tool Circlip pliers Size 6 punch 1 1 Push up outer sleeve 1 and hold The outer sleeve must be held at the top otherwise the circlip cannot be assembled 2 Press disc 2 and sleeve 3 down at the same time 3 Insert circlip 4 and press all the way down together with disc and sleeve 4 Place nut 3 on shaft 5 Assemble circlip 4 ...

Page 78: ... of industrial rights registration FEIN retains all rights of disposal such as copying and circulation C SC_CSSM 2013 06 78 82 Version 1 0 1 Slide drill chuck 1 up in to fitting 2 Screw down drill chuck with nut 2 7 Assembly Assembling drill chuck 2 Tool Torx T20 1 ...

Page 79: ...reserved by FEIN especially in case of industrial rights registration FEIN retains all rights of disposal such as copying and circulation C SC_CSSM 2013 06 79 82 Version 1 0 1 Assemble container 1 7 Assembly Assembling container 1 ...

Page 80: ...h as copying and circulation C SC_CSSM 2013 06 80 82 Version 1 0 1 Use six stud bolts 1 to set zero backlash on the guide To check the drill unit move it up and down with the spider At the places where the drill unit moves too fast or too slowly screw the stud bolts in or out 7 Assembly Assembling drill unit Tool Size 2 5 socket wrench 1 ...

Page 81: ... by FEIN especially in case of industrial rights registration FEIN retains all rights of disposal such as copying and circulation C SC_CSSM 2013 06 81 82 Version 1 0 8 Troubleshooting See separate file on Extranet or retail partner portal ...

Page 82: ...rights reserved by FEIN especially in case of industrial rights registration FEIN retains all rights of disposal such as copying and circulation C SC_CSSM 2013 06 82 82 Version 1 0 9 Connection diagram Only for 230V variant ...

Reviews: