background image

Follow very carefully the instructions in this manual, save it 

and keep it close at hand, ready to carry out any inspection 

of parts that may be necessary.

If the machine is used carefully and normal maintenance is 

carried out, it will work well for a long time.

The functions and use of the tool you have bought shall be 

only those described in this manual. Any other use of the tool 

is strictly forbidden.

ILLUSTRATIONS

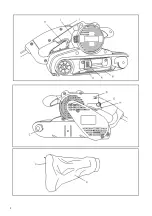
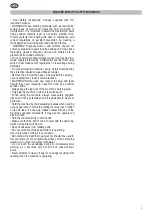
DESCRIPTION (See figures)

A Lever (Fig.1 & )

B Steel plate (Fig.)

C Adjustment screw (Fig.)

D Sawdust extraction tube (Fig.)

E Dust bag (Fig.)

F Zip fastener (Fig.)

G Blocking button (Fig.)

H Trigger switch (Fig.1 & )

I Speed control (electronic model only) (Fig.)

J Brush holder cover (Fig.)

K Belt direction indicator arrow (Fig.)

EQUIPMENT

- 1 sawdust and shaving collector bag

- 1 sanding belt (610x100) 80 grit

- Operating instructions

- Safety instructions

- Warranty

BRIEF DESCRIPTION

Any  use  differing  from  the  above  is  strictly  forbidden.  Belt 

sanders are devices equipped with powerful motors and an 

“endless” abrasive belt, which rotates at great speed over two 

rollers. These tools are perfectly adapted for grinding large 

amounts of material in a short time: for instance, they are 

ideal for rough-grinding wood, for rough sanding, for stripping 

painted  wood...  However,  they  are  not  at  all  suitable  for 

achieving a fine finish.

BEFORE USING THIS TOOL

Before using the tool, make sure the mains voltage is correct: 

it  must  be  the  same  as  that  on  the  specification  label. 

Machines with 0V can also be connected to a 0-V mains 

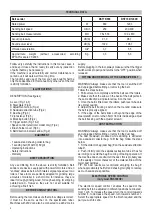
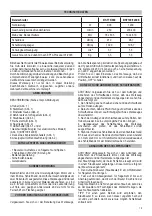
TECHNICAL DATA

supply.

Before plugging in the tool, always make sure that the trigger 

switch works properly and returns to the “OFF” position when 

released.

FITTING AND REMOVAL OF THE ABRASIVE BELT

WARNING! Always make sure that the tool is switched off 

and unplugged before fitting or removing the belt.

Follow the steps below:

1. Pull out lever A completely and fit the belt over the rollers.

. Make sure that the arrow on the back of the belt points in 

the same direction as indicator arrow K on the tool.

3. Once the belt is fitted over the rollers, push lever A back to 

its original position.

. Adjust the belt tracking: switch on the tool and make sure 

the belt is properly aligned.

5. If the edge of the belt sticks out beyond the edge of the 

steel plate B or is more than 6 mm from its inside edge, adjust 

the belt tracking with the adjuster screw C.

DUST EXTRACTION

WARNING! Always make sure that the tool is switched off 

and unplugged before fitting or removing the dust bag.

The  dust  (sawdust)  produced  while  sanding  is  extracted 

into a sawdust collector bag. To fit the bag, follow the steps 

below:

1. Fit the collector bag (dust bag) E on the sawdust extraction 

tube D.

2. Push it firmly onto the sawdust extraction tube D has far 

as it will go to avoid the bag E coming off during operation. If 

the machine does not extract all the dust, this is probably due 

to the quality or moist charac-ter of the material. Blow off the 

moist dust particles.

TIP:  For  best  results  we  recommend  emptying  the  bag  E 

when approximately half full and shaking it slightly to remove 

as much sawdust as possible.

ELECTRONIC SPEED CONTROL

(only mod. FBS100CE)

The  electronic  speed  control  I  enables  the  speed  of  the 

sanding belt to be adjusted in different positions num-bered

from 1 al 6. To increase the speed, turn the control I towards 

number 6, to decrease the speed, turn towards number 1. 

Select the appropriate speed for the finish required and the 

part you wish to sand.

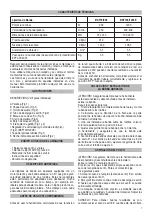
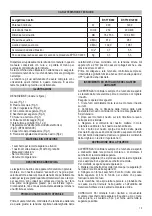
Belt sander

BSF76/900

BSF100/1200E

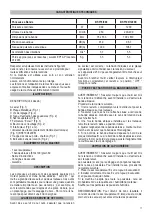
Rated power

W

900

100

Sanding belt speed

m/min

50

00-00

Sanding belt measurements

Mm

76 x 5

100 x 610

Acoustic pressure

dB(A)

91,0

96,7

Sound-power level

dB(A)

10,0

106,7

Vibration acceleration

m/s²

,7

5,5

Approximate  weight  (without  accessories)  according 

EPTAProcedure 01/00

Kg.

,

5,

Summary of Contents for BSF76/900

Page 1: ...BSF76 900 МАШИНА ЛЕНТОЧНО ШЛИФОВАЛЬНАЯ BELT SANDING MACHINE CORREA LIJADORA PONCEUSE DE CEINTURE NASTRO ABRASIVO MACCHINA BANDSCHLEIFMASCHINE BSF100 1200E ...

Page 2: ... ...

Page 3: ...pairs or maintenance WARNING Before each use inspect the plug and lead Should they need replacing have this done by an official service centre Always keep the lead out of the machine s working area Only plug the machine in when it is switched off When using the machine always wear safety goggles gloves and non slip footwear and it is advisable to wear ear protection Hold the machine by the insulat...

Page 4: ...tting or removing the belt Follow the steps below 1 Pull out lever A completely and fit the belt over the rollers 2 Make sure that the arrow on the back of the belt points in the same direction as indicator arrow K on the tool 3 Once the belt is fitted over the rollers push lever A back to its original position 4 Adjust the belt tracking switch on the tool and make sure the belt is properly aligne...

Page 5: ...could put you at serious risk Motor maintenance Never press too hard when using the sander Excessive pressure may produce an over load and damage the motor or the part being sanded Brush replacement The brushes disconnect automati cally and should be replaced after 150 200 hours use or when they are less than 10 mm long Have them replaced by an Official Service Centre To clean the sander thoroughl...

Page 6: ...ntrole el estado del enchufe y del cable Deje sustituirlos por un especialista en el caso de que estén deterio rados Mantener siempre el cable separado del radio de acción de la máquina Enchufar la máquina a la red solamente en posición desconectada Para trabajar con la máquina utilizar siempre gafas de protección guantes calzado de seguridad antidesli zante así como es conveniente llevar protecci...

Page 7: ...r de gatillo trabaja correctamente y regresa a la posición OFF cuando lo suelta COLOCACIÓN Y EXTRACCIÓN DE LA BANDA ABRASIVA ATENCIÓN Asegurarse siempre que la herramienta está desconectada y desenchufada antes de instalar o extraer la banda Seguir los pasos siguientes 1 Tirar de la palanca A completamente hacia fuera y montar la banda sobre los rodillos 2 Cerciorarse que la dirección de la flecha...

Page 8: ... y contragolpes Utilice la banda de lija apropiada según la superficie a pulir lijar y según los resultados deseados PRECAUCIÓN Durante el pulido lijado es necesario mantener siempre el cable hacia atrás para evitar que lo pueda coger la máquina ACCESORIOS Los accesorios y sus correspondientes números para pedido están reflejados en nuestros catálogos MANTENIMIENTO Y CUIDADOS ATENCIÓN Desconecte s...

Page 9: ...r sujetas a un reciclaje que respete el medio ambiente DECLARACIÓN DE CONFORMIDAD Declaramos bajo nuestra sola responsabilidad que los productos marca FELISATTI descritos en este manual están en conformidad con las normas o documentos normalizados siguientes EN60745 1 2009 EN60745 2 4 2009 EN55014 2 1997 A1 A2 E N 6 10 0 0 3 2 2 0 0 6 A1 A 2 EN61000 3 3 2008 de acuerdo con las directivas 2006 42 E...

Page 10: ...nchez toujours la machine avant d effectuer toutes interventions La machine doit toujours être arrкtée en relachant l interrupteur non en enlevant la prise AVERTISSEMENT А chaque fois que vous utilisez la machine vérifiez l état de la prise et du câble Faitesles remplacer par un spécialiste s ils sont détériorés Tenir toujours le câble hors du rayon d action de la machine Brancher la machine sur l...

Page 11: ... Avant de se servir de cet outil s assurer que la tension du secteur est correcte la tension indiquée sur la plaque signalétique doit coпncider avec la tension du secteur Les appareils а 230 V peuvent également être branchés sur du 220 V Avant de brancher l outil vérifier toujours si l interrupteur fonctionne correctement et revient а la position OFF lorsqu on le lache POSE ET EXTRACTION DE LA BAN...

Page 12: ...es sur la pièce de bois Utilisez une bande abrasive adaptée au matériau а poncer et aux résultats recherchés PRÉCAUTION Pendant le ponçage veillez а ce que le cordon soit toujours placé а l arrière afin d éviter qu il soit happé par la machine ACCESSOIRES Les accessoires et leurs références sont répertoriées dans nos catalogues ENTRETIEN AVERTISSEMENT Avant toute intervention sur la machine débran...

Page 13: ...clés de manière écophile DÉCLARATION DE CONFORMITÉ Nous déclarons sous notre seule responsabilité que les produits FELISATTI décrits dans ce manuel sont conformes aux normes ou documents suivants EN60745 1 2009 EN60745 2 4 2009 EN55014 2 1997 A1 A2 E N 6 10 0 0 3 2 2 0 0 6 A1 A 2 EN61000 3 3 2008 en accord avec les directives 2006 42 EC 2006 95 EC 2004 108 EC 2002 96 EC Tous droits de modification...

Page 14: ...ioni della spina e del cavo di alimentazione della vostra macchina utensile Se sono deteriorati fateli sostituire presso un centro di assistenza tecnica autorizzato Collegare la macchina alla rete elettrica solo con l interruttore in OFF Tenere sempre il cavo di alimentazione lontano dal raggio d azione della macchina Collegarelamacchinaallareteelettricasoloconl interruttore in OFF Per l uso della...

Page 15: ...llare che la tensione dellarete sia quella giusta la tensione riportata nella targhetta delle caratteristiche deve coincidere con la tensione direte Gli apparecchi a 230V possono essere collegati anche a una tensione di rete di 220V Prima di collegare a rete l utensile controllare sempre se l interruttore a grilletto funziona bene e ritorna nella posizione OFF quando viene rilasciato INSERIMENTO E...

Page 16: ...lpi Usare il nastro di carta vetrata di grana appropriata in base alla superficie da carteggiare e ai risultati desiderati PRECAUZIONE Durante la carteggiatura tenere sempre il cavo all indietro per evitare che rimanga impigliato nella macchina ACCESSORI Gli accessori e i relativi numeri di codice per le ordinazioni sono riportati nei nostri cataloghi CURA E MANUTENZIONE AVVERTENZA Prima di compie...

Page 17: ...le norme ambientali DICHIARAZIONE DI CONFORMITÀ Dichiariamo sotto la nostra esclusiva responsabilità che i prodotti della marca FELISATTI descritti in questo manuale sono conformi alle norme o ai regolamenti seguenti EN60745 1 2009 EN60745 2 4 2009 EN55014 2 1997 A1 A2 E N 6 10 0 0 3 2 2 0 0 6 A1 A 2 EN61000 3 3 2008 ai sensi delle direttive 2006 42 EC 2006 95 EC 2004 108 EC 2002 96 EC Riservato i...

Page 18: ...Prüfen Sie vor jedem Einsatz der Maschine den korrekten Zustand des Steckers und des Kabels Sollte deren Zustand nicht korrekt sein lassen Sie sie durch einen Fachmann ersetzen Den Netzstecker nur bei ausgeschaltetem Gerät einstecken Halten Sie das Kabel immer fern vom Arbeitsbereich der Maschine Die Maschine nur ausgeschaltet an den Netzstrom anschließen Beim Arbeiten mit der Maschine immer eine ...

Page 19: ...s Werkzeugs daß die Netzspannung korrekt ist die Spannungsangabe auf demTypenschildmußmitderNetzspannungübereinstimmen Die Geräte mit 230 V können auch an eine Netzspannung von 220 V angeschlossen werden Prüfen Sie vor dem Einstecken des Werkzeugs daß der Griffschalter korrekt funktioniert und nach Loslassen auf die Position OFF schaltet AUFLEGEN UND ABNEHMEN DES SCHLEIFBANDES ACHTUNG Vergewissern...

Page 20: ...len Sie das geeignete Schleifband in Funktion der zu schleifenden Fläche und dem gewünschten Ergebnis aus ACHTUNG Das Netzkabel beim Schleifen immer hinter dem Werkzeug halten damit es nicht von der Maschine erfaßt werden kann ZUBEHÖR Das Zubehör und die entsprechenden Bestellnummer finden Sie in unseren Katalogen WARTUNG UND PFLEGE WARTUNG UND PFLEGE ACHTUNG Ziehen Sie vor der Durchführung von Ar...

Page 21: ...009 EN55014 2 1997 A1 A2 E N 6 1 0 0 0 3 2 2 0 0 6 A1 A 2 EN61000 3 3 2008 gemäß den Richtlinien 2006 42 EC 2006 95 EC 2004 108 EC 2002 96 EC We reserve the right to make technical changes 06 2011 Francisco Ruis Technischer Leiter GERÄUSCH UND VIBRATIONSWERTE Das Werkzeug wurde für eine minimale Geräuschentwicklung konstruiert und gebaut Unter besonderen Bedingungen jedoch kann das maximale Geräus...

Page 22: ...есь в исправности питающего кабеля и вилки В случае обнаружения каких либо неисправностей обра щайтесь к специалистам Избегайте попадания кабеля питания на обрабатывае мую электроинструментом поверхность Подключайте электроинструмент к сети только после того как Вы убедитесь в том что кнопка включения нахо дится в выключенном состоянии При работе с электроинструментом пользуйтесь средс твами индив...

Page 23: ...успехом позволяет очень быстро обработать большое количество поверхностей например он очень подходит для обработки древесины для грубой обработки для снятия краски и т д однако он совсем не подходит для тонкой обработки поверхностей ПЕРЕД НАЧАЛОМ РАБОТЫ Перед началом работы убедитесь в том что напряжение электросети соответствует рабочему напряжению элект роинструмента рабочее напряжение указано н...

Page 24: ...я оказания необходимого давления на обраба тываемую деталь и получения оптимального результата работы Оказание чрезмерного давления может привес ти к перегреву электродвигателя прыганью и вибрации машины и горению обрабатываемой детали Лента должна соответствовать типу обрабатываемой поверхности и тонкости ее обработки ПРЕДУПРЕЖДЕНИЕ Во избежание повреждения пита ющего кабеля во время работы избег...

Page 25: ...е наносящими вреда экологии ДЕКЛАРАЦИЯ О СООТВЕТСТВИИ Мы со всей ответственностью за являем что электроинструменты марки FELISATTI описание кото рых приведено в данной инструк ции соответствуют требованиям следующих нормативных доку ментов EN60745 1 2009 EN60745 2 4 2009 EN55014 2 1997 A1 A2 E N 6 1 0 0 0 3 2 2 0 0 6 A1 A 2 EN61000 3 3 2008 в соответствии с директивами 2006 42 EC 2006 95 EC 2004 1...

Page 26: ...26 ...

Page 27: ...27 ...

Page 28: ...28 ...

Page 29: ......

Reviews: