background image

5

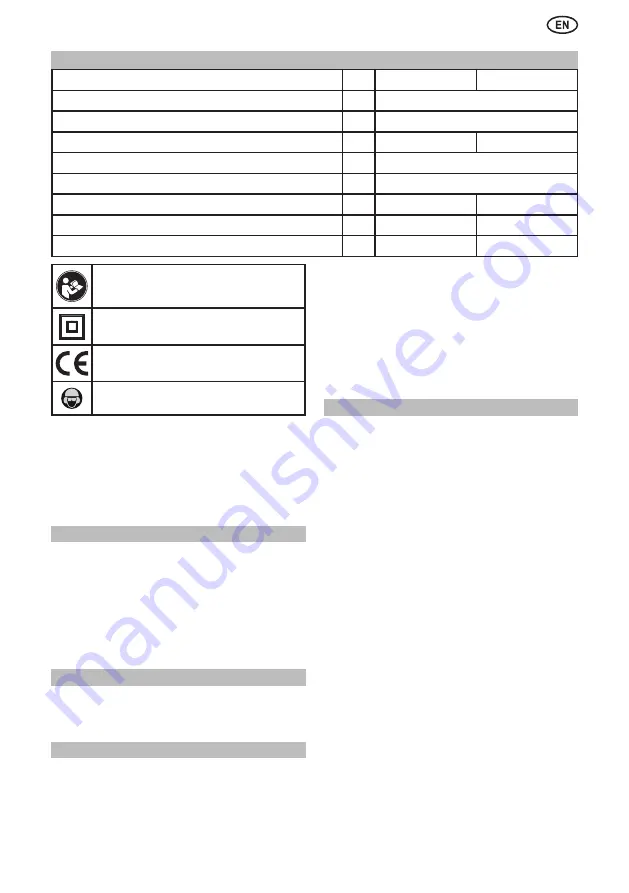
Read the instruction manual completely and 

carefully before using the power tool. 

Protection category II power tool; double 

insulated

In accordance with essential applicable safety 

standards of European directives

Wear eye, ear protection


Follow very carefully the instructions in this manual, 

save  it  and  keep  close  at  hand,  ready  to  carry  out  any 

inspection of parts that may be necessary.

  If the machine is used carefully and normal 

maintenance is carried out, it will work well for a long time.


The  functions  and  use  of  the  tool  you  have  bought 

shall be only those described in this manual. 

Any other 

use of the tool is strictly forbidden.

ILLUSTRATIONS


The numbering of the product features refers to the 

illustration of the machine on the graphics page.
1  Dust protection cap

2  Chuck sliding ring

3  Mode changeover

4  On-/off switch

5  Speed regulating handwheel

6   Auxiliary handle

7  Principal hand grip

EQUIPMENT

-  Auxiliary handle

-  Plastic case

-  Operating instructions with Safety instructions

-  Warranty

BRIEF DESCRIPTION


A percussion unit generates the power necessary for 

hammer drilling or chiselling in masonry.


Just  like  when  we  hit  a  conventional  chisel  with 

hammer, a free piston strikes the bit or chisel, which can 

move lengthways, through an intermediate part. This free 

piston is driven by a second piston activated by an electric 

motor  through  an  air  cushion.  This  electro-pneumatic 

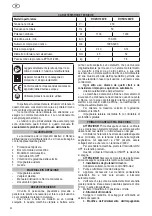
TECHNICAL DATA

principle  offers  great  percussion  elasticity  and  work  free 

from recoil.


Any other use not mentioned is not allowed.


Additional features of the rotary hammer:

-  The  machine  is  equipped  with  a  safety  clutch  or 

mechanism which operates when a bit seizes up, protecting 

the user and the machine’s electro-mechanical parts. The 

clutch is released automatically.

-  For maximum speed regulation use handwheel 

5

.

-  Auxiliary  handle 

6

,  adjustable,  with  integral  depth 

gauge

.

BEFORE USING THIS TOOL


WARNING!

 Before carrying out any work, check, for 

instance, using a metal detector, that there are no electric 

wires or gas or water pipes under the surfaces you wish to 

work on.


Make  sure  the  mains  voltage  is  correct:  it  must  be 

the same as that on the specification label. Machines with 

230V can also be connected to a 220-V mains supply.


To turn the machine on, press the ON/OFF switch 

4


and keep it pressed down.


When  the  ON/OFF  switch  is  released,  the  machine 

stops.


WARNING!

  Always  disconnect  the  plug  from  the 

socket before doing any work on the machine.


1. Fitting the working tools (Fig.1, 2)


Only use tools with SDS-max shaft!

1.  Clean and grease the shaft of the tool.

2.  Insert the tool in a twisting manner into the tool holder 

until it latches itself.

3.  Check  that  the  tool  is  properly  locked  into  place.  It 

must be possible to move it about 10 mm lengthways.

4.  Switch machine over to hammer drilling with lever 

3

 in 

appropriate position.


2.Removal tools


Push back the locking sleeve 

2

 and remove the tool.


3. Changing the position of the auxiliary handle

1.  Unscrew  the  auxiliary  handle 

6

 in an anticlockwise 

direction.

2.  Turn the auxiliary handle 

6

 to the required position.

3.  Screw the auxiliary handle 

6

 in place again.


4. Setting the depth gauge


Make sure before you start that drill-bit is inserted in 

the


SDS-max chuck.

1.  Slightly loosen the fixing wing nut .

2.  Hold  the  bit  tip  against  the  work  surface.  Push  the 

Rotary hammer

RH45/1100VE

RH50/1200VE

Rated voltage, V~

V~

230

Rated frequency, Hz

Hz

50

Rated power, W

W

1100

1200

No load speed, /min

/min

130-370  

No load hammer rate, /min

min

1990-3200

Nominal impact energy, J

J

0-10

0-14

Drilling diameter in concrete,mm

mm

45

52

Weight according EPTA-Procedure 01/2003, kg

kg

7

7,6

Summary of Contents for RH45/1100VE

Page 1: ...ROTARY HAMMER MARTILLO PERFORADOR MARTEAU PERFORATEUR MARTELLO PERFORATORE BOHRHAMMER RH45 1100VE RH50 1200VE...

Page 2: ...2 1 3 4 5 6 7 2 Fig 1 Fig 2...

Page 3: ...Do not wear loose clothing or jewellery Keep your hair clothing and gloves away from moving parts Loose clothes jewellery or long hair can be caught in moving parts g If devices are provided for the...

Page 4: ...lting from vibration emission if the power tool is being used over longer period of time or not adequately managed and properly maintained WARNING This power tool produces an electromagnetic field dur...

Page 5: ...ro mechanical parts The clutch is released automatically For maximum speed regulation use handwheel 5 Auxiliary handle 6 adjustable with integral depth gauge BEFORE USING THIS TOOL WARNING Before carr...

Page 6: ...s not covered in this instruction manual should be replaced in a Felisatti Official Ser vice Centre See Warranty Official Service Centre ad dress leaflet depth gauge against the work surface to the sa...

Page 7: ...Do not dispose of electric tools in the household waste In accordance with European Directive 2002 96 EC relating to old electrical and electronic appliances and its translation into national law used...

Page 8: ...o protectores del o do reduce la posibilidad de sufrir lesiones personales c Evitarlapuestaenmarchaaccidental Comprobar que el interruptor est en la posici n de apagado antes de conectar la herramient...

Page 9: ...ocuci n nicamente sujete el aparato por las empu aduras aisladas al realizar trabajos en los que el til pueda tocar conductores el ctricos ocultos o el propio cable del aparato El contacto con conduct...

Page 10: ...dos no est autorizado Caracter sticas adicionales del perforador La m quina va equipada con un embrague de seguri dad o mecanismo que entra en funcionamiento al que dar agarrotada una broca protegiend...

Page 11: ...del agujero para limpiar el polvo Conmute a taladrado con percusi n para hormig n losetas y ladrillos duros piedra y cemento duro pero no cuando taladre la superficie de m rmol Para baldosas piedras...

Page 12: ...zarla mediante un chorro de aire seco Las ranuras de ventilaci n de la m quina deben estar despejadas en todo momento Comprobar que el cable de toma de corriente est en buen estado y en caso contrario...

Page 13: ...l sions personnelles c Eviter les mises en marche accidentelles S assurer que l interrupteur est en position Off avant de le raccorder au r seau lectrique Transporter les outils lectriques avec le do...

Page 14: ...ovoquer un choc lectrique Ne tenir l outil lectroportatif qu aux poign es isol es si pendant les travaux l outil de travail risque de toucher des c bles lectriques cach s ou son propre c ble d aliment...

Page 15: ...t quip e d un embrayage de s curi t ou d un m canisme qui entre en fonctionnement lorsqu un outil reste gripp prot geant ainsi l utilisateur et les l ments lectrom caniques de la machine Le r enclench...

Page 16: ...machine Conseils de per age en ma onnerie Extraire de temps en temps le foret du trou pour enle ver la poussi re Commutez sur per age en percussion pour b ton dallettes et briques dures pierre et cim...

Page 17: ...r est inf rieure 10 mm Le chan gement devra alors tre effectu par un centre d assistance agr Nettoyer soigneusement la machine apr s son utilisa tion avec un jet d air sec Les ouies d a ration de la m...

Page 18: ...e con l interruttore in posizione di accensione pu provocare incidenti d Rimuovere qualsiasi chiave di regolazione prima di accendere l utensile elettrico Una chiave lasciata attaccata a una parte rot...

Page 19: ...l elettroutensile afferrandolo sempre alle superfici di impugnatura isolate Un contatto con un cavo elettrico mette sotto tensione anche le parti in metallo dell elettroutensile e provoca quindi una s...

Page 20: ...i citati da considerarsi improprio e quindi non autorizzato Ulteriori caratteristiche del perforatore La macchina dotata di una frizione o meccanismo di sicurezza che disinnesta la trasmissione quando...

Page 21: ...liere ogni tanto la punta dal foro per rimuovere la polvere Usare la percussione su calcestruzzo mattonelle e mattoni duri pietra e cemento duro ma non per forare superfici di marmo Per forare piastre...

Page 22: ...a un centro di assistenza tecnica autorizzato Pulire accuratamente la macchina dopo l uso con un getto d aria asciutta Le aperture di ventilazione della macchina non devono essere sempre libere Verif...

Page 23: ...eiden Sich vergewissern da der Schalter auf AUS steht bevor er an das Stromnetz angeschlossen wird Das Tragen der Elektrowerkzeuge mit dem Finger am Schalter oder das Verbinden derselben mit dem Strom...

Page 24: ...er das eigene Netzkabel treffen kann Kontakt mit einer spannungsf hrenden Leitung setzt auch Metallteile des Elektrowerkzeuges unter Spannung und f hrt zu einem elektrischen Schlag Zus tzliche Sicherh...

Page 25: ...eies Arbeiten Jegliche andere Verwendung gilt als sachwidrig Weitere Merkmale des Bohrhammers Die Maschine ist mit einer Sicherheitsrutschkupplung ausgestattet die durch ein eventuelles Festklemmen de...

Page 26: ...eitigen Bei Beton hartem Ziegelstein Stein und hartem Zement auf Schlagbohren schalten Anbohren von Marmor jedoch ohne Schlagbohren Bei Fliesen Fu bodenplatten weichen Kacheln und Ziegelsteinen weiche...

Page 27: ...hf hrung des Austauschs an eines der Kundendienstcenter Reinigen Sie die Maschine nach der Arbeit mit trockener Druckluft Die Bel ftungsschlitze der Maschine m ssen immer frei sein berpr fen Sie den k...

Page 28: ...28 1 b 2 b d f 3 b d f g 4 b d...

Page 29: ...29 f g h i 5...

Page 30: ...C RU C ES ME77 B 00750 10 09 2013 10 09 2018 141400 29 Santiago L pez Jordi Carbonell INTERSKOL Power Tools S L Ctra de St Joan de les Abadesses s n 17500 RIPOLL Girona SPAIN INTERSKOL Power Tools S L...

Page 31: ...31 II 1 1 1 2 10 40 80 1 3 1 4 1 5 1 1 2 C 3 4 5 6 7 RH45 1100VE RH50 1200VE 230 50 1100 1200 130 370 1990 3200 0 10 0 14 45 52 EPTA 01 2003 7 7 6...

Page 32: ...32 5 6 2 0 220 4 1 SDS max 1 2 3 10 4 3 2 2 3 1 6 2 6 3 6 4 SDS max 1 2 3 4 5 8 6 1 5 2 3 1 3 2 SDS max 3 70 40 80...

Page 33: ...33 85 RH45 1100VE RH50 1200VE 87 89 98 100 K 3 3 ah 2 15 16 K 2 1 5 1 5 1 1 2 Y 3...

Page 34: ...34...

Page 35: ......

Page 36: ...Interskol Power Tools S L Carretera de Sant Joan de les Abadesses s n17500 RIPOLL Girona SPAIN Tel 34972700200 Fax 34972700554 e mail felisatti interskol es...

Reviews: