6
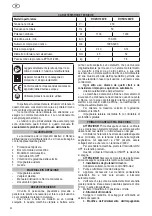
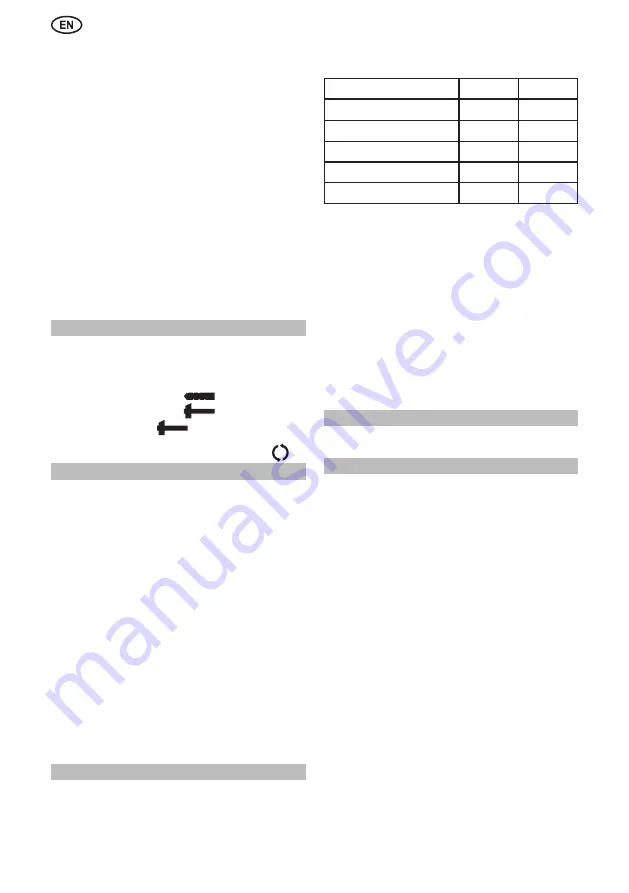
The machine’s noise and vibration levels, measured in
compliance with EN60745, usually reach:
RH45/1100VE
RH50/1200VE
Sound pressure level, dB(A)
87
89
Sound power level, dB(A)
98
100
Uncertainty K, dB(A)
3
3
Vibration total values a
h
, m/s
2
15
16
Uncertainty K, m/s
2
1.5
1.5
Use ear protection!
WARNING!
The vibration level given in these
instructions has been measured in accordance with
a standardized measurement procedure specified in
EN60745 and can be used to compare devices. Different
uses of the device give rise to different vibration levels and
in many cases they may exceed the values given in these
instructions. It is easy to underestimate the vibration load
if the electrical power tool is used regularly in particular
circumstances.
Note.
If you wish to make an accurate assessment of
the vibration loads experienced during a particular period of
working , you should also take into account the intervening
periods of time when the device is switched off or is running
but is not actually in use. This can result in a much lower
vibration load over the whole of the period of working.
ACCESSORIES
Accessories and their corresponding order number
can be found in our catalogues.
MAINTENANCE AND CARE
WARNING
-Always unplug the machine before
carrying out work on it.
- When you notice a decrease in hammer output, take
the machine to an Official Service Centre.
- Tool inspection: Using a blunt cutting tool leads to
less efficient work and could damage the motor, there-fore
cutting tools should be sharpened or replaced as soon as
any wear is noticed. Daily: Clean the tool-holder.
- Inspect the mounting screws: Regularly inspect all the
mounting screws and ensure they are firmly tight-ened.
Should any screw be loose, tighten it immedi-ately. Failure
to do so could put you at serious risk.
- Motor maintenance: Take the utmost care to ensure
that the motor winding is not damaged and does not
become damp with oil or water.
- Brush replacement: The brushes disconnect auto-
matically and should be replaced after 150-200 hours
use or when they are less than 10 mm long. Have them
replaced by an Official Service Centre.
- Clean the machine thoroughly after each use with a
blast of dry air.
- The vents of the machine should be kept clear at all
times.
- Check that the mains lead is in good condition. If it is
not, take it to an Official Service Centre to have it re-placed.
- Use only Felisatti accessories and spares. The parts
the changing of which is not covered in this instruction
manual, should be replaced in a Felisatti Official Ser-vice
Centre (See Warranty/Official Service Centre ad-dress
leaflet).
depth gauge
against the work surface, to the same depth
as the length of the bit.
3. Read the value in mm off the scale on the depth gauge
and subtract the required drill depth.
4. Tighten the fixing wing nut and adjust the resulting
value for the depth stop.
5. Indicator LED
The green power-ON indicator LED lights up when the
tool is plugged. If indicator led does not light up, the mains
cord or the controller may be detective. The red service
indicator LED lights up when the carbon Brushes are worn
out to indicate that the tool needs servicing.
After approximately 8 hours of use, the motor will
automatically be shut off.
5. Mains connection
WARNING!
Connect only to a single-phase AC
current supply and only to the mains voltage specified
on the rating plate. Connection to sockets without earth
protec-tion is possible as the appliance features protective
class II insulation according to European Standard EN
60745. Radio interference suppression complies with the
European Standard EN 60745.
FUNCTIONS
1. Speed selection
Maximum speed is set up by handwheel
5
.
2. Switching over between modes
WARNING!
Only turn the lever E when the machine
has stopped.
Position for hammer drilling
Position for chiselling
Position for adjustment of the chiselling position
OPERATION
Hammer-drilling
1. Set the following adjustments before starting work:
- Lever
3
in appropriate position.
- Clockwise rotation.
2. Fit the SDS-max
drill.
3. Place the drill against the material before switch-ing
it on, press it until the lengthways play is taken up, then
switch on and work exerting light pres-sure (e.g. 70N).
Note.
Exerting greater pressure does not increase the
machine’s effectiveness!
Tips on drilling in masonry:
• Take the drill out of the hole from time to time to re-
move dust.
• Switch to percussion-drilling for concrete, hard bricks
and tiles, stone and hard cement (but not when drilling the
surface of marble).
• For tiles, paving-stones, soft bricks and tiles, soft
cement, breeze-block and plaster, switch to normal drilling.
• Use percussion carbide-tipped masonry drill-bits.
WARNING!
This machine must not be used with hole
saws, core bits, diamond bits, etc, as they tend to jam in
the hole easily. This would cause the safety clutch to trip
out too often.
NOISE AND VIBRATION
This tool has been designed and made to reduce
noise to a minimum. However, in spite of this,
in certain
circumstances the maximum noise level in the place of
work could exceed 85 dBA. In this case, the operator
should wear ear protection.
Summary of Contents for RH45/1100VE
Page 2: ...2 1 3 4 5 6 7 2 Fig 1 Fig 2...
Page 28: ...28 1 b 2 b d f 3 b d f g 4 b d...
Page 29: ...29 f g h i 5...
Page 33: ...33 85 RH45 1100VE RH50 1200VE 87 89 98 100 K 3 3 ah 2 15 16 K 2 1 5 1 5 1 1 2 Y 3...
Page 34: ...34...
Page 35: ......


