background image

10

DO

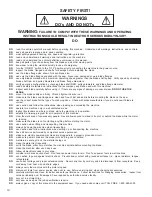
read this entire operator’s manual before operating this machine.  Understand all warnings, instructions, and controls

.

DO

keep all guards in place and in good condition.

DO

wear safety approved hearing, eye, head and respiratory protection.

DO

read and understand all warnings and instructions on the machine.

DO

read and understand the symbol definitions contained in this manual.

DO

keep all parts of your body away from the blade and all other moving parts.

DO

know how to stop the machine quickly in case of emergency.

DO

turn the “ON/OFF” switch to the “OFF” position prior to connecting the machine to the power source.

DO

inspect the blade, flanges and shafts for damage before installing the blade.

DO

use the blade flange size shown for each blade size.

DO

use only the blade flanges supplied with the saw.  Never use damaged or worn blade flanges.

DO

use only blades marked with a maximum operating speed greater than the blade shaft speed.  Verify speed by checking
blade shaft rpm and pulley diameters and blade flange diameters.

DO

verify saw drive configuration by checking blade shaft RPM, pulley diameters, and blade flange diameter.

DO

read all safety materials and instructions that accompany any blade used with this machine.

DO

inspect each blade carefully before using it.  If there are any signs of damage or unusual wear, 

DO NOT USE THE

BLADE.

DO

mount the blade solidly and firmly.  Wrench tighten the arbor nut.

DO

make sure the blade and flanges are clean and free of dirt and debris before mounting the blade on the saw.

DO

use the correct blade for the type of work being done.  Check with blade manufacturer if you do not know if blade is
correct.

DO

use caution and follow the instructions when loading and unloading the machine.

DO

operate this machine only in well ventilated areas.

DO

instruct bystanders on where to stand while the machine is in operation.

DO

establish a training program for all operators of this machine.

DO

clear the work area of unnecessary people.  Never allow anyone to stand in front of or behind the blade while the motor
is running.

DO

make sure the blade is not contacting anything before starting the motor.

DO

use caution when lifting and transporting this machine.

DO

always tie down the machine when transporting.

DO

use caution and follow instructions when setting up or transporting the machine.

DO

have all service performed by competent service personnel.

DO

make sure electric powered machines are plugged into a properly grounded circuit.

DO

make sure power cords are the proper size and in good condition.

DO

maintain a secure grip on the material being cut.

DO

clean the water tray frequently.

DO

verify the blade arbor hole matches the machine spindle before mounting the blade.

DO

clean the machine after each day’s use.

DO

follow all electrical codes in your area.

DO

consider work area environment.  Don’t expose power tools to rain.  Don’t use power tools in wet locations.

DO

use caution to guard against electric shock.  Prevent body contact with grounded surfaces (i.e., pipes, radiators, ranges,
refrigerators).

DO

use correct voltage and proper extension cords.  Never carry tool by cord or yank it to disconnect it from receptacle.  Keep
cord away from heat, oil and sharp edges.

DO

always carry the machine with the motor stopped.

DO

disconnect tools from power source when not in use, before servicing and when changing accessories.

DO

carefully maintain and clean for better and safer performance.  Follow instructions for changing accessories.  Inspect tool
cords periodically and, if damaged, have repaired by authorized service facility.

DO

only cut in a straight line.

DO

only saw as deep as the job specifications require.

DO

always give a copy of this manual to the equipment user.  If you need extra copies, call TOLL FREE  1-800-365-4003.

SAFETY FIRST!

WARNINGS

DO’s AND DO NOT’s

WARNING:


FAILURE TO COMPLY WITH THESE WARNINGS AND OPERATING

INSTRUCTIONS COULD RESULT IN DEATH OR SERIOUS BODILY INJURY.

DO

Summary of Contents for TILE MASTER XL TM1-XLHT

Page 1: ...NES DE OPERACI N Y LISTA DE PIEZAS 0AF04028 Copyright May 2002 DBInc Printed in U S A Model TM1 XLHT 17400 W 119th Street Olathe Kansas 66061 Customer Service 800 365 4003 Corporate Office 913 928 100...

Page 2: ...2...

Page 3: ...BRICA CADA M QUINA ES SOMETIDA A PUREBAS DETENIDAS CADA M QUINA DE CORTE ES ENTREGADA CON UNA CIPIA DE ESTE MANUAL LOS OPERARIOS DE ESTOS EQUIPOS DEBEN LEER Y FAMILIARIZARSE CON LAS INSTRUCCIONES DE S...

Page 4: ...ncia Wear Eye Protection Usar Gafas De Protecci n Wear Head Protection Usar Casco De Protecci n Wear Breathing Protection Usar M scara De Protecci n The Use Of Ear Protection Is Mandatory Es Obligator...

Page 5: ...ean Well Lit Remove All Safety Hazards Mantenga Limpio El Sitio De Trabajo Bien Iluminado Elimine Todos Los Riesgos De Seguridad Dangerously High Noise Level Nivel De Ruido Elevadamente Peligroso Pay...

Page 6: ...De La Brida De La Hoja Blade Cutting Depth Profundidad De Corte De La Hoja Machine Mass lbs Masa De La M quina lbs Electric Motor Motor el ctrico WARNING HEARING HAZARD DURING NORMAL USE OF THIS MACHI...

Page 7: ...7 NOTES...

Page 8: ...ESCRIPTIONS LOCATION DESCRIPCI N DE CALCAMONIAS Y UBICACIONES P N 187043 Location Top of Belt Guard P N 046326 Location Motor Assembly P N 046327 Location Motor Assembly P N 169265 Location Front of W...

Page 9: ...026 Inner Location Blade Guard P N 169281 Location Side of Belt Guard Side of Blade Guard P N 161459 Location Water Pan Sides P N 189027 Location Belt Guard DECAL DESCRIPTIONS LOCATION DESCRIPCI N DE...

Page 10: ...DO establish a training program for all operators of this machine DO clear the work area of unnecessary people Never allow anyone to stand in front of or behind the blade while the motor is running D...

Page 11: ...is in operation DO NOT operate this machine in an enclosed area unless it is properly vented DO NOT operate this machine in the vicinity of anything that is flammable Sparks could cause a fire or an...

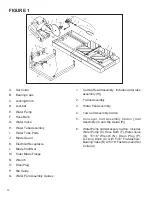
Page 12: ...Plug P Rip Guide Q Water Pan Assembly Guides 1 Cutting HeadAssembly Includes water tube assembly H 2 FrameAssembly 3 Water Pan Assembly 4 Tow Cart Assembly Carton 5 Conveyor Cart Assembly Carton Cart...

Page 13: ...ened intake The motor and pump power cords are securely mounted directly into the Motor Housing K The removable Drain Plug O at the back end of the pan permits easy coolant draining and quick sludge c...

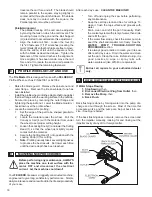
Page 14: ...ch to OFF prior to mounting the blade 1 Be sure you are using the correct blade for the material being cut For example blades are avail able for cutting materials such as wall tile quarry tile marble...

Page 15: ...to ensure that the unit functions freely Adjustment tools required Carpenter s Square two 2 7 16 wrenches 1 2 wrench and 5 32 hex key 1 Check the Blade in Slot Alignment The blade should be centered i...

Page 16: ...ocate the material for profiling 1 Set the edge of the part to be shaped parallel to the wheel 2 Locate the material under the wheel Pull the Conveyor Cart 4 with the material from under the wheel to...

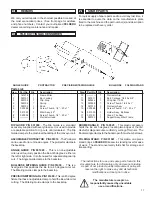
Page 17: ...fixture that has an adjustable clamp to hold the tile while miter cutting The Mitering Guide clamps to the backstop BOOMERANGLE P N 169525 This plastic accessory holds the tile at 45 degrees locating...

Page 18: ...despeje el lugar de trabajo de personas innecesarias No permita que nadie se sit e delante o detr s de la hoja mientras el motor est funcionando SI aseg rese que la hoja no est haciendo contacto con n...

Page 19: ...m quina de corte con la hoja instalada NO use un disco que haya sufrido un golpe o ca da NO use discos con puntas de carburo NO utilice discos abrasivos con agua convencionales NO toque una hoja diam...

Page 20: ...njunto de la Bandeja de Agua 1 Conjunto del Cabezal de Corte Incluye el Conjunto de Tuber a para Agua H 2 Conjunto del Marco 3 Conjunto de la Bandeja de Agua 4 Caja del conjunto del carro de remolque...

Page 21: ...or sus siglas en ingl s de motor de 115V 60 1 en la sierra convencional La confiable bomba para l quido enfriador sumergible y de elevado volumen presenta una toma con pantalla Los cables del motor y...

Page 22: ...oja est n limpias 5 Instale la brida externa con el di metro grande contra la hoja Apriete la Tuerca del Eje de la Hoja L con la Llave N de 15 16 que se proporciona Saque todos los art culos de la caj...

Page 23: ...de agua arrancar autom ticamente cuando arranque el motor El ajuste de la provisi n de agua puede ser hecho por medio de la V lvula de Control G Siga las recomendaciones del fabricante de la hoja para...

Page 24: ...lares de sujeci n A continuaci n afloje las cuatro 4 contratuercas de 5 16 18 llave de 1 2 que abrazan los sombreretes del cojinete B a la barra pivotante Mueva el Conjunto del Cabezal a lo largo de l...

Page 25: ...r vida til y productividad a su sierra Despu s de cada jornada de uso LIMPIE LA MAQUINA Apague y desenchufe la sierra antes de efectuar cualquier mantenimiento Mantenga la parte superior del carro lim...

Page 26: ...encial proporcionar con cada pedido los datos que aparecen en la chapa del fabricante fijada a la m quina adem s de los n meros de pieza de la m quina y la descripci n de la pieza a ser reemplazada Ef...

Page 27: ...ara sostener el azulejo cuando se efect an cortes diagonales El Soporte para Corte Diagonal de Precisi n se abraza a la parada posterior BUMERANGULO P N 169525 Este accesorio de pl stico sostiene el a...

Page 28: ...28 DIAGRAM 1 TILE MASTER XL 80 81 82 83 5 8 9 1 2 3 4 17 21 20 19 18 16 7 6 12 13 11 14 15 10 29 28 27 25 25 26 23 22 24 36 30 34 35 31 32 33 79 12 11 13...

Page 29: ...16 18 x 2 1 4 030141 1 Dual Voltage Switch 000605 32 020742 1 Washer Flat 5 16 000873 1 Manual Reset Switch 000605 33 020197 1 Locknut Fiber 5 16 18 189117 1 Capacitor Start 000605 34 169486 1 Knob 5...

Page 30: ...30 Diagram 2 Wiring Diagram 193042 1 5HP HT 115V 60 1...

Page 31: ...31 Diagram 3 Wiring Diagram 000605 1 5HP 115V 208 230 60 1...

Page 32: ...32 Diagram 4 Wiring Diagram 000607 2 HP 240 50 1...

Page 33: ...have been defective This warranty does not cover labor except for gas powered Quickie Super saws and does not cover maintenance items such as belts air filters bearings and wheels Purchaser will be re...

Page 34: ...34 NOTES...

Page 35: ...35...

Page 36: ...Kwun Tong Hong Kong Phone 852 2516 6602 FAX 852 2516 6605 E mail Targethk netvigator com Felker Japan Korea Taiwan 1803 36 Oyama Machi Machida Shi Tokyo 194 0212 Japan Phone 8142 797 0212 FAX 8142 79...

Reviews: