14
•
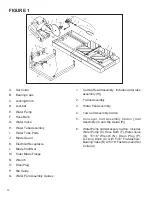
Mount the water pan assembly Guides (Q) over the
Frame Assembly (2) legs between the vertical post and
the Sliding Pan Stop (R). The Pan Assembly (3) should
slide freely back and forth on the Guides (Q) with little
lateral movement. Adjust if needed.
•
Install the Cart Assembly (4) with the Back Stop at the
operating end. Check that all four wheels are on the
rails and that it travels freely back and forth.
Install the Cutting Head Assembly (1):
1.
Set the Cutting Head Assembly (1) on the pivot
bar up against the Set Collar (A). The set collar
has been pre-set at the factory to align the blade
with the slot in the center of the cart; it can be
adjusted if needed.
2.
Install the two Bearing Caps (B) over the long
setscrews located in the bottom of the Cutting Head
(1) using 5/16" flatwashers and locknuts. Next,
tighten the locknuts so that the Cutting Head (1) is
held securely on the base pivot bar, but can be
adjusted up or down.
3.
Insert the Locking Knob (C) with 5/16" flatwasher
through the slotted Lockbar (D) into the tapped
hole in the belt guard. This is used to set the
cutting depth of the blade.
Water Pump Assembly (5) Set-up:
1.
Remove the Water Pump (E), Hose Barb (F), the
Water Control Valve (G) and Water Tube Assem-
bly (H) from their carton. Thread the Hose Barb
(F) on the water pump outlet, hand tighten.
2.
Slide the Control Valve (G) onto the flexible plastic
tubing and push the open end onto the Hose Barb
(F).
3.
Set the Water Pump Assembly (5) in the deep
end of the pan beneath the belt guard.
Note:
The
water pump inlet screen must be submerged
in order to properly pick up water.
4.
Place the Water Tube Assembly (H) to the back
of the Blade Guard (J) and insert the two 1/4"
plastic nozzles into the Ports (I) on the side of the
Blade Guard (J). To prevent interference with the
full movement of the cart, it is recommended that
the tubing and electrical cord exit out the back
through the indented area of the pan.
5.
Insert the male plug into the Receptacle (K) on
the motor. The Water Pump (E) will start when
the motor is turned on. For dry cutting, the water
pump should be unplugged or removed to prevent
damage to the pump.
Install the Cutting Blade:
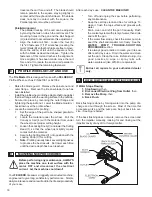
Always set the Motor Switch to OFF prior to
mounting the blade.
1.
Be sure you are using the correct blade for the
material being cut. For example, blades are avail-
able for cutting materials such as wall tile, quarry
tile, marble, slate and similarly hard materials. For
the best results, always use genuine
FELKER ®
diamond blades. Contact your nearest dealer to
select the correct blade for your specific cutting
needs.
2.
Rotate the Blade Guard (J) fully up, tightening the
wing nut if needed to hold it in the fully raised
position.
3.
Remove the Blade Shaft Nut (L) and the Outer
Blade Flange (M).
4.
Check the blade for Counter Clockwise rotation
(CCW) and install on the spindle shaft.
Rotation direction is indicated by an arrow on
one side of the blade. Make sure the blade
contact surfaces are clean.
5.
Install the outer flange with the large diameter
against the blade. Tighten the Blade Shaft Nut (L)
with the 15/16" Wrench (N) provided.
6.
Lower the Blade Guard (J) and retighten the wing
nut to securely hold the guard in place.
•
Install the Drain Plug (O) into the back end of the pan
and fill with clean water until inlet filter of water pump is
covered; about 12 gal. (46.1 l).
•
Adjust the Pan Assembly (3) to accommodate the size
of the tile to be cut and to obtain the most comfortable
position for the operator.
1.
When cutting smaller tile units, adjust the pan all
the way to the rear. The operator has full view
and control of the work with minimum stretching.
2.
For cutting intermediate sized units, such as 8" or
10" tile, the pan can be placed somewhere between
the maximum forward and maximum rear positions.
3.
When cutting larger units, the pan should be moved
to the maximum forward position, thus giving the
operator the best and most comfortable position, even
when cutting 18" x 18" or larger units.
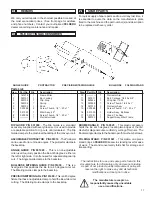
WARNING: Read the Operating Procedure
completely before operating your tile saw.
Take into account the working conditions from
the health and safety point of view.
Always pay extreme care and attention to the
preparation of the machine before starting.
Remove all wrenches and tools from the
machine.
Always keeps blade guard in place.
•
Fill the Pan with enough water to fully submerge the
water pump screen. It takes approximately 12 gallons
(46.1 l.) to fill the Pan.
•
Before connecting the power cord:
*
Check the spindle nut to be sure it is tight and that
the blade rotates freely.
4
OPERATING PROCEDURE
Summary of Contents for TILE MASTER XL TM1-XLHT
Page 2: ...2...
Page 7: ...7 NOTES...
Page 30: ...30 Diagram 2 Wiring Diagram 193042 1 5HP HT 115V 60 1...
Page 31: ...31 Diagram 3 Wiring Diagram 000605 1 5HP 115V 208 230 60 1...
Page 32: ...32 Diagram 4 Wiring Diagram 000607 2 HP 240 50 1...
Page 34: ...34 NOTES...
Page 35: ...35...


