background image

COLD

80   

mic

100 

mic

250 

mic HELPTEMP

175 

mic

125 

mic

5

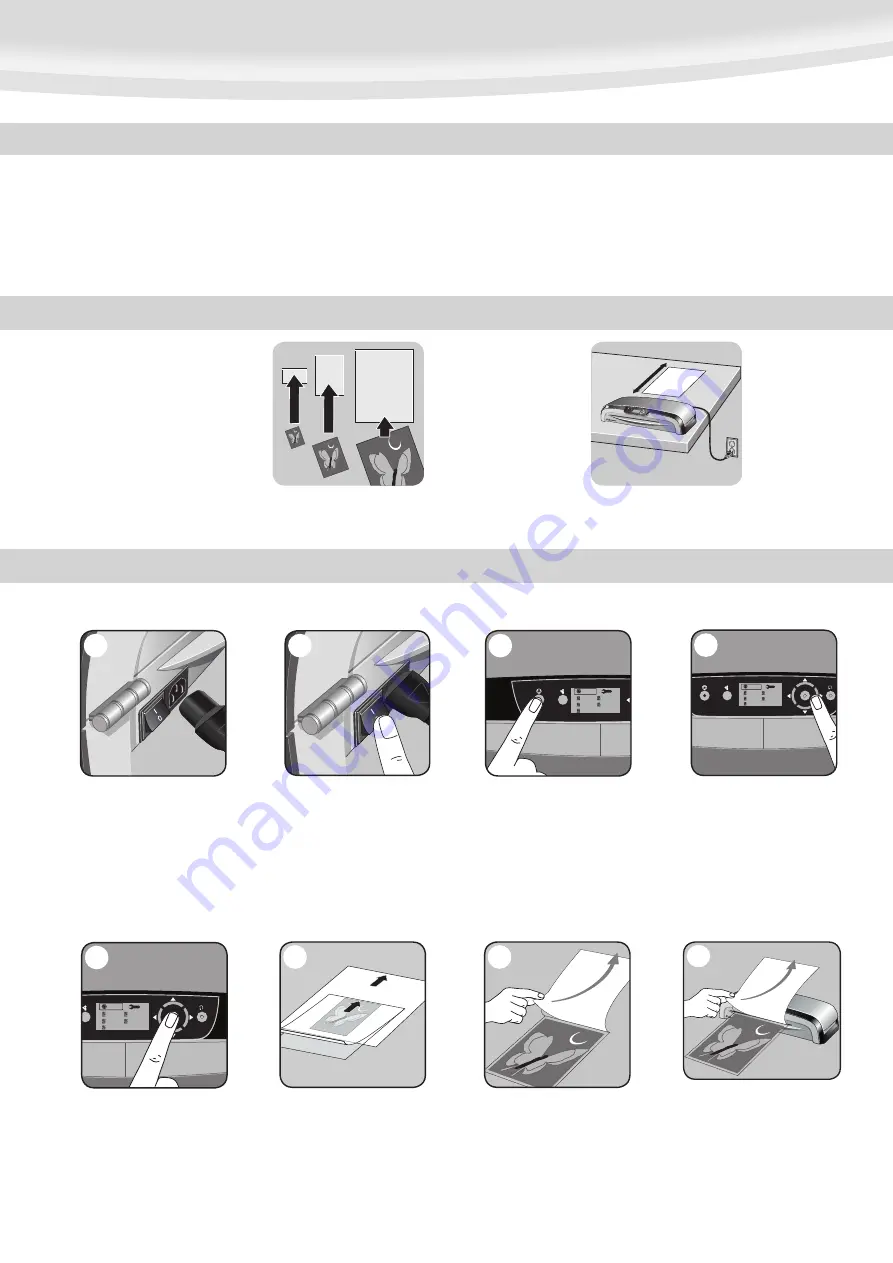
5. Confirm your selection by 

pressing “Enter” button in the 

middle of navigation keys.  

Laminator will take a few minutes 

for temperature adjustment. 

COLD LAMINATION STEPS

Position laminator so you 

have enough space to allow 

items to pass freely through 

the machine.

For best results use 

Fellowes® brand pouches 

(Enhance80 – Preserve250). 

Select correct pouch size for 

laminated item.

3

BEFORE YOU LAMINATE

CAUTION: Only use self-adhesive pouches when laminating with a cold setting.

• Always put item in a pouch. Never laminate an empty pouch.
• Trim excess pouch material from around your item after laminating and cooling.
• Clean laminator rollers with Fellowes roller wipes (item #5703701) after 

15-20 applications to guarantee optimum laminating results as explained under 

“maintenance”.

TIPS

• Do not laminate heat-sensitive documents (i.e., tickets, ultrasounds, etc.).
• Use a dry-erase marker for writing on laminated pouches.

1. Please connect the laminator 

to the socket using the separate 

power cable supplied.

1

2. Switch laminator on with 

Power On / Off button at back 

of machine.

2

3. Press Stand-by button at left 

of front operating panel to switch 

laminator on.

COLD

80   

mic

100 

mic

250 

mic HELPTEMP

175 

mic

125 

mic

3

4. Use navigation keys to select 

setting for cold lamination.

COLD

80   

mic

100 

mic

250 

mic HELPTEMP

175 

mic

125 

mic

4

6. Centre item on clear side against 

sealed edge; documents cannot be 

repositioned once laminated.

6

7. Peel a small part of the protective 

sheet away from document.

7

8

8. Place pouch, sealed edge first, 

into laminator entry. Keep pouch 

straight and use the edge guide 

to centre it. Continue peeling the 

protective sheet away.

Summary of Contents for Venus A3

Page 1: ...istruzioni Gelieve deze instructies te lezen v r gebruik L s dessa instruktioner f re anv ndningen L s venligst denne vejledning f r anvendelse Lue n m ohjeet ennen k ytt Vennligst les n ye igjennom d...

Page 2: ...Discrete carry handles at side Active Cooling System Temperature controlled release trigger for lid Support Shelf on entry to guide Laminate path LCD Interface for user guidance HeatGuard Technology...

Page 3: ...pplications to guarantee optimum laminating results as explained under maintenance TIPS Do not laminate heat sensitive documents i e tickets ultrasounds etc Use a dry erase marker for writing on lamin...

Page 4: ...ill take a few minutes for temperature adjustment 6 During warm up a wait symbol will appear in the LCD screen until the required temperature has been reached 7 Once temperature is reached acoustic be...

Page 5: ...ed 3 The open symbol will show in the LCD screen will turn on and the ready beep will sound when machine is ready to be opened 4 Press the buttons on both sides of the machine to activate the Easi Acc...

Page 6: ...ep 1 Step 2 EXIT F mil C mic EXIT F C mic mil EXIT mil mic C F COLD 80 mic COLD 80 mic 100 mic 250 mic TEMP 125 mic 175 mic 250 mic COLD 80 mic 100 mic TEMP 175 mic 125 mic 250 mic 80 mic 100 mic TEMP...

Page 7: ...ease number Move Highlight 1 position down Move Highlight 1 position up Select the highlighted element on the screen Save system settings Go to Main Menu Step 3 Step 4 Step 5 80 mic C EXIT 90 C EXIT 9...

Page 8: ...otto classificato come Apparecchiatura elettrica ed elettronica In caso di smaltimento accertarsi di seguire le disposizioni della Direttiva sui Rifiuti di apparecchi elettrici ed elettronici RAEE e l...

Page 9: ...tejeholikvidacivsouladuseSm rnic 2002 96 ESoodpaduzelektrick chaelektronick ch za zen ch OEEZ avsouladusm stn mip edpisy kter stoutosm rnic souvis V ceinformac osm rniciOEEZnajdetenastr nk chwww fello...

Page 10: ...as amended by directives 92 31 EEC 96 68 EEC And the following Harmonised European Normes EN standards and IEC standards Information Technology Equipment EN 60950 1 2001 IEC 60950 1 2001 EMC EN 55014...

Reviews: