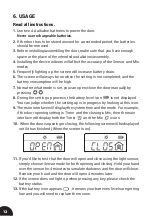
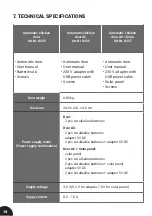
background image

11

5. ANTI-PINCH FUNCTION

When both are set, the door opener will use the Light Sensor as its primary 

reference for closing. If it is not dark enough to close using the Light Sensor, 

the default time you set will be used instead.
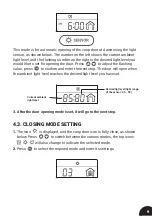
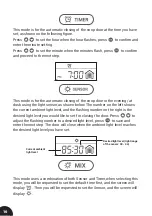
3. 

After the Closing mode setting, the screen displays SAVE, indicating the 

end of the setting up process. After that, teh screen power down in 120 

seconds later to save battery.

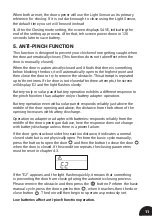
This function is designed to prevent your chickens from getting caught when 

the door automatically closes (This function does not take effect when the 

door is manually closed).
When the door is automatically closed and it finds that there is something 

below blocking the door, it will automatically open to the highest point and 

then close the door to try to remove the obstacle. This attempt is repeated 


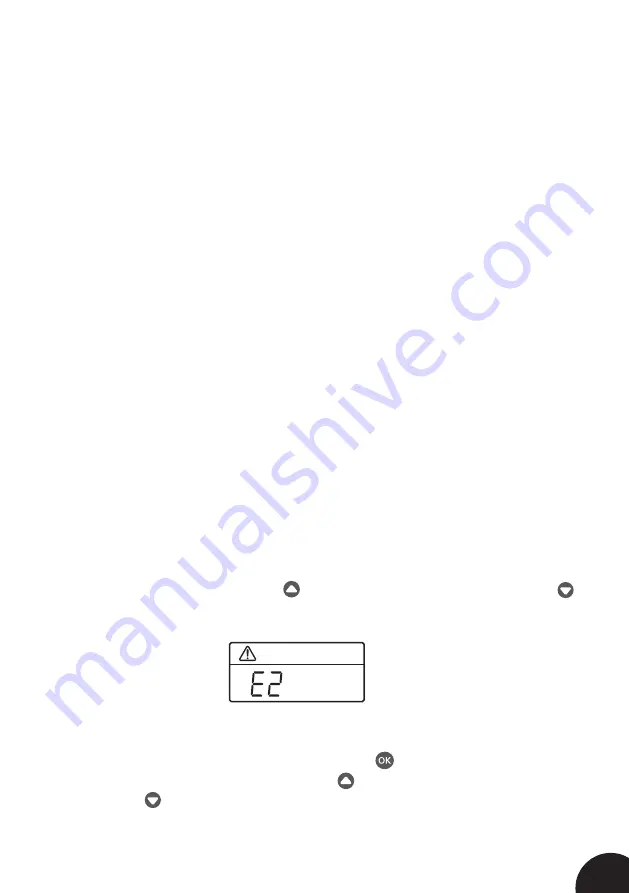
up to three times. If the door is not closed after three attempts, the screen  

will display E2 and the light flashes slowly.

lf the "E2" appears, and the light flashes quickly, it means that something 

is preventing the door from closing during the automatic closing process. 

Please remove the obstacle and then press the     button. Perform the basic 

manual cycle, press the door open button       , when it reaches, then the door 

close button       . The door will then begin to operate as previously set.

Low batteries affect anti-pinch function operation.

Battery-only or solar panel battery operation exhibits a different response to 

the pinch function than adapter-only or battery adapter operation.

Battery operation even with a solar panel: responds reliably just above the 

middle of the door opening and above, the distance from the bottom of the 

opening increases with battery discharge.
Operation on adapter or adapter with batteries: responds reliably from the 

middle of the door opening and above, here the response does not change 

with battery discharge unless there is a power failure.
If the door gets stuck outside this reaction distance, it indicates a normal 

closed state but is not physically open. Perform the basic cycle manually, 

press the button to open the door       and then the button to close the door        

when the door is closed. if this condition repeats, the closing parameters 

must be reset in chapter 4.3.

Summary of Contents for 8225

Page 1: ...USER MANUAL 420 730 893 828 www fencee eu Electric fencing AUTOMATIC SMART CHICKEN DOOR Manual for models Art Nr 8225 8226 8227 VNT electronics s r o Dvorsk 605 563 01 Czech Republic...

Page 2: ...Preparation 3 2 Installatio n 4 3 Solar panel install 6 4 Setup 7 4 1 System time setting 8 4 2 Opening mode setting 8 4 3 Closing mode setting 9 5 Anti pinch function 11 6 Usage 12 7 Technical specif...

Page 3: ...ed to mount the appliance is 20 3 4 8 25 4 cm PARTS NEEDED FOR INSTALLATION Two AA alkaline batteries included in package don t use rechargeable batteries 6 pcs Tapping screw included in package DC ca...

Page 4: ...teries Then close the battery cover and tighten the screws 2 3 First time the door is turned on the door must be closed opening does not respond Press the button to clo se the door then perform the ba...

Page 5: ...the opening by connecting the hole 2 7 Before installing the door please make sure that the installation surface of the door is flat and do not bend the door panel 2 8 Put the door panel in the positi...

Page 6: ...L INSTALL Art Nr 8228 3 2 Place the solar panel slanted upward as shown and fix the solar panel beside the door panel with four selftapping screws 3 3 Plug the power cord from the solar panel into the...

Page 7: ...LOSING 4 SET UP DEFAULT MODE The door automatically works on default mode if not configured differently by the user Default mode is sensor mode Both open and close ln the default mode the door detects...

Page 8: ...press to save and enter the next step 1 The icon is displayed and the coop door icon is fully open as shown below Press to switch between the various modes the top icons will also change to indicate t...

Page 9: ...level you would like to set for opening the door Press to adjust the flashing value press to confirm and enter the next step The door will open when the ambient light level reaches the desired light...

Page 10: ...ening at dusk using the light sensor as shown below The number on the left shows the current ambient light level and the flashing number on the right is the desired light level you would like to set f...

Page 11: ...is preventing the door from closing during the automatic closing process Please remove the obstacle and then press the button Perform the basic manual cycle press the door open button when it reaches...

Page 12: ...el icon is not displayed You can judge whether the setting up is in progress by looking at this icon 9 The main interface will display the system time and the mode For example if the door opening sett...

Page 13: ...Additional information about the products Doors with battery only operation cannot be connected to mains adapter or solar panel The solar panel has its own built in rechargeable battery which when suf...

Page 14: ...ter with USB power cable Solar panel Screws Door weight 0 85 kg Door size 34 9 24 1 4 6 cm Power supply mode Power supply combination Door 2 pcs AA alkaline batteries Door AC 2 pcs AA alkaline batteri...

Page 15: ...15...

Page 16: ...16 VNT electronics s r o Dvorsk 605 563 01 Lan kroun Czech Republic www fencee eu Electric fencing 07022024...

Reviews: