background image

fender.com

fender.com

7

7

Passport®  300 Pro

Passport®  300 Pro

5.

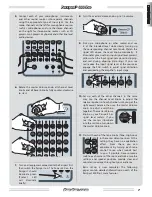
  Connect  each  of  your  microphones,  instruments 

and other sound sources into separate channels 
using the appropriate type of input jack. Use the 
mono channels on the left for monophonic sources 
such as microphones and use the stereo channels 
on the right for stereo/mono sources such as CD 
players, mp3 players, keyboards and other line level 
audio devices.

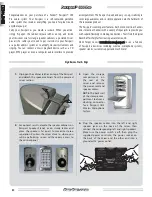
6.

  Rotate the master Volume knob, all channel Level 

knobs and all Reverb knobs fully counter-clockwise 
to start.

7.

  Turn on all equipment connected to the Passport first, 

then switch the Passport on. The Power LED on the 
Passport should 
illuminate green 
(Protect LED 
will illuminate 
briefly).

8.

  Turn  the  master  Volume  knob  up  to  1/4  volume.

9.

  Pick up a microphone (or other source) and use 

it at the intended level while slowly turning up 
the corresponding channel Level knob. Watch the 
signal LED above the Level knob occasionally.  It 
illuminates green with an input signal level present, 
yellow when the input signal gets closer to clipping, 
and red during clipping (distorting). If you see 

red

, reduce the input signal level at the source or 

engage the PAD switch to avoid signal distortion 
and overloading the amplifier's input stage. 

10.

 Set up each of the other channels in the same 

way. Use the channel Level knobs to adjust the 
relative loudness of each channel until you get the 
right overall balance, then use the master Volume 
knob  to  adjust  everything 
together. The master Volume 
knob on your Passport has 
signal level meters. If you 
see the meters illuminate 
into the 

red

 zone, turn down 

the master Volume knob.

11.

 Start with each of the tone knobs (Tone, High, Low) 

in the center detent position. At this 
setting they have no equalization 
effect. From there you can 
experiment  by  turning  each  tone 
control to see what sounds best 
to  you.  If  possible,  have  someone 

walk to each corner of the room and make sure the 
settings and speaker positions provide clear and 
consistent coverage throughout your audience. 

  Basic set-up is now complete! The following 

pages contain detailed information on each of the 
Passport 300 Pro's many features.

LEFT

RIGHT

POWER

PROTECT

1

2

3

4

5

6

7

8/USB

LEVEL

LEVEL

LEVEL

LEVEL

LEVEL

LEVEL

LEVEL

LEVEL

L

R

VOLUME

HIGH

LOW

HIGH

LOW

REVERB 2

REVERB 1

L

R

1

2

3

4

5

6

7

8/USB

TONE

VOLUME

REVERB

TONE

TIME

SELECT

LEVEL

LEVEL

LEVEL

LEVEL

LEVEL

LEVEL

LEVEL

LEVEL

HIGH

LOW

REVERB

HIGH

LOW

REVERB

HIGH

LOW

REVERB

HIGH

LOW

REVERB

HIGH

LOW

REVERB

HIGH

LOW

REVERB

HIGH

LOW

REVERB

HIGH

LOW

REVERB

PAD

PAD

PAD

PAD

PAD

PAD

USB

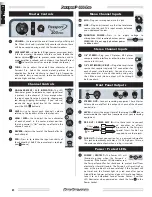
Summary of Contents for Passport 300 Pro

Page 1: ......

Page 2: ...ll servicing to qualified service personnel Servicing is required when the apparatus hasbeendamagedinanyway suchaspower supplycordorplugisdamaged liquidhasbeen spilled or objects have fallen into the...

Page 3: ...l s mbolo de cabeza de flecha dentro de un tri ngulo equil tero tiene por objeto alertar al usuario de la presencia de voltaje peligroso no aislado dentro del gabinete del producto que puede ser de ma...

Page 4: ...esetzt werden Bei unsachgem em Anschluss Austausch der Batterien besteht Explosionsgefahr Der Austausch darf nur mit Batterien des gleichen oder gleichwertigen Typs erfolgen der in den Anweisungen ode...

Page 5: ...ferimentos provocados por uma poss vel queda 13 Desligue este aparelho durante trovoadas ou quando n o for utiliz lo por um longo per odo de tempo 14 Solicitetodasasrepara esapessoaldeassist nciaqual...

Page 6: ...visit www fender com passport www fender com passport to see a full line of Passport accessories including wireless microphone systems speaker stands customer support and much more 1 Flip open the ca...

Page 7: ...void signal distortion and overloading the amplifier s input stage 10 Set up each of the other channels in the same way Use the channel Level knobs to adjust the relative loudness of each channel unti...

Page 8: ...trument or other line level mono source into this jack This input accepts balanced and unbalanced sources PHANTOM POWER Press in to supply voltage to microphones that require phantom power WARNING Do...

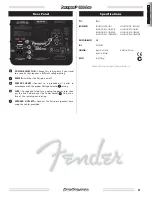
Page 9: ...der out of the Power Socket Only use a fuse of the same type and rating SPEAKER OUTLETS Connect the Passport speakers here using the cables provided Specifications TYPE PR845 PARTNUMBERS 069 4403 000...

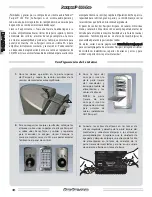
Page 10: ...sitar nuestra p gina web www fender com passport www fender com passport para ver la amplia gama de accesorios Passport incluyendo sistemas de micr fonos inal mbricos soportes de altavoz y otros y par...

Page 11: ...tor PAD para evitar la distorsi n y la sobrecarga de la entrada 10 Ajuste el resto de canales de la misma forma Use los mandos Level de canal para ajustar el volumen relativo de cada canal hasta que t...

Page 12: ...epta fuentes tanto balanceadas como no balanceadas ALIMENTACION FANTASMA Pulse este interruptor para pasar alimentaci n fantasma a aquellos micr fonos que la necesiten PRECAUCION No use esto con micro...

Page 13: ...corriente y tire del recept culo del fusible que est debajo de la entrada de corriente Sustituya el fusible solo por otro de id nticas caracter sticas SALIDAS DE ALTAVOZ Conecte aqu los altavoces Pas...

Page 14: ...L INSTRUMENTS CORPORATION CORONA CALIFORNIA USA This product is covered by one or more of the following US patents 5 933 507 D389 824 D395 656 D395 432 Fender and Passport are registered trademarks of...

Reviews: