background image

Fenix 

Fenix F1 70


Rev.    0.0


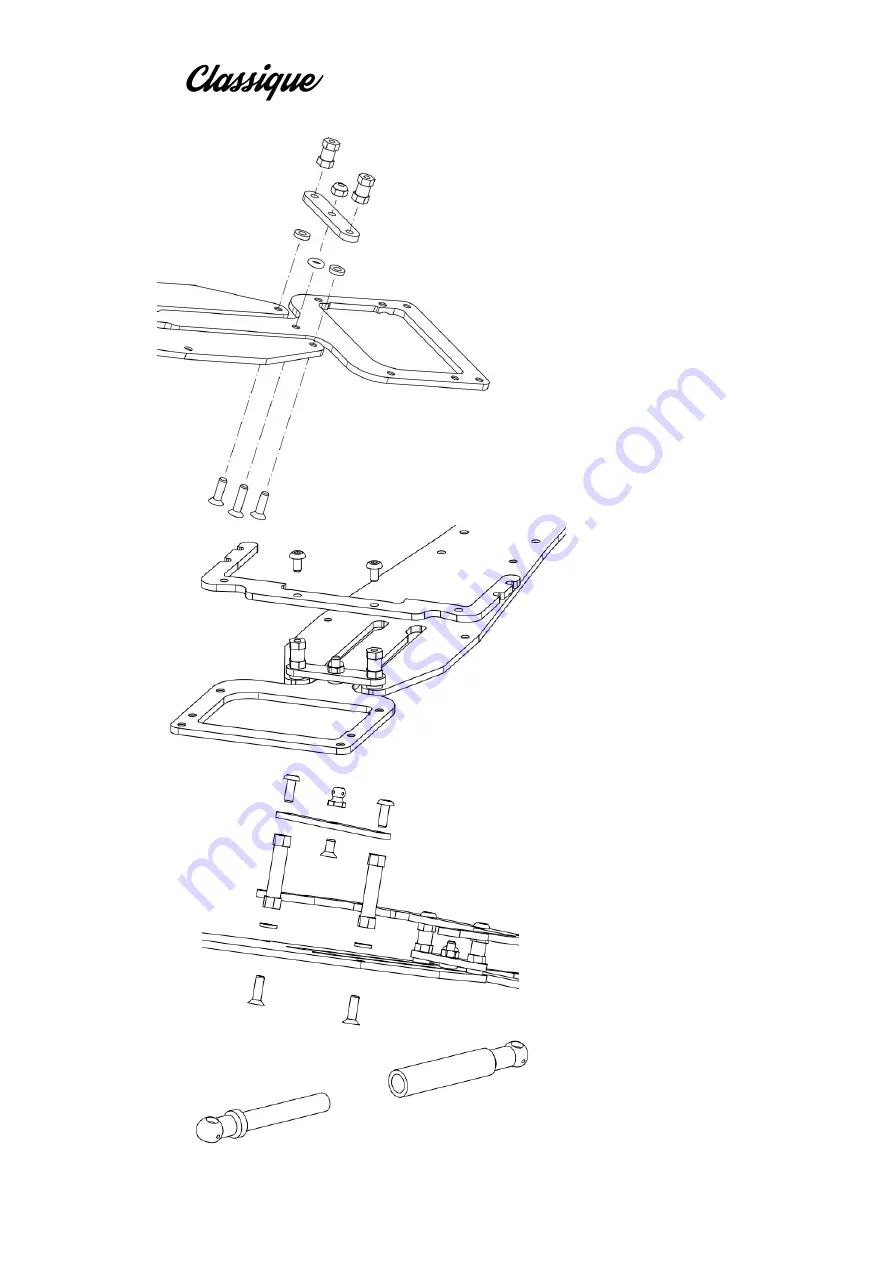
Start  with  the  HW026 
M3x12 countersunk and 
insert  it  in  the  central 
hole of the “T-bar”, slide 
the o-ring over it. 
Insert  the  2  HW004 
M3x10  countersunk  in 
the side holes. 
Slide  the  2  FX0063 
1.5mm shims over. 
Insert  the  F2-3  plate 
over. 
Tight  the  M3  Nylock 
over the central HW026 
and the 2 x FX1045 over 
the HW004. 
 
Rear 

suspension 

responsiveness  can  be 
tuned  by  tighten  the 
HW026. 


Fix  the  F2-2  using  2  x 
HW008  M3  x  6  button 
screw 


Insert 2 x HW004 M3x10 
countersunk screws and 
slide  the  FX0023  1mm 
shims over, secure them 
with  the  2  x  FX0054 
posts. 
 
Fix the 4.8mm male stud 
to the F2-7 shock holder 
using  1  x  HW012  M3x6 
countersunk screw. 
 
Fix the group to the post 
using  2  x  HW003  M3x8 
button screws. 


Put some 100K syrup 
over the piston and 
assembly the damper. 
Keep it for later 
installation. 

Summary of Contents for Classique F1 70

Page 1: ...Fenix Fenix F1 70 1 Rev 0 0 Fenix F1 70 Rev 0 6 May 2020 ...

Page 2: ...the same frequency with somebody else at the same time Ensure that others are aware of the operating frequency you are using and when you are using it Use a transmitter designed for ground use with RC cars Make sure that no one else is using the same frequency as yours in your operating area Using the same frequency at the same time whether it is driving flying or sailing can cause loss of control...

Page 3: ...Fenix Fenix F1 70 3 Rev 0 0 Bag A Main chassis ...

Page 4: ...nd the 2 x FX1045 over the HW004 Rear suspension responsiveness can be tuned by tighten the HW026 Fix the F2 2 using 2 x HW008 M3 x 6 button screw Insert 2 x HW004 M3x10 countersunk screws and slide the FX0023 1mm shims over secure them with the 2 x FX0054 posts Fix the 4 8mm male stud to the F2 7 shock holder using 1 x HW012 M3x6 countersunk screw Fix the group to the post using 2 x HW003 M3x8 bu...

Page 5: ...Fenix Fenix F1 70 5 Rev 0 0 Bag B Steering ass y ...

Page 6: ... HS2 servo holder Note the flat area goes to the front of the model Insert the low profile servoin the servo holder Fix it with using 4 x HW004 screws and 4 HW002 M3 Nylock nut Insert 2 x HW003 into the servo saver and screw 2 x FUFX48 Insert the servo saver over the servo and fix it using the proper screw provided in the servo box ...

Page 7: ...ing 4 x HW003 M3x8 Button Open Bag B1 Steering hubs Use 1 x HW0014 M2x 6 screw to fix the 19804495 uniball Use the Grey ball joint 53601 over the 19804495 uniball Grub screw M3x3 can be used to better secure the steering over the kingpin Provided plastic shims can be used to set the front ride height Assembly 2 steering turnbuckles ...

Page 8: ...Fenix Fenix F1 70 8 Rev 0 0 Bag C Motor holder ...

Page 9: ... fix the FX FU48 male stud to the F2 4 shock holder Assembly the motor holders to the chassis using 4 x HW012 M3x6 countersunk Fix the F2 5 wing holder to the holders using 4 x HW008 M3x6 button Install the shock holder on the motor holder using 2 x HW008 M3x6 button ...

Page 10: ...ifferential Please refer to proper manual for Fenix Sphere diff or Gear diff according your version of F1 70 Chassis Fenix Classique F1 70 is available with 3 different chassis Tamiya F103 F104 and Xray X1 are available only as Transformation kit ...

Reviews: