


4
b) Montáž — mírně akumulační systém
INSTALACE DO BETONU (samonivelační hmoty)
•
Nejprve si přečtěte Všeobecné podmínky.
•
V případě fixace topného kabelu přímo na tepelnou izolaci (jen
extrudovaný polystyrén) nesmí být instalovaný příkon větší než
160W/m
2
.
•
Betonová směs musí být natolik zhutněná, aby vrstva neobsa-
hovala vzduchové bubliny, kaverny apod. a zajišťovala dokonalý
kontakt s topným kabelem. Hutnit nutno opatrně, ručně, aby
nedošlo k poškození kabelu. V žádném případě nepoužívat
ponorné vibrátory.
•
Betonová směs musí obsahovat tzv. plastifikátory.
•
Při betonování je nutno dbát na skutečnost, že při přestávce
delší 60minut se betonované plochy dokonale nespojí. Proto při
delší prodlevě je nutno vytvořit adhezívní spojovací můstek,
např. penetrací nebo jiným způsobem.
•
Při instalaci armovacího železa je nutno dát pozor, aby nedošlo
k poškození izolace kabelu.
POSTUP
•
Na hydroizolovaný podklad položte tepelnou izolaci.
•
Rozviňte topný kabel ve tvaru meandru, dle požadovaného
výkonu.
•
Topný kabel fixujte přímo na tepelnou izolaci tak, aby se
při betonáži nemohl pohnout, např. páskou Grufast nebo
Plastovou příchytkou kabelů.
•
Proveďte proměření odporu topného okruhu a unikajícího —
rozdílového proudu, zapište do Záručního listu.
•
Kabel zalijte vrstvou betonu do požadované výšky, po
skončení betonářských prací opět proveďte měření a zápis
do Záručního listu.
•
Rohož uveďte do chodu nejdříve po 28 dnech, po úplném
vyzrání betonu.
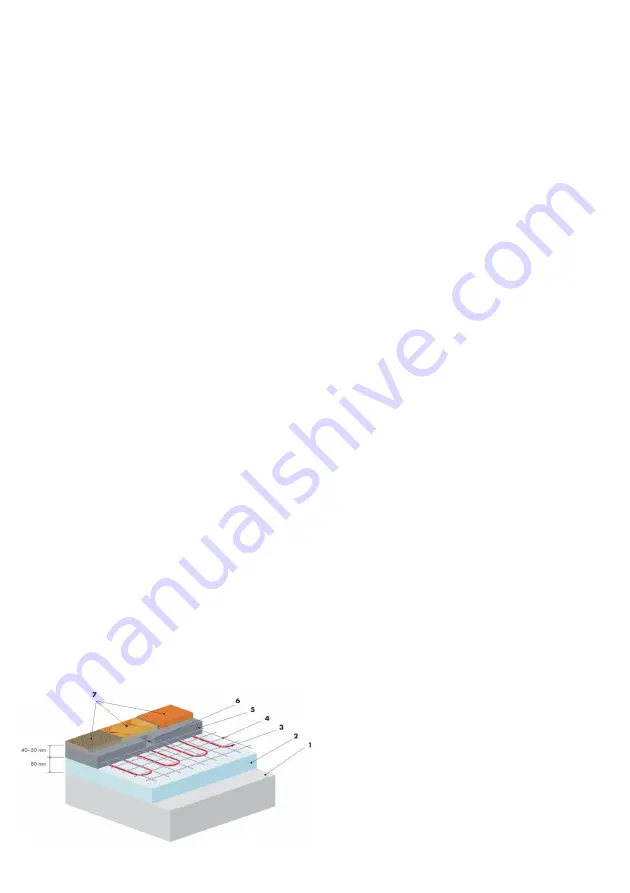
System with moderate accumulation of heat /
Mírně akumulační systém
1) Base / Podklad
2) Thermal insulation 80mm / Tepelná izolace 80mm
3) Ecofloor heating cable / Topný kabel Ecofloor
4) Reinforcing steel grid / Armovací ocelová síť
5) Concrete accumulation layer 40—50mm / Betonová akumu-
lační vrstva 40—50mm
6) Wiring tube with floor probe / Instalační trubka s podlaho-
vou sondou
7) Finish floor / Nášlapná vrstva
b) Installation — system with moderate accumulation of heat
INSTALLATION INTO CONCRETE (self- levelling screed)
•
Firstly, read General conditions.
•
In the case of fixing of the heating cable directly to thermal
insulation (only extruded polystyrene), higher input than
160W/m
2
must not be installed.
•
Concrete mixture has to be compacted to such extent that
no air bubbles, caverns etc. are present in the layer and so
that it ensures perfect contact with the heating cable. The
compacting has to be performed carefully and manually, so
that the cable is not damaged. In no case it is possible to
use immersion vibrators.
•
The concrete mixture must contain so- called plastifiers.
•
In the course of concreting, it is necessary to pay attention
to the fact that a break longer than 60 minutes results in an
imperfect uniting of areas being concreted. So, in the case of
longer pause, it is necessary to create an adhesive
connecting bridge, for example by means of penetration or in
another way.
•
Be careful when installing the reinforcing grid not to damage
the cable insulation.
PROCEDURE
•
Lay the thermal insulation to damp- proof base.
•
Unroll the heating cable to the shape of meander, according
to required output.
•
Attach the heating cable directly to the thermal insulation, so
that it cannot move in the course of concreting, for example
with using of Grufast tape or plastic cable clips.
•
Measure
the
resistance
of
heating
circuit
and
leakage - differential current, record the measured values in
the Certificate of Warranty.
•
Pour concrete to the cable up to required thickness. After the
completion of concreting work, perform the measurements
again and record measured values in the Certificate of
Warranty.
•
The mat may be put into operation only after 28 days, after
full maturity of the concrete.


