


5
PROCEDURE:
•
Cover the hydro- insulated foundation with a thermal-
insulation layer, then cover this layer with a 4 cm layer of
concrete.
•
Allow the concrete to set fully.
•
Clean the concrete area, remove any sharp objects and
coat it using a suitable penetrating solution.
•
Place the heating cable in an open- looping pattern in
accordance with the required output.
•
Fix the heating cable (e.g., using Grufast fastening strips)
so that it cannot move during further concreting.
•
In humid spaces, connect the protective braiding of the
cable to the protective grounding connection for the room.
•
Measure the resistance of the heating circuit and the
insulation resistance and record the measured values in the
certificate of warranty.
•
Cover the cable with a concrete layer up to the required
height. After concreting is finished, measure the resistance
values again and record them in the certificate of warranty.
•
Wait at least 28 days after installation before putting the
mat into operation, so that the concrete will be set fully.
•
Materials used in finishing the floor surface (glue for tiles,
carpet, parquets, etc.) must be approved by their respective
manufacturers for use on floors under thermal stress.
POSTUP — poloakumulační systém
•
Na hydroizolovaný podklad položte tepelnou izolaci, na
izolaci vytvořte 4cm vrstvu betonu.
•
Beton nechte vyzrát.
•
Betonovou vrstvu očistěte a zbavte ostrých předmětů a
natřete penetrační nátěrem.
•
Rozviňte topný kabel ve tvaru meandru, dle požadovaného
výkonu.
•
Topný kabel fixujte tak, aby se při další betonáži nemohl
pohnout, např. páskou Grufast.
•
Ve vlhkých prostorech spojte ochranné opletení kabelu s
ochranným pospojováním místnosti.
•
Proveďte proměření odporu topného okruhu a izolačního
odporu zapište do Záručního listu.
•
Kabel zalijte vrstvou betonu do požadované výšky, po
skončení betonářských prací opět proveďte měření a zápis
do Záručního listu.
•
Rohož uveďte do chodu nejdříve po 28 dnech, po úplném
vyzrání betonu.
•
Materiály dále používané pro zušlechtění povrchu podlahy
(lepidlo na dlažbu, koberec, parkety apod.) musí mít dopo-
ručení od výrobce, že jsou určeny pro tepelně namáhané
podlahy.
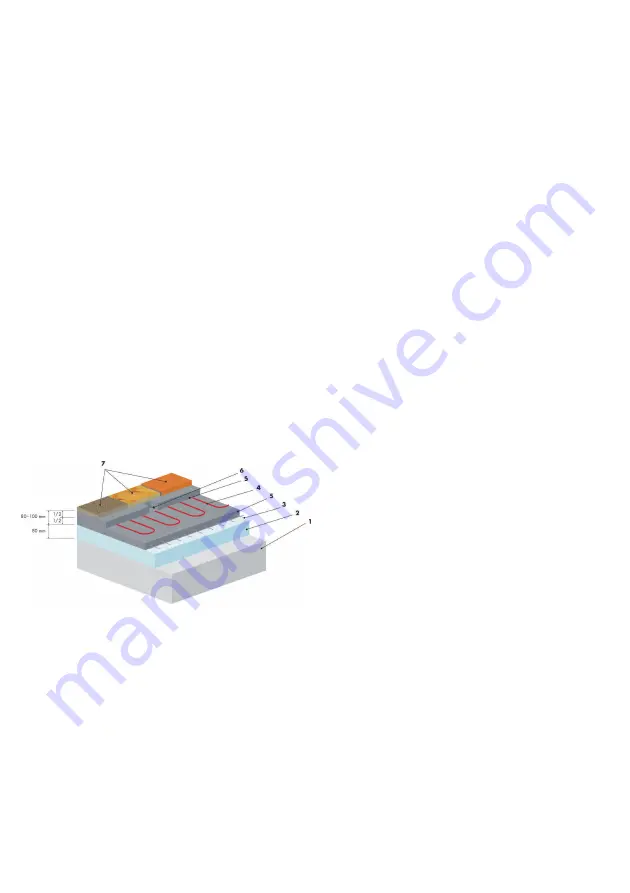
Semi- accumulating system /
Poloakumulační systém
1) Base / Podklad
2) Thermal insuletion, 80mm Tepelná izolace 80mm
3) Reinforcing steel grid / Armovací ocelová síť
4) Ecofloor heating cable / Topný kabel Ecofloor
5) Accumulating concrete layer, 80- 100 mm / Betono-
vá akumulační vrstva 80—100mm
6) Installation pipe with a floor probe / Instalační
trubka s podlahovou sondou
7) Floor finish / Nášlapná vrstva
c) Regulation
•
For regulation, use one of FENIX’s available thermostats.
•
For floors where exceeding the hygienic limit of 27°C
is not anticipated, or for floors in rooms occupied for
only short intervals (bathroom, lavatory, corridor) with
surface area output of up to 160 W/m
2
, it is optional
to use the thermostat’s limiting floor probe. For all
other applications, the thermostat must be equipped
with a floor probe with the maximum temperature set
to 35°C.
•
For semi- accumulating floor heating, a thermostat with a
floor probe is required.
c) Regulace
•
Pro regulaci použijte termostat z aktuální nabídky firmy
FENIX.
•
U podlah, kde se nepředpokládá překročení hygienické
hranice 27 °C nebo se jedná o krátkodobě obývané
místnosti (koupelna, WC, chodba) s plošným příkonem do
160 W/m
2
není podmínkou limitující podlahová sonda
termostatu. U všech ostatních aplikací musí být termostat
vybaven podlahovou sondou s max. nastavením 35 °C.
•
U poloakumulačního podlahové vytápění je nezbytný regulátor
s podlahovou sondou.


