background image

7

EN

•   Before using the machine and after impact, 

check for signs of wear or damage and repair if 
necessary

•   Never operate the product when you are tired, 

ill or under the influence of alcohol, drugs or 
medicine.

•   Always wear long heavy trousers, boots and 

gloves. Do not wear loose clothing, jewellery, 
short trousers, sandals and never work 
barefoot.

•   Wear safety eye protection and ear defenders 

when operating the machine

•   Keep firm footing and balance. Do not 

overreach.

•   Never work with this trimmer while people, 

especially children or pets are nearby

•   Wait until the spool line has completely 

stopped before touching it. The spool line 
continues to rotate after the trimmer is 
switched off; a rotating wire can cause injury.

•   Work only in daylight or in good artificial light
•   Avoid operating the trimmer in bad weather 

conditions especially when there is a risk of 
lightning.

•   Operating the trimmer in wet grass decreases 

the efficiency of performance.

•   Switch off when transporting the trimmer to 

and from the area to be worked on.

•   Switch on the motor only when the hands and 

feet are away from the cutting means.

•   Do not put hands or feet near the cutting 

system.

•   Remove battery before spool change
•   Never fit metal cutting elements to this 

trimmer.

•   Inspect and maintain the trimmer regularly. 
•   Have the trimmer repaired only by an 

authorized customer service agent.

•   Always ensure that the ventilation slots are 

kept clear of debris

•   Remove the battery:

  •   whenever you leave the machine 

unattended for any period of time

  •  before replacing the wire
  •  before cleaning or working on the trimmer

•   Store the machine in a secure, dry place out 

of the reach of children. Do not place other 
objects on top of the machine

•   Do not operate the machine without the wire 

attachment fitted

Battery tool use and care:

a)  

Recharge only with the charger specified by 
the manufacturer

A charger that is suitable 

for one type of battery pack may create a risk 
of fire when used with another battery pack.

b)  

Use power tools only with specifically 
designated battery packs. 

Use of any other 

battery packs may create a risk of injury and 
fire.

c)  

When battery pack is not in use, keep it 
away from other metal objects, like paper 
clips, coins, keys, nails, screws or other 
small metal objects, that can make a 
connection from one terminal to another

Shorting the battery terminals together may 
cause burns or a fire.

d)  

Under abusive conditions, liquid may be 
ejected from the battery; avoid contact.
If contact accidentally occurs, flush with 
water. If liquid contacts eyes, additionally 
seek medical help

Liquid ejected from the 

battery may cause irritation or burns.

Service:

a)  

Have your power tool serviced by a 
qualified repair person using only identical 
replacement parts.


This will ensure that the 

safety of the power tool is maintained.

For the charger:
Intended use

Charge only CDA1106 20V max. 2.0 Ah Li-ion type 
rechargeable battery packs. Other types of batteries 
may burst causing personal injury and damage.
a)   The appliance is not to be used by persons 

(including children) with reduced physical, 
sensory or mental capabilities, or lack of 
experience and knowledge, unless they have 
been given supervision or instruction 

b)   Children being supervised not to play with the 

appliance

c)   Do not recharging non-rechargeable batteries!
d)   During charging, batteries must be placed in 

the well ventilated area!

Residual risks:

Even when the power tool is used as prescribed it 
is not possible to eliminate all residual risk factors. 
The following hazards may arise in connection 
with the power tool’s construction and design:

Summary of Contents for GTM1003

Page 1: ...WWW FERM COM EN LT LV Original instructions 06 Originalios instrukcijos vertimas 11 Instrukciju tulkojums no ori in lvalodas 17 GTM1003...

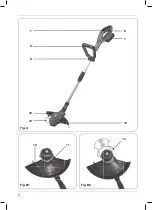
Page 2: ...2 Fig B1 Fig B2 Fig A 1 14 6 11 12 10 7 8 9 10 12...

Page 3: ...3 Fig D2 Fig E Fig C1 Fig C3 Fig D1 Fig C2 14 8 13 8 9 3 1 4 2 1 5 1...

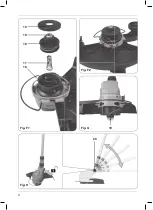
Page 4: ...5 4 3 2 1 4 Fig F1 Fig F2 Fig G Fig H 18 20 19 15 19 16 17...

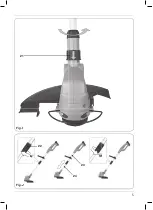
Page 5: ...5 Fig I Fig J 22 23 24 21...

Page 6: ...rence The following symbols are used in the user manual or on the product Read the user manual Denotes risk of personal injury loss of life or damage to the tool in case of non observance of the instr...

Page 7: ...e machine Do not operate the machine without the wire attachment fitted Battery tool use and care a Recharge only with the charger specified by the manufacturer A charger that is suitable for one type...

Page 8: ...min Cutting diameter 220 mm Cutting system 2 line wire spool Tap and go 1 2mm x 5m Weight incl battery 2 1 kg Sound pressure level LPA 71 2 dB A K 3 dB A Sound power level LWA 88 2 dB A K 3 dB A Vibra...

Page 9: ...the button 3 on battery 1 shortly The battery has 3 lights indicating the charge level the more lights that burn the more charge the battery has left Charging the battery Fig C2 Take the battery 1 ou...

Page 10: ...the knob 20 of the trimmer head to tilt the head in the desired position When knob is released the head will click and lock in the chosen position Turning the trimmer head Fig I Press the ring 21 dow...

Page 11: ...s can be changed without further notice AKUMULIATORIN OLIAPJOV GTM1003 D kojame kad nusipirkote bendrov s Ferm produkt sigijote puik gamin i vieno geriausi Europos platintoj Visi bendrov s Ferm tiekia...

Page 12: ...es bei pir tines Ned v kite laisv drabu i papuo al trump kelni neav kite sandal ir niekada nedirbkite basomis Dirbdami renginiu d v kite aki ir klausos apsaugos priemones Stov kite tvirtai ir u tikrin...

Page 13: ...ais u j saug atsakingas asmuo b Pri i r kite vaikus neleiskite vaikams aisti su iuo prietaisu c Nebandykite krauti vienkartini baterij d Kraunamus akumuliatorius privaloma laikyti gerai v dinamoje pat...

Page 14: ...ninis ratukas 14 oninio ratuko laikiklis F J pav 15 Rit s dangtelis 16 Rit s ritinys 17 Rit s spyruokl 18 Rit s korpusas 19 Rit s ritinio antgalis 20 oliapjov s galvos reguliavimo ranken l 21 oliapjov...

Page 15: ...ranken 8 ant laikiklio sumontuoto ant vir utinio veleno statykite var t e iakamp kiaurym ir prisukite ranken l 9 prie var to Priekin s rankenos reguliavimas D2 pav iek tiek atsukite ranken l 9 ir nusp...

Page 16: ...int paleisti varikl jungiklis i jungiklis 6 ir apsauginis jungiklis 7 turi b ti naudojami kartu Nustojus spausti vien ar abu jungiklius renginys staiga sustoja jungimas ir i jungimas Nor dami jungti o...

Page 17: ...jumi Izlasiet os nor d jumus Apz m ievainojuma n ves vai instrumenta boj juma risku ja netiek iev roti aj rokasgr mat sniegtie nor d jumi Elektrisk s str vas trieciena risks Valk jiet ausu aizsargus V...

Page 18: ...s b rniem nepieejam viet Nenovietojiet uz instrumenta nek dus priek metus o instrumentu nedr kst darbin t ja nav uzst d ts auklas piederums Akumulatora ekspluat cija un apkope a Uzl d jiet tikai ar ra...

Page 19: ...CDA1107 L d t ja ieejas jauda 220 240V 50 60Hz 1 2A L d t ja izejas jauda 21V DC 2 2A Akumulatora uzl d anas laiks 60 min Izvelkams k ts 1000 1150 mm K ta le a regul ana 0 90 Griez jgalvas regul ana 0...

Page 20: ...vienu roku cie i turiet instrumentu Ievietojiet akumulatoru 1 instrumenta pamatn Spiediet akumulatoru dzi k iek l dz tas nofiks jas Akumulatora uzl des st vok a p rbaude C3 att Komplekt cij eso ais a...

Page 21: ...irms izsl dziet instrumentu un atvienojiet akumulatoru Griez jgalvas sasv r ana H att Nospiediet griez jgalvas klo i 20 lai sasv rtu griez jgalvu vajadz gaj poz cij Atlai ot klo i griez jgalva tiek no...

Page 22: ...a un vai nolietota elektrisk vai elektronisk aparat ra j nog d piem rot utiliz cijas centr Tikai EK valst m Neizmetiet elektroinstrumentus sadz ves atkritumos Saska ar Eiropas Direkt vu 2012 19 EK par...

Page 23: ...t No Description Position No 410804 Spring 10 GTA1002 Wire spool 410806 Spring cap 54 410807 Spool cover 12 410808 Front handle 20 22 32 410809 Switch 36 410810 Wheel adapter 44 45 410811 Wheel set 46...

Page 24: ...24 Exploded view...

Page 25: ...isk og elektronisk utstyr DA Vi erkl rer under eget ansvar at dette produkt er i overensstemmelse med f lgende standarder og bestemmelser er i overensstemmelse med direktiv 2011 65 EU fra Europa Parla...

Page 26: ...WWW FERM COM 2019 FERM 1911 01...

Reviews: