9
EN
3. OPERATING
Before any operating, mounting or adjusting
disconnect the battery from the machine
Warning! You may not use the grass
trimmer without the protection guard.
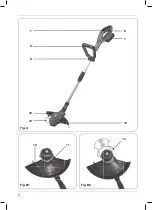
Mounting the Protection guard (Fig. B1)
• Fit the protection guard (10) onto the trimmer
head housing.
• Secure the guard using the screw (11)
delivered.
Mounting the guardrail (Fig. B2)
• Squeeze the ends of the guardrail (12) together
and slide into the holes of the trimmer head
housing
• The guardrail can be set in different protection
distances. To adjust the rail, simply press or
pull the rail.
The machine must be charged before
first use
Removing the battery from the machine
Fig. C1
• Hold the machine firmly with one hand.
• Push down the battery unlock button (2)
located on the rear side of the battery (1) with
the other hand.
• Keep pushing the unlock button (2) down
and slide the battery backwards out of the
machine, like shown in Fig. C1.
Inserting the battery into the machine
Fig. C1
Ensure that the exterior of the battery is
clean and dry before connecting to the
charger or machine.
• Hold the machine firmly with one hand.
• Insert the battery (1) into the base of the machine.
• Push the battery further forward until it clicks
into place.
Checking the battery charging status
Fig. C3
The included battery is delivered in partly
charged condition.
• To check the battery charge status, push the
button (3) on battery (1) shortly.
• The battery has 3 lights indicating the charge
level, the more lights that burn, the more
charge the battery has left.
Charging the battery
Fig. C2
• Take the battery (1) out of the machine
• Turn the battery (1) to upside down position and
slide it onto the charger (4) as shown in Fig. C2.
• Push the battery (1) until it is fully pushed into
the slot.
• Plug the charger (4) in an electrical outlet
and wait a while. The LED indicator (5) on
the charger (4) will lighten up and show the
charging status.
Charging indication light
Fig. C2
The charger has a charging indication light (5)
which indicates the status of the charging process:
LED color Status
Red
Battery charging in progress
Green
Battery charging finished, battery fully charged
• Fully charging the battery may take up to 1 hour.
• After the battery is fully charged remove the
charger plug from the outlet and remove the
battery from the charger.
• The battery can be stored or directly installed
on the machine.
Lithium-Ion cells can be stored for a long
period without losing much of their
charge. When the machine is not being
used over a longer period of time it is best
to store the battery in charged condition.
Mounting the front handle (Fig. D1)
• Place the handle (8) on the holder mounted on
the upper shaft.
• Fit the bolt in the hexagon hole and mount the
knob (9) onto the bolt.
Adjusting the front handle (Fig. D2)
• Unscrew the knob (9) slightly and press or pull
the front handle (8) in to desirable position.
This can either be down or upwards and
rotatable around upper shaft.
Summary of Contents for GTM1003
Page 2: ...2 Fig B1 Fig B2 Fig A 1 14 6 11 12 10 7 8 9 10 12...
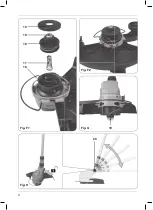
Page 3: ...3 Fig D2 Fig E Fig C1 Fig C3 Fig D1 Fig C2 14 8 13 8 9 3 1 4 2 1 5 1...
Page 4: ...5 4 3 2 1 4 Fig F1 Fig F2 Fig G Fig H 18 20 19 15 19 16 17...
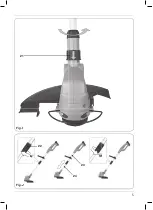
Page 5: ...5 Fig I Fig J 22 23 24 21...
Page 24: ...24 Exploded view...
Page 26: ...WWW FERM COM 2019 FERM 1911 01...


